")
In the article, you will find a detailed guide on how to automatically monitor a SQL Server database for schema changes and automatically create a report and log file. The examples of scripts to set up the process are provided.
Automation of database schema changes tracking increases the speed of application releases and brings a certain level of agility to the organization’s database development routine. This practice facilitates the lives of database developers and database administrators (DBAs) and improves their performance.
Database change management is not easy. The database is not a simple collection of files or code fragments, and you can not just roll back to the previous version to correct a mistake as in application development. Database changes are definitely the riskiest part of any application update and as a database grows, DBAs start to keep a close eye on it to avoid unexpected issues. That’s why it is so important to automate database schema changes monitoring—to save a database team loads of time and energy.

In a multi-user environment, to keep the risks to a minimum, it is vitally important to regularly monitor changes made to the database schemas. Can the process be automated?
How to set up automatic database schema changes tracking
Prerequisites
To monitor a SQL Server database for schema changes we will use the dbForge Schema Compare tool that comes as part of the SQL Tools bundle, a custom configuration file, and PowerShell scripts.
By the way, to learn how to use dbForge Schema Compare for creating a database during the CI process, feel free to watch this video.
The logic of the process
Step 1.
A custom PowerShell script initiates dbForge SQL Schema Compare, creates a database snapshot, and puts it into the D:\Monitor\Baseline folder.
Step 2.
After a specified time interval, another PowerShell script launches and initiates the schema comparison between the current database and the snapshot.
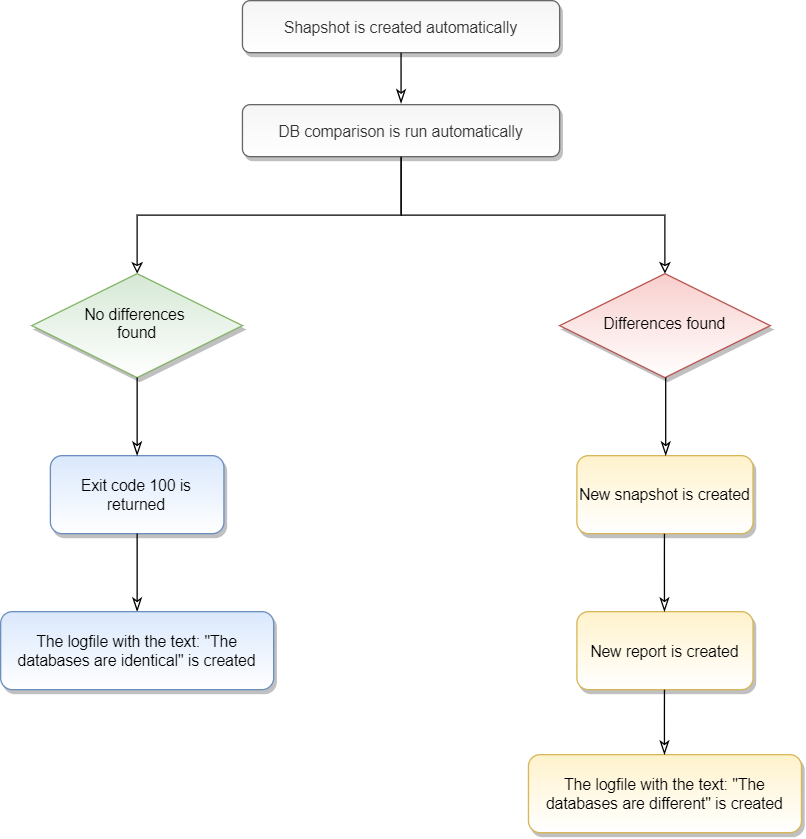
Step 3.
In case the schema differences are detected, a new snapshot is created with the current date and time and placed into the D:\Monitor\DiffSnapshots folder, a report is created and placed into the D:\Monitor\DiffReports folder, and a log file with the text: “The databases are different” is created in the D:\Monitor\Logs folder.
In case there are no schema differences found, exit code 100 is returned, and, accordingly, a new snapshot and a report are not generated, but only a log file with the text: “The databases are identical” is created in the D:\Monitor\Logs folder so that the DBA could be sure that the process has run.
Please, see the picture below to better understand the logic behind the process.
Implementation
Create the configuration file
In the configuration file D:\Monitor\Databases.txt, you need to specify the server name, the database name, authentication type, login, and password for generating a snapshot, as well as the target database to compare it with. For example:
demo-mssql\SQLEXPRESS,AdventureWorks2022_P1,,login,passwordOur configuration file looks like as below as we using Windows Authentication to connect to SQL Server.
demo-mssql\SQLEXPRESS,AdventureWorks2022_P1,true,,Create a custom PowerShell script to create a database snapshot
#region Variables

$rootFolder = "D:\Monitor"
$databasesTxtPath = "D:\Monitor\Databases.txt"
#Declare $diffToolLocation variable for dbForge Studio for SQL Server
$diffToolLocation = "C:\Program Files\Devart\dbForge SQL Tools Professional\dbForge Schema Compare for SQL Server\schemacompare.com"
#Declare $diffToolLocation variable for dbForge Studio for SQL Server
#$diffToolLocation = "C:\Program Files\Devart\dbForge Studio for SQL Server\dbforgesql.com"

#endregion

foreach ($line in [System.IO.File]::ReadAllLines($databasesTxtPath)) {
   # Read the connection parameters for the current database from the configuration file
   $server = ($line -split ",")[0]
   $database = ($line -split ",")[1]
   $isWindowsAuthentication = ($line -split ",")[2]
   $userName = ($line -split ",")[3]
   $password = ($line -split ",")[4]

   $BaselineLocation = New-Item -ItemType Directory -Force -Path ($rootFolder + "\" + "BaseLine")

   $srvCleanName = ($server -replace "\\", "")
   $currentSnapshotFile = Join-Path $BaselineLocation "$srvCleanName.$database.snap"


    # Create database connection
   if ($isWindowsAuthentication -eq 'True') {
      $connectionString = "Server=$server;Database=$database;Integrated Security=True;"
                                 }
   else {
      $connectionString = "Server=$server;Database=$database;User ID=$userName;Password=$password;"
        }


   # Test database connection
   Write-Host "Testing the database connection..."
  $connection = New-Object System.Data.SqlClient.SqlConnection($connectionString)
     try {
           $connection.Open()
           Write-Host "Connection successful"
         }
   catch { Write-Host "Connection failed: $($_.Exception.Message)" }
 finally { $connection.Close() }


   Write-Host "Creating a snapshot for the Server: $server; Database: $database"

   # Create a snapshot
    if ($isWindowsAuthentication -eq 'True') {
 Start-Process -FilePath $diffToolLocation "/snapshot /connection:`"Data Source=$server;Initial Catalog=master;Integrated Security=True;User ID=$userName`" /database:$database  /file:`"$currentSnapshotFile`" /compress:No" -PassThru -Wait -windowstyle hidden
                                             }
  else {
 Start-Process -FilePath $diffToolLocation "/snapshot /connection:`"Data Source=$server;Initial Catalog=master;Integrated Security=False;User ID=$userName`" /database:$database /password:$password /file:`"$currentSnapshotFile`" /compress:No" -PassThru -Wait -windowstyle hidden
       }
}
You can run the script manually, schedule its execution, or use it in your CI.
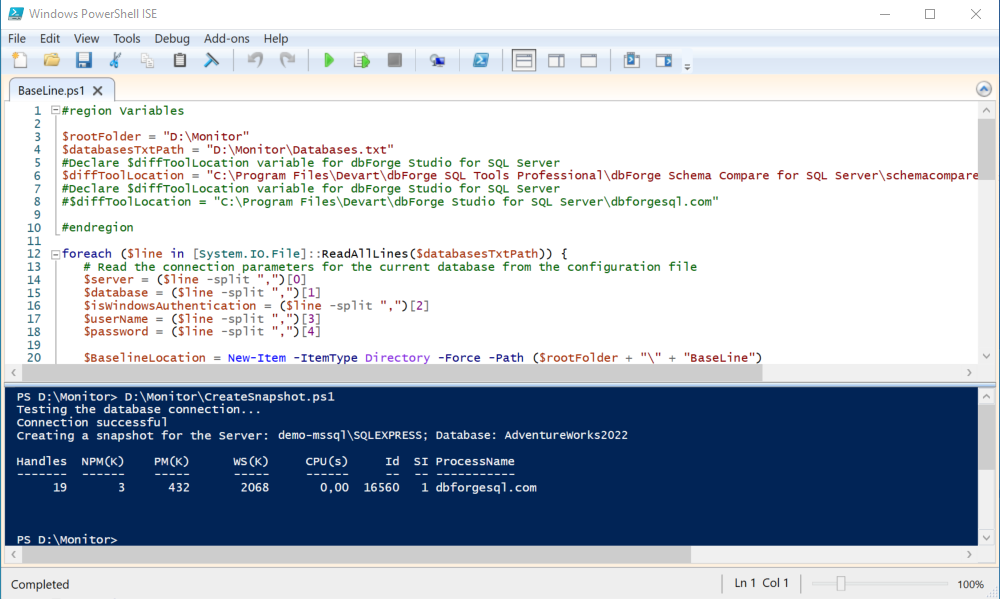
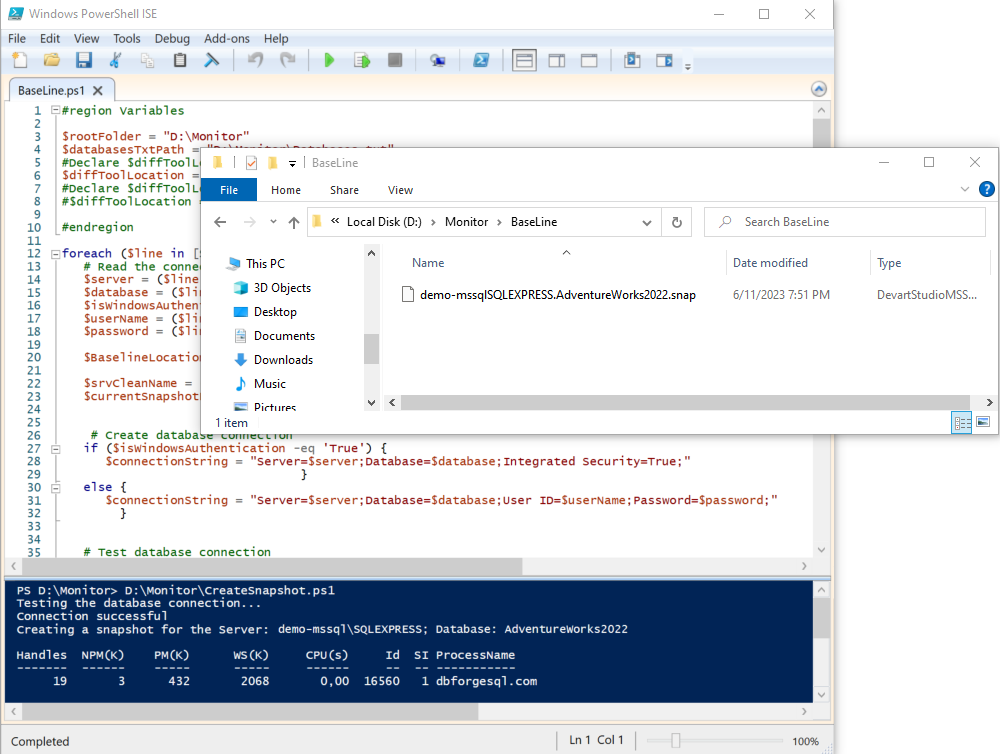
On successful script execution, a new snapshot will be created in the D:\Monitor\Baseline folder.
Create a custom PowerShell script to run the comparison between the snapshot and a target database
#region Variables

$rootFolder = "D:\Monitor"
$databasesTxtPath = "D:\Monitor\Databases.txt"
#Declare $diffToolLocation variable for dbForge Studio for SQL Server
#$diffToolLocation = "C:\Program Files\Devart\dbForge SQL Tools Professional\dbForge Schema Compare for SQL Server\schemacompare.com"
#Declare $diffToolLocation variable for dbForge Studio for SQL Server
$diffToolLocation = "C:\Program Files\Devart\dbForge Studio for SQL Server\dbforgesql.com"

#endregion


foreach ($line in [System.IO.File]::ReadAllLines($databasesTxtPath)) {
   # Read the connection parameters for the current database from the configuration file
   $server = ($line -split ",")[0]
   $database = ($line -split ",")[1]
   $isWindowsAuthentication = ($line -split ",")[2]
   $userName = ($line -split ",")[3]
   $password = ($line -split ",")[4]
   $today = (Get-Date -Format "dd-MM-yyyy_HH_MM_ss")
   $BaselineLocation = New-Item -ItemType Directory -Force -Path ($rootFolder + "\" + "BaseLine")
   $DiffsnapshotsLocation = New-Item -ItemType Directory -Force -Path ($rootFolder + "\" + "DiffSnapshots")
   $ReportsLocation = New-Item -ItemType Directory -Force -Path ($rootFolder + "\" + "DiffReports")
   $logsLocation = New-Item -ItemType Directory -Force -Path ($rootFolder + "\" + "Logs")
   $srvCleanName = ($server -replace "\\", "")
   $currentSnapshotFile = Join-Path $BaselineLocation "$srvCleanName.AW2019Dev.snap"
   $currentReportFile = Join-Path $ReportsLocation "$srvCleanName.$database.$today"
   $logName = Join-Path $logsLocation "$srvCleanName.$database.$today.txt"
   $diffSnapshotFile = Join-Path $DiffsnapshotsLocation "$srvCleanName.$database.$today.snap"


   Write-Host "Server: $server; Database: $database; isWindowsAuthentication: $isWindowsAuthentication"


# Create database connection
   if ($isWindowsAuthentication -eq 'True') {
      $connectionString = "Server=$server;Database=$database;Integrated Security=True;"
      $TargetConnectionString = "Data Source=$server;Initial Catalog=$database;Integrated Security=True;"
                                 }
   else {
      $connectionString = "Server=$server;Database=$database;User ID=$userName;Password=$password;"
      $TargetConnectionString = "Data Source=$server;Initial Catalog=$database;Integrated Security=False;User ID=$userName;Password=$password;"
        }


   # Test database connection
   Write-Host "Testing the database connection..."
  $connection = New-Object System.Data.SqlClient.SqlConnection($connectionString)
     try {
           $connection.Open()
           Write-Host "Connection successful"
         }
   catch { Write-Host "Connection failed: $($_.Exception.Message)" }
 finally { $connection.Close() }


   # Log information about checking the database
   New-Item -ItemType File -Force -Path $logName


   # Compare
 $process = Start-Process -FilePath $diffToolLocation -ArgumentList "/schemacompare /source snapshot:`"$currentSnapshotFile`" /target connection:`"$TargetConnectionString`" /report:`"$currentReportFile`" /reportformat:html /includeobjects:All /log:`"$logName`"" -PassThru -Wait -windowstyle hidden


   # Return exit code 100 in case the databases are identical
   if ($process.ExitCode -eq 100) {
      Add-Content -Path $logName -Value "The databases are identical"
      #remove the newly created report, since no differences are detected
      Remove-Item -Path $currentReportFile".html" -Force:$true -Confirm:$false
      continue
   }
   else {
      Add-Content -Path $logName -Value "The databases are different"
 # Generate a new snapshot in case there are differences detected
      if ($isWindowsAuthentication -eq 'True') {
 Start-Process -FilePath $diffToolLocation "/snapshot /connection:`"Data Source=$server;Initial Catalog=master;Integrated Security=True;User ID=$userName`" /database:$database  /file:`"$diffSnapshotFile`" /compress:No" -PassThru -Wait -windowstyle hidden
                                             }
  else {
 Start-Process -FilePath $diffToolLocation "/snapshot /connection:`"Data Source=$server;Initial Catalog=master;Integrated Security=False;User ID=$userName`" /database:$database /password:$password /file:`"$diffSnapshotFile`" /compress:No" -PassThru -Wait -windowstyle hidden
       }
}
}
You can run the script manually, schedule its execution, or use it in your CI.
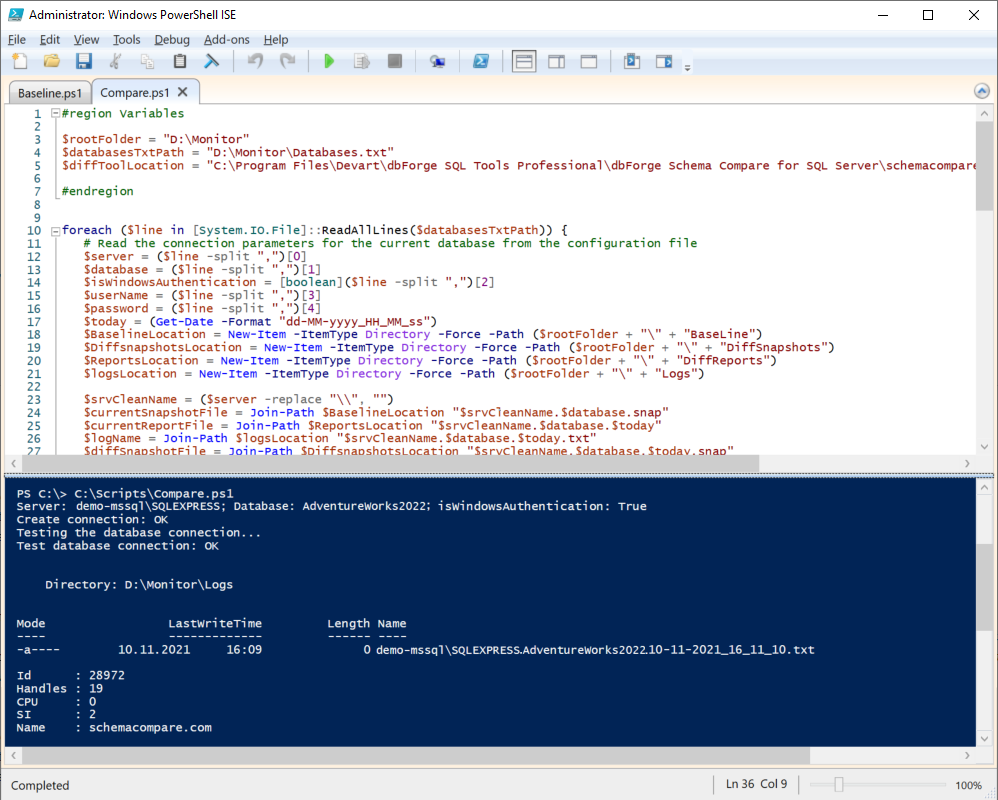
On successful script execution, a new snapshot is created in the D:\Monitor\DiffSnapshots folder, and a diff report is created in the D:\Monitor\DiffReports folder.
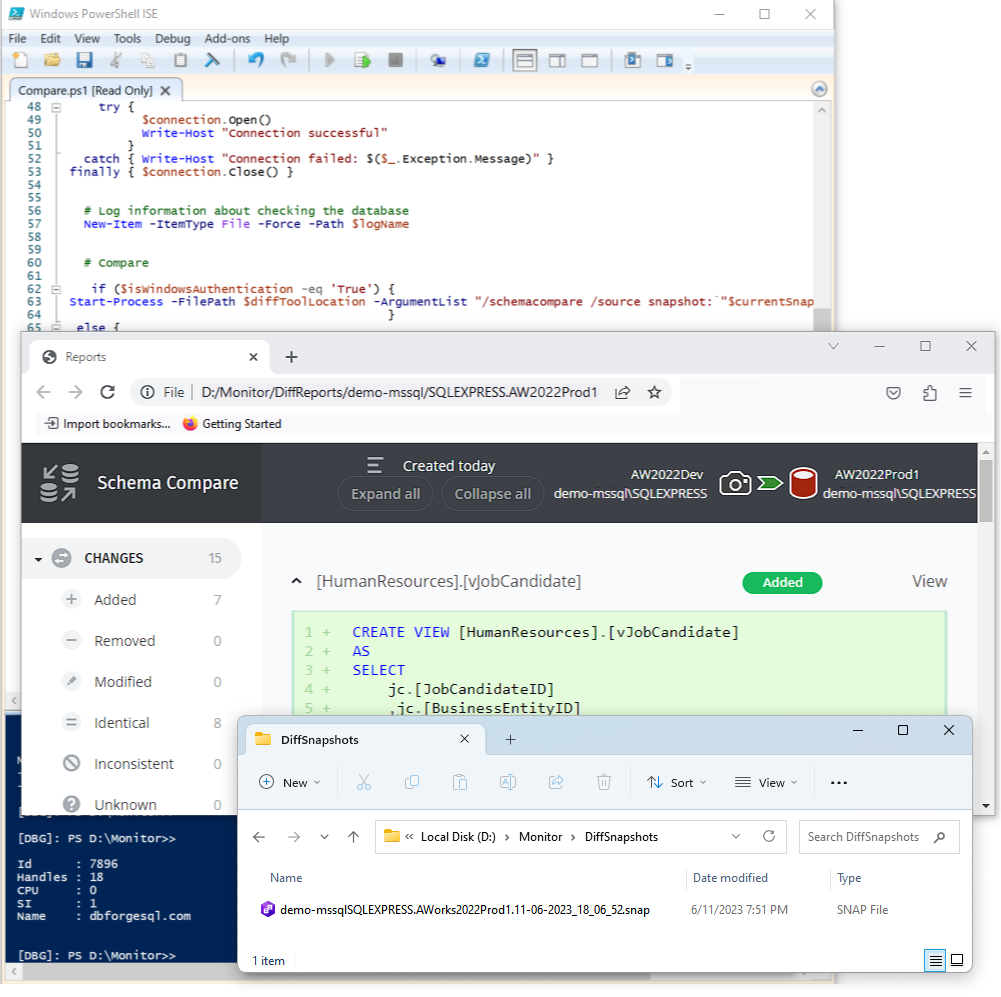
Workflow
The database administrator every morning monitors the D:\Monitor\Logs and D:\Monitor\DiffSnapshots folders and, accordingly, can see whether there have been changes.
If there were changes, there is a newly created snapshot file in the D:\Monitor\DiffSnapshots folder. Then the administrator can check the D:\Monitor\DiffReports folder to view and analyze the differences.
The database administrator can also compare the baseline snapshot from the D:\Monitor\Baseline folder and the snapshot that was automatically generated and placed into the D:\Monitor\DiffSnapshots folder.
In this simple, yet elegant way, you can use dbForge Schema Compare for SQL Server to automate the process of detecting and tracking database changes.
Scaling
The proposed worked example to automate database schema changes tracking can be scaled to multiple databases. Just make changes to the configuration file—add the databases you want to track schema changes for.
demo-mssql\SQLEXPRESS,AdventureWorks2022_P1,true,,
demo-mssql\SQLEXPRESS,AdventureWorks2022_P2,true,,
demo-mssql\SQLEXPRESS,AdventureWorks2022_P3,true,,
Conclusion
The article provides a simple way of automating SQL Server database schema comparison tasks that can be scaled to multiple databases.
It is worth mentioning, that the schema compare functionality is also available in dbForge Studio for SQL Server—our all-in-one IDE that covers nearly every aspect of SQL Server database development, management, and administration. To automatically monitor a SQL Server database for schema changes, you can use either dbForge Schema Compare for SQL Server or dbForge Studio for SQL Server—just choose the tool that suits you best.
Devart products come with a free 30-day trial. Download dbForge Studio for SQL Server or dbForge Schema Compare for SQL Server and see for yourself that automation of schema changes tracking can be easy and painless.
Note
To give our customers more choice, we deliver dbForge Schema Compare for SQL Server as part of two different toolkits: dbForge Compare Bundle for SQL Server (a pack of two essential compare tools) and dbForge SQL Tools (a pack of 15 advanced tools for DB development, management, and administration )—just choose the tools pack that meets your project requirements.