")
ASP.Net Core is a widely used, popular web application development framework with many features for building modern web applications. This article talks about how you can implement an IP address safelist in ASP.NET Core 6 applications. IP whitelists, also known as IP safelists, guarantee that only trusted IP addresses may access your application’s sensitive information. You can use middleware and action filters to implement IP whitelisting in ASP.NET Core.

Pre-requisites
You’ll need the following tools to deal with code examples:
What Are We Building Here?
In this article, we delve into crafting an ASP.NET Core 6 project focused on IP Whitelisting, exploring its importance and practical implementation steps. Here are the steps we’ll follow throughout this article to accomplish this:
- What is IP Whitelisting? Why do we need it?
- How can I implement IP Whitelisting in ASP.NET 6 Core?
- Develop an IP Whitelisting Project Using ASP.NET Core 6
- Create the Model Class
- Create the CartRepository Class
- Create the CartController Class
- Implementing IP Whitelisting in ASP.NET Core
- Specify Whitelisted IP Addresses
- Create an IP Blocking Middleware
- Register the IP Blocking Middleware
- Run Application to Test IP Whitelisting
- Using an Action IP Whitelist Filter
What is IP Whitelisting? Why do we need it?
IP Whitelist is a security mechanism that restricts access to a computer network or web application by allowing access only from a pre-defined list of trusted IP addresses. In other words, it is a list of IP addresses allowed to access a network or web application while all other IP addresses are denied access.
IP Whitelisting is commonly used as a security measure to protect against unauthorized access, such as hacking attempts or malicious attacks. It can also be used to limit access to sensitive information or resources to authorized users only. For example, a company might use IP Whitelisting to limit access to its internal network or sensitive data only to its employees or partners working from pre-approved locations.
How can I implement IP Whitelisting in ASP.NET 6 Core?
There are several ways to implement IP whitelisting in an ASP.NET 6 Core application. Here are a few examples:
- Using a middleware: This approach involves creating a custom middleware component that filters incoming requests based on the source IP address of the request. You can apply the middleware to the request processing pipeline for the entire application. You can then add the middleware component to the ASP.NET Core request processing pipeline in your Program class.
- Using an action filter: This approach involves creating a custom action filter that filters incoming requests based on the source IP address of the request. The action filter can be applied to specific controller actions or the entire application.
- Using a custom attribute: This approach involves creating a custom attribute that can be applied to specific controller actions or the entire application. The attribute checks the source IP address of the request and either allows or denies access based on the whitelist.
Develop an IP Whitelisting Project Using ASP.NET Core 6
In this section, we’ll learn how to create a new ASP.NET 6 Core Web API project in Visual Studio 2022.
Now, follow the steps outlined below:
- Open Visual Studio 2022.
- Click Create a new project.
- Select ASP.NET Core Web API and click Next.
- Specify the project name and location to store that project in your system. Optionally, checkmark the Place solution and project in the same directory checkbox.
- Click Next.
- Select .NET 6.0 (Long-term support) in the Additional information window as the project version.
- Disable the Configure for HTTPS and Enable Docker Support options (uncheck them).
- Since we’ll not be using authentication in this example, select the Authentication type as None.
- Since we won’t use Open API in this example, deselect the Enable OpenAPI support checkbox.
- Since we’ll not be using minimal APIs in this example, ensure that the Use controllers (uncheck to use minimal APIs) are checked.
- Leave the Do not use top-level statements checkbox unchecked.
- Click Create to finish the process.
We’ll use this project in this article.
Install NuGet Package(s) into the Project
In your API project, i.e., the project you just created, you should install the dotConnect for PostgreSQL package in your project. dotConnect for PostgreSQL is a high-performance data provider for PostgreSQL built on ADO.NET technology that provides a comprehensive solution for building PostgreSQL-based database applications.
You can install this package either from the NuGet Package Manager tool inside Visual Studio or from the NuGet Package Manager console using the following command:
PM> Install-Package Devart.Data.PostgreSQLCreate the Database
You can create a database using the pgadmin tool. To create a database using this Launch this tool, follow the steps given below:
- Launch the pgadmin tool
- Expand the Servers section
- Select Databases
- Right-click and click Create -> Database…
- Specify the name of the database and leave the other options to their default values
- Click Save to complete the process
Alternatively, you can use the following script to create the database:
-- Database: demo
DROP DATABASE IF EXISTS demo;
CREATE DATABASE demo
    WITH
    OWNER = postgres
    ENCODING = 'UTF8'
    LC_COLLATE = 'English_India.1252'
    LC_CTYPE = 'English_India.1252'
    TABLESPACE = pg_default
    CONNECTION LIMIT = -1
    IS_TEMPLATE = False;
Create a database table
Select and expand the database you just created
Select Schemas -> Tables
Right-click on Tables and select Create -> Table…
The table script is given below for your reference:
CREATE TABLE cart (
  cart_id serial NOT NULL,
  user_id integer,
  product_id integer,
  quantity integer,
  created_on TIMESTAMP NOT NULL,
  CONSTRAINT cart_pk PRIMARY KEY (cart_id)
);
We’ll use this database in the subsequent sections of this article to demonstrate how we can work with Integration Tests in ASP.NET Core using dotConnect for PostgreSQL.
Add a few records to the Cart table
Now, run the following script in your database to insert a few records in the Cart table:
INSERT INTO cart(user_id, product_id, quantity, created_on)
VALUES (12, 8, 50, current_timestamp);

INSERT INTO cart(user_id, product_id, quantity, created_on)
VALUES (12, 5, 250, current_timestamp);

INSERT INTO cart(user_id, product_id, quantity, created_on)
VALUES (12, 9, 100, current_timestamp);
Figure 1 below illustrates the pgAdmin editor where you can write and execute your scripts:

Create the Model Class
Create a solution folder in the Solution Explorer window and name it Models. Next, create a .cs file called Cart.cs with the following code in there:
public class Cart
    {
        public int Cart_Id { get; set; }
        public int User_Id { get; set; }
        public int Product_Id { get; set; }
        public int Quantity { get; set; }
        public DateTime Created_On { get; set; }
    }
Create the CartRepository Class
The ICartRepository interface would look like this:
public interface ICartRepository
    {
        public List GetCarts();
    }
The CartRepository class implements the GetCarts method of the ICartRepository interface and encapsulates all database operations.
public class CartRepository : ICartRepository
    {
        public List GetCarts()
        {
            try
            {
                List carts = new List();
                using (PgSqlConnection pgSqlConnection =
                 new PgSqlConnection("User Id = postgres; Password = sa123#;" +
                 "host=localhost;database=demo;"))
                {
                    using (PgSqlCommand pgSqlCommand = new PgSqlCommand())
                    {
                        pgSqlCommand.CommandText =
                        "Select * From cart";
                        pgSqlCommand.Connection = pgSqlConnection;
                        if (pgSqlConnection.State !=
                        System.Data.ConnectionState.Open)
                            pgSqlConnection.Open();
                        using (var pgSqlReader =
                         pgSqlCommand.ExecuteReader())
                        {
                            while (pgSqlReader.Read())
                            {
                                Cart cart = new Cart();
                                cart.Cart_Id =
                                int.Parse(pgSqlReader.GetValue(0).ToString());
                                cart.User_Id =
                                int.Parse(pgSqlReader.GetValue(1).ToString());
                                cart.Product_Id =
                                int.Parse(pgSqlReader.GetValue(2).ToString());
                                cart.Quantity =
                                int.Parse(pgSqlReader.GetValue(3).ToString());
                                cart.Created_On =
                                DateTime.Parse(pgSqlReader.GetValue(4).ToString());
                                carts.Add(cart);
                            }
                        }
                    }
                }
                return carts;
            }
            catch
            {
                throw;
            }
        }
    }
Create the CartController Class
Next, select and right-click on the Controllers solution folder and create a new controller class called CartController with the following code in there:
[Route("api/[controller]")]
    [ApiController]
    public class CartController : ControllerBase
    {
        private readonly ICartRepository _cartRepository;
        public CartController(ICartRepository cartRepository)
        {
            _cartRepository = cartRepository;
        }
        [HttpGet]
        public List Get()
        {
            return _cartRepository.GetCarts();
        }
    }
Note how an instance of type ICartRepository is injected in the constructor of the CartController class. Remember that you must add an instance of type ICartRepository to the services container using the following piece of code in the Program.cs file:
builder.Services.AddScoped<ICartRepository, CartRepository>();When you execute the application and run the Http Get endpoint of the CartController class, you’ll see the records of the Cart database table displayed:

Implementing IP Whitelisting in ASP.NET Core
Follow the steps outlined in the “Create a new ASP.NET 6 Core Web API Project” section given earlier to create another ASP.NET Core WebAPI project in Visual Studio 2022. In this section, we’ll implement a simple API that will be used to implement IP Whitelisting.
Specify Whitelisted IP Addresses
First, you should specify the whitelisted IPs, i.e., the allowed IPs in a config file in the project. To do this, specify the following whitelisted IPs in the appsettings.json file:
"IPWhitelistOptions": {
    "Whitelist": [ "192.168.0.5", "192.168.1.6", "::1" ]
  }
Note that if you want to whitelist IP addresses in your application, you should replace these IP addresses with ones relevant to your application. Next, create a class named IPWhitelistOptions with the following code in there:
public class IPWhitelistOptions
{
    public List WhitelistedIPAddresses { get; set; }
}
Note that the class name IPWhitelistOptions should match the name you specified in the config file.
Create an IP Blocking Middleware
Create a class named CustomIPWhiteListMiddleware in a file having the same name with a .cs extension and replace the default generated code with the code listing given below:
public class CustomIPWhitelistMiddleware
    {
        private readonly RequestDelegate _next;
        private readonly IPWhitelistOptions _ipWhitelistOptions;
        private readonly ILogger _logger;
        public CustomIPWhitelistMiddleware(RequestDelegate next,
        ILogger logger,
            IOptions whiteListOptions)
        {
            _ipWhitelistOptions = whiteListOptions.Value;
            _next = next;
            _logger = logger;
        }
        public async Task Invoke(HttpContext context)
        {
            IPAddress remoteIpAddress = context.Connection.RemoteIpAddress;
            List whiteListIPList = _ipWhitelistOptions.WhitelistedIPAddresses;
            if (!whiteListIPList.Contains(remoteIpAddress.ToString()))
            {
                _logger.LogCritical(
                "Request from {RemoteIp} is forbidden.", remoteIpAddress);
                context.Response.StatusCode = (int)HttpStatusCode.Forbidden;
                return;
            }
            await _next.Invoke(context);
        }
    }
Register the IP Blocking Middleware
Now you should add the middleware to the request processing pipeline using the following code in the Program.cs file:
app.UseMiddleware(); The complete source code of Program.cs file is given here for reference purposes:
var builder = WebApplication.CreateBuilder(args);
// Add services to the container.
builder.Services.AddControllers();
var app = builder.Build();
// Configure the HTTP request pipeline.
app.UseMiddleware();
app.UseAuthorization();
app.MapControllers();
app.Run();
License Key Validation Error
When you execute the application, you might run into license validation errors if no valid license key is available. If the license key validation fails, you will encounter a Devart.Common.LicenseException. To resolve this error, you must either have a license key and already be a user or install the installation file, which will install a trial key into the system.
Run Application to Test IP Whitelisting
Lastly, you can execute the application to see IP Whitelisting at work. You can test the application to determine how IP Whitelists work by invoking the endpoints from Postman. When the endpoints are executed from Postman, the custom middleware would verify if the IP address from where the request has originated is in the list of allowed IPs, i.e., if it is in the whitelisted IPs that have been configured in the config file.
If the IP address is found in the list of allowed IPs, the request passes through, i.e., it is allowed. If not, i.e., if the IP address of the request doesn’t match the list of allowed IPs, the custom middleware would disallow the request and return an “Http 403 Forbidden” response.
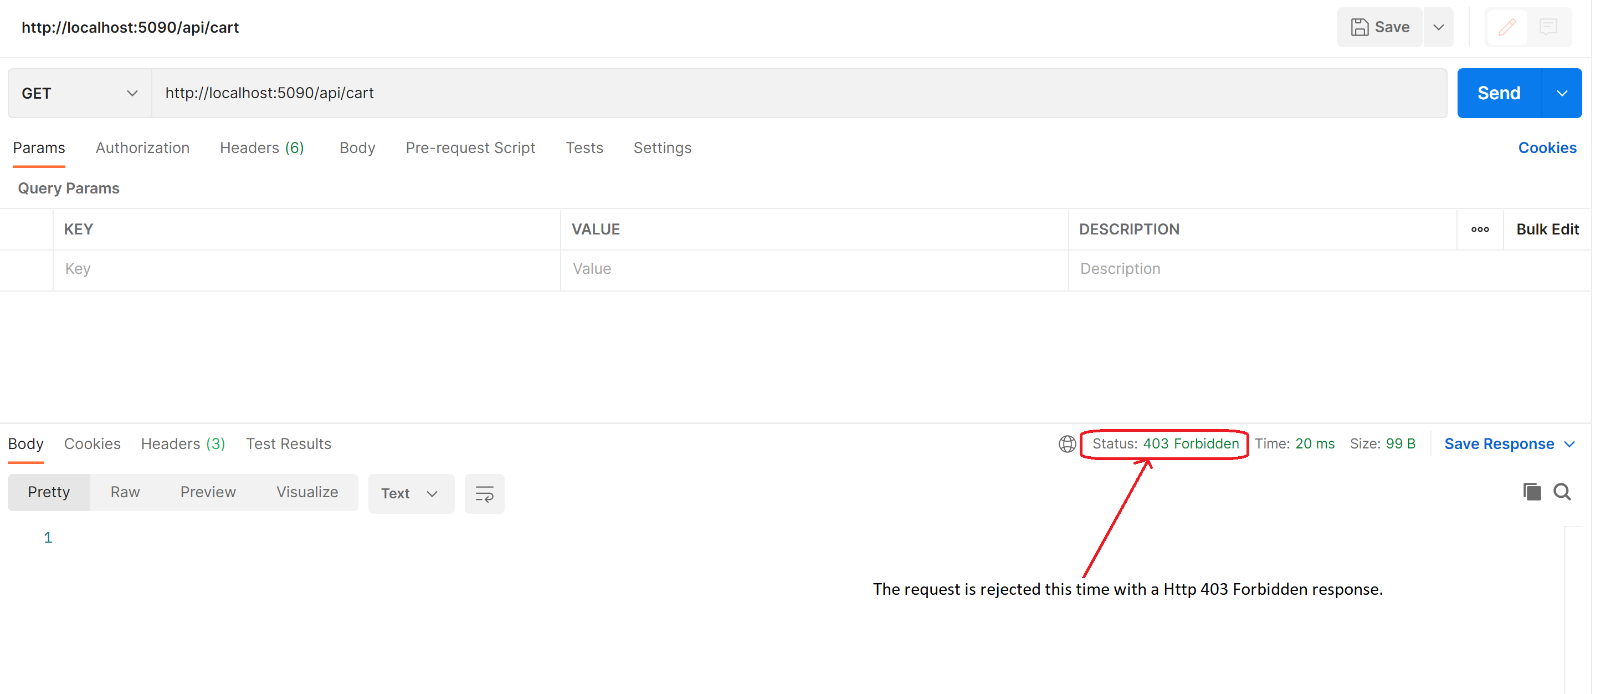
Figure 3: A HTTP 403 Forbidden response is generated since the IP address of the computer is not whitelisted
Using an Action IP Whitelist Filter
You can take advantage of an action filter to get more granular control, such as restricting access to a particular endpoint in your application. The code listing below shows how you can implement a custom action filter to restrict access to your API endpoints from unauthorized IPs.
public class CustomIPWhitelistActionFilter : ActionFilterAttribute
    {
        private readonly IPWhitelistOptions _ipWhitelistOptions;
        private readonly ILogger<CustomIPWhitelistActionFilter> _logger;

        public CustomIPWhitelistActionFilter(IOptions<IPWhitelistOptions>
        whiteListOptions, ILogger<CustomIPWhitelistActionFilter> logger)
        {
            _ipWhitelistOptions = whiteListOptions.Value;
            _logger = logger;
        }

        public override void OnActionExecuting(ActionExecutingContext context)
        {
            IPAddress remoteIpAddress = context.HttpContext.Connection.RemoteIpAddress;
            List<string> whiteListIPList = _ipWhitelistOptions.WhitelistedIPAddresses;

            if (!whiteListIPList.Contains(remoteIpAddress.ToString()))
            {
                _logger.LogCritical(
                "Request from {RemoteIp} is forbidden.", remoteIpAddress);
                context.HttpContext.Response.StatusCode =
                (int)HttpStatusCode.Forbidden;
                return;
            }

            base.OnActionExecuting(context);
        }
    }
Now, add action filer as a scoped service in the Program.cs file:
builder.Services.AddScoped(); To invoke the action filter when the action method is executed, you should specify the action filter at the action method level in your controller class:
[HttpGet]
[ServiceFilter(typeof(CustomIPWhitelistActionFilter))]
public List Get()
{
   return _cartRepository.GetCarts();
}
Summary
There are several ways to implement IP Safelist, i.e., block requests from unwanted IP addresses. Several approaches can be adopted to restrict access to your API endpoints from unauthorized IP addresses.
The most appropriate approach for a given application will depend on factors such as the specific security requirements, the application’s architecture, and the development team’s preferences.