
Introduction
This article demonstrates how you can work with HangFire, a popular, open-source library for background processing in .NET Core applications. This article builds a simple application that does some background processing to demonstrate the concepts covered using PostgreSql as the database to store data and dotConnect for PostgreSQL as the data provider for PostgreSQL.
To store and retrieve data from the database, we’ll use dotConnect for PostgreSQL, a high-performance and enhanced data provider for PostgreSQL built on top of ADO.NET and can work on both connected and disconnected modes.
Pre-requisites
You’ll need the following tools to deal with code examples:
- Visual Studio 2022 Community Edition
- PostgreSQL
- dotConnect for PostgreSQL
You can download PostgreSQL from here: https://www.postgresql.org/download/

What Are We Building Here?
In this article, we’ll be building a simple application that will demonstrate how to customize HTTP 400 and 404 error responses in ASP.NET 6. Here are the steps we’ll follow throughout this article to accomplish this:
- Gain an understanding of Hangfire in ASP.NET Core
- Create an ASP.NET 6 Core Web API project in Visual Studio 2022
- Add the Devart.Data.PostgreSql NuGet package to the API project
- Create a simple WebAPI controller
- Create methods inside the controller to retrieve resource usage information and persist it in a database table
- Create fire-and-forget and recurring jobs
- Run the Application
What are Background Tasks?
In today’s application, certain operations, such as sending emails, creating reports, or uploading large files, can take a long time to complete. If your application performs these operations synchronously within a request-response cycle, it can lead to timeouts and delays. This is where a background task can help.
A background task is a task that executes an operation in the background so that the application’s workflow is not interrupted and, most importantly, the currently executing thread is not blocked. In other words, background tasks allow you to separate time-consuming or non-critical operations from the main logic of your application.
Background tasks typically run asynchronously and are used to offload time-consuming or resource-intensive processes from the actual request-response cycle of your application, allowing them to run in the background. By decoupling them from immediate user interaction, background tasks allow you to send emails, modify data, or queue alerts without requiring an immediate user response.
You can configure a background job to trigger at regular intervals of time. This is great for automating normal processes such as backups, synchronizations, and generating daily reports. You can focus on core functions and offload certain background tasks to other components, which improves code maintainability.
What is Hangfire?
Hangfire is an open-source library for processing background tasks in. NET and ASP.NET Core applications. It provides a straightforward and effective method for performing long, time-consuming, or repetitive tasks outside the normal request-response cycle.
By providing a unified and easy-to-use API, Hangfire simplifies the implementation of background processing of tasks. It eliminates the need to write sophisticated threading code or manually manage background processing infrastructure. Due to its intuitive API and rich features, Hangfire has gained popularity among developers for managing secondary tasks in NET applications.
Features of Hangfire
Here are the key features of Hangfire:
- Background jobs: Hangfire allows you to define jobs or activities that need to run in the background, independent of the user’s request. These activities may include operations that require a lot of processing capability from the central processing unit (CPU), such as generating reports, delivering emails, or any other task that can benefit from asynchronous processing.
- Persistent Storage: Hangfire uses persistent storage to store information about tasks that have been queued, scheduled, and processed. This protects against the loss of tasks in case of an application restart or malfunction. Hangfire supports various storage options, including SQL Server, PostgreSQL, and Redis.
- Job Scheduling: Hangfire makes scheduling tasks at specific times or recurring intervals easy. You can schedule tasks to run once or repeatedly or define complex schedules using cron-like expressions.
- Dashboard: Hangfire provides a web-based interface that allows you to monitor and manage secondary tasks. The dashboard provides visibility into task status, execution history, processing statistics, and the ability to initiate or terminate jobs manually.
- Fault Tolerance: Hangfire ensures fault tolerance by automatically retrying failed tasks. If a job fails due to an exception, Hangfire can be configured to retry the job a specified number of times with an interval between retries.
- Distributed Processing: Hangfire facilitates distributed processing by allowing an application to scale across multiple servers or worker processes. This enables parallel processing of tasks and increases overall system efficiency.
Components of Hangfire
Hangfire used three main components for managing jobs. These include Storage, Client, and Server. The storage component is responsible for storing job information. The client component is used to create background jobs and storing jobs in a data store based on the configured storage provider. The server component is responsible for executing all background jobs.
Create a new ASP.NET 6 Core Web API Project
In this section, we’ll learn how to create a new ASP.NET 6 Core Web API project in Visual Studio 2022.
Now, follow the steps outlined below:
- Open Visual Studio 2022.
- Click Create a new project.
- Select ASP.NET Core Web API and click Next.
- Specify the project name and location to store that project in your system. Optionally, checkmark the Place solution and project in the same directory checkbox.
- Click Next.
- In the Additional Information window, select .NET 6.0 (Long-term support) as the project version.
- Disable the Configure for HTTPS and Enable Docker Support options (uncheck them).
- Since we’ll not be using authentication in this example, select the Authentication type as None.
- Since we won’t use Open API in this example, deselect the Enable OpenAPI support checkbox.
- Since we’ll not be using minimal APIs in this example, ensure that the Use controllers (uncheck to use minimal APIs) is checked.
- Leave the Do not use top-level statements checkbox unchecked.
- Click Create to finish the process.
We’ll use this project in this article.
Implementing an Automatic Resource Monitor
In this example, we’ll examine how we can implement an automatic resource monitor using Hangfire in ASP.NET Core. This application creates and runs a recurring task in the background at pre-defined intervals, which then retrieves CPU, and Memory usage information and stores them in a PostgreSQL database table.
Create the Database
You can create a database using the pgadmin tool. To create a database using this Launch this tool, follow the steps given below:
- Launch the pgadmin tool
- Expand the Servers section
- Select Databases
- Right-click and click Create -> Database…
- Specify the name of the database and leave the other options to their default values
- Click Save to complete the process
Now follow the steps given below to create a table in the database you just created:
- Select and expand the database you just created
- Select Schemas -> Tables
- Right-click on Tables and select Create -> Table…
The table script is given below for your reference:
CREATE TABLE perfdata (
	id serial PRIMARY KEY,
	job_Id VARCHAR ( 255 ) NOT NULL,
	cpu_usage VARCHAR ( 255 ) NOT NULL,
	memory_usage VARCHAR ( 255 ) NOT NULL
);
We’ll use this table in the subsequent sections of this article to demonstrate how we can work with Integration Tests in ASP.NET Core using dotConnect for PostgreSQL.
Install NuGet Package(s) into the API Project
Next, you should install the required NuGet packages into your project. You can install them either from the NuGet Package Manager tool inside Visual Studio or, from the NuGet Package Manager console using the following commands:
PM> Install-Package Devart.Data.PostgreSql
PM> Install-Package Hangfire
PM> Install-Package Hangfire.MemoryStorage
dotConnect for PostgreSQL is a high-performance data provider for PostgreSQL built on ADO.NET technology that provides a comprehensive solution for building PostgreSQL-based database applications.
Configuring Hangfire in ASP.NET Core
Once Hangfire has been installed into your project, the next step is to configure it. You can add Hangfire services to the services collection using the following piece of code:
builder.Services.AddHangfire(c => c.UseMemoryStorage());
builder.Services.AddHangfireServer();
You can view the real-time data related to the running or completed jobs in a dashboard. You can the code snippet given below to turn on this feature:
app.UseHangfireDashboard();Creating Jobs in Hangfire
In this section, we’ll examine how we can create jobs in Hangfire to perform processing in the background while our application continues to be responsive.
Hangfire provides support for the following job types:
- Fire-and-Forget Job: These jobs are executed only once
- Delayed Job: These jobs are executed after a specific interval of time has elapsed
- Continuation Job: These jobs are executed as soon as the execution of the parent job is complete
- Recurring Job: These jobs are executed based on a schedule on a recurring basis
Creating a Fire-and-Forget Job
You can create a background job in Hangfire using the BackgroundJob.Enqueue method. A fire-and-forget job is one that would be triggered or executed only once. Create a new API controller named CustomJobController and write the following code in there:
[Route("api/[controller]")]
    [ApiController]
    public class CustomJobController : ControllerBase
    {
        private readonly ILogger _logger;
        private readonly IBackgroundJobClient _backgroundJobClient;
        public CustomJobController(ILogger<CustomJobController> logger, IBackgroundJobClient backgroundJobClient)
        {
            _logger = logger;
            _backgroundJobClient = backgroundJobClient;
        }

        [HttpGet]
        public IActionResult Get()
        {
            var jobId = _backgroundJobClient.Enqueue(() => FireAndForgetJob(null));
            Thread.Sleep(5000);
            return Ok($"Job Id: {jobId} completed...");
        }

        public Task FireAndForgetJob(PerformContext context)
        {
            var jobId = context.BackgroundJob.Id;
            _logger.LogInformation($"Executing Job Id: {jobId}...");
            return Task.CompletedTask;
        }
    }
When you execute the application and hit the HttpGet endpoint of the CustomJobController, you can see the fire-and-forget job executed once, as shown in Figure 1:

Figure 1
Creating a Delayed Job
The following code snippet shows how to create a delayed job in Hangfire:
var jobId = BackgroundJob.Schedule(() => Console.WriteLine("This is an example of a delayed job"), TimeSpan.FromDays(1));Create a Continuation Job
In Hangfire, continuation jobs are those that run as soon as the execution of the parent job is complete. You can also create and manage continuation tasks or jobs in Hangfire. The following code snippet shows how you can create a continuation task in Hangfire:
var id = BackgroundJob.Enqueue(() => InitializeInputData());
BackgroundJob.ContinueWith(id, () => ValidateInputData());
Creating a Recurring Job
Recurring jobs are those that are executed based on a schedule. For example, you can have a recurring job that executes every minute, or every hour, every week. To work with recurring jobs in Hangfire, you should use the IRecurringJobManager interface. Actually, you should inject an instance of type IRecurringJobManager interface in the constructor of the CustomJobController class as shown in the code listing given below:
 [Route("api/[controller]")]
    [ApiController]
    public class CustomJobController : ControllerBase
    {
        private readonly ILogger _logger;
        private readonly IRecurringJobManager _recurringJobManager;
        public CustomJobController(ILogger<CustomJobController> logger,
        IRecurringJobManager recurringJobManager)
        {
            _logger = logger;
            _recurringJobManager = recurringJobManager;
        }

        [HttpGet]
        public IActionResult Get()
        {
            var jobId = Guid.NewGuid().ToString();
            _recurringJobManager.AddOrUpdate(jobId, () => CustomRecurringJob(jobId),
            Cron.Minutely);
            Thread.Sleep(5000);
            return Ok($"Job Id: {jobId} completed...");
        }

        public Task CustomRecurringJob(string jobId)
        {
            _logger.LogInformation($"Executing Job Id: {jobId} at {DateTime.Now}");
            return Task.CompletedTask;
        }
    }
When you execute the application and hit the HttpGet endpoint, you can see the job being executed every minute as shown in Figure 2:
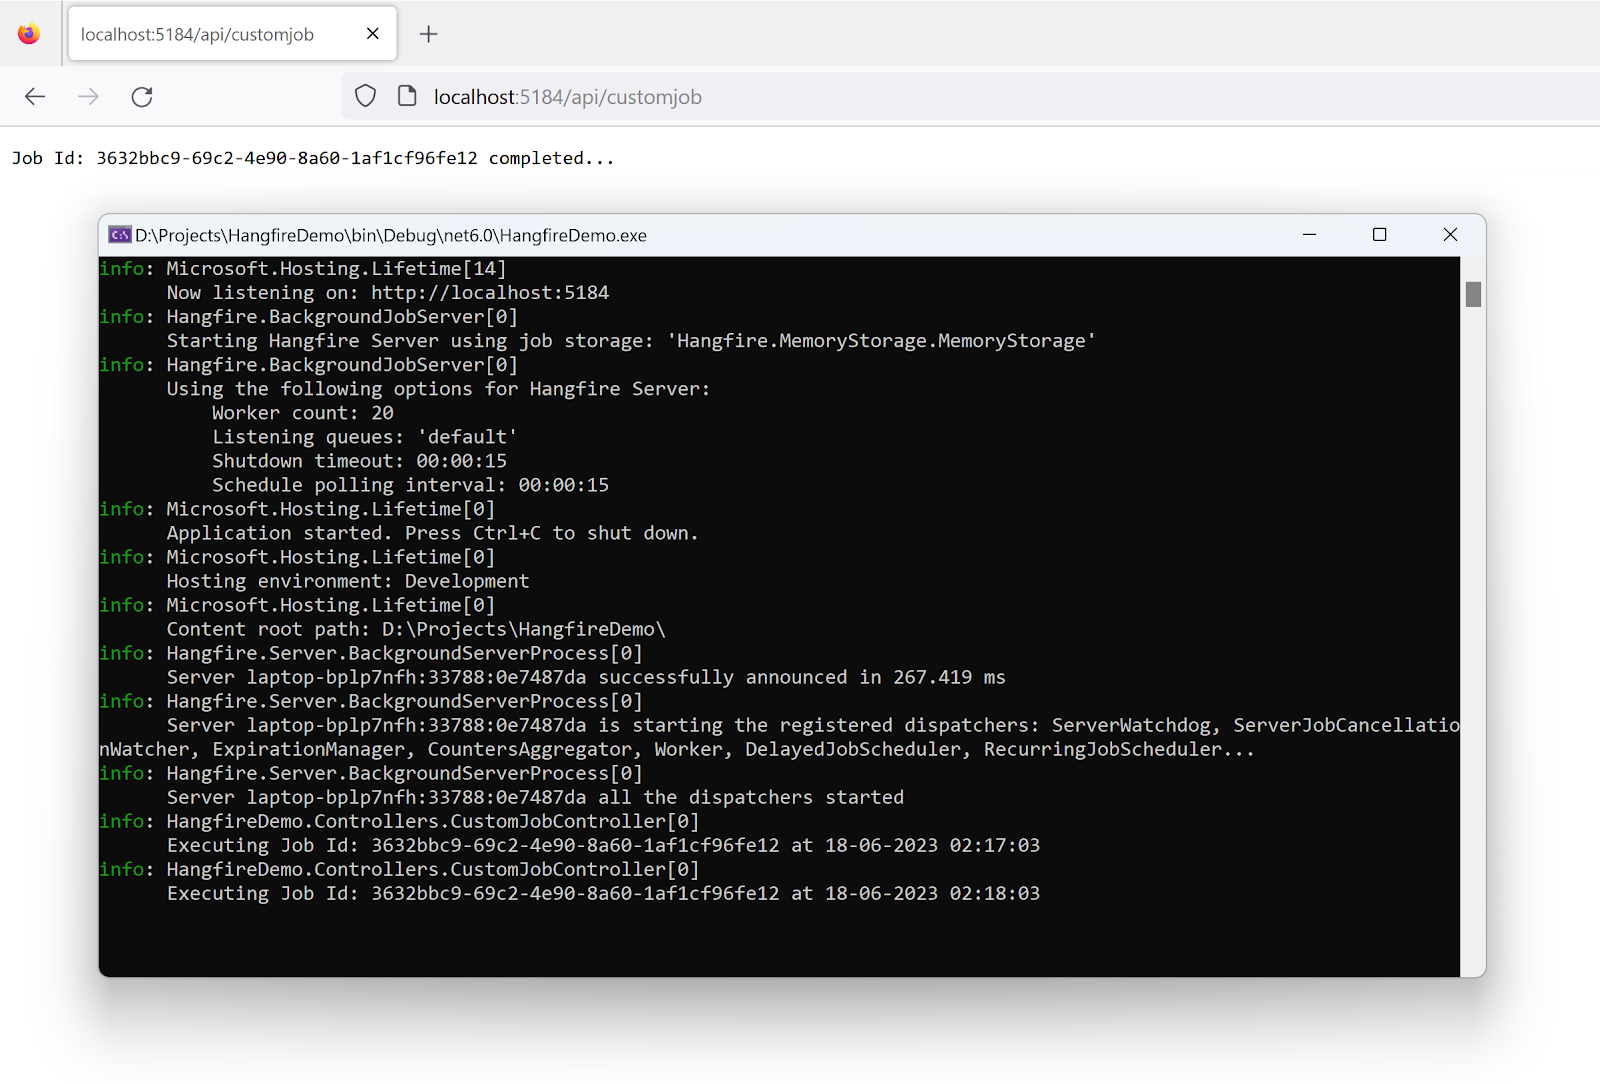
Figure 2
Retrieve Resource Consumption Info
Let us now create a recurring job in Hangfire and use it to retrieve CPU and memory usage data. The following piece of code should how you can get resource usage information on your computer:
private dynamic GetResourceUsageForProcess()
       {
         string currentProcessName = Process.GetCurrentProcess().ProcessName;
         PerformanceCounter cpuCounter = new PerformanceCounter("Process",
         "% Processor Time", currentProcessName, true);
         PerformanceCounter memoryCounter = new PerformanceCounter("Process",
         "Private Bytes", currentProcessName, true);
         cpuCounter.NextValue();
         memoryCounter.NextValue();
         Task.Delay(500);
         dynamic result = new ExpandoObject();
         result.CPU = Math.Round(cpuCounter.NextValue() /
         Environment.ProcessorCount, 2);
         result.RAM = Math.Round(memoryCounter.NextValue() / 1024 / 1024, 2);
         return result;
       }
Store Resource Consumption Info in the Database
Now that the resource usage information is available, you should store this information in a database.
The StoreResourceUsageData method given below shows how you can persist CPU and memory usage data in a PostgreSql database.
 public void StoreResourceUsageData(string job_id, string cpu_usage, string
  memory_usage)
    {
      try
      {
        using (
          PgSqlConnection pgSqlConnection = new PgSqlConnection
          ("User Id = postgres; Password = sa123#;" +
        "host=localhost;database=demo; license key=Specify your license key here;"))
        {
          using (PgSqlCommand cmd = new PgSqlCommand())
          {
            cmd.CommandText = "INSERT INTO perfdata (job_id, cpu_usage, memory_usage) "
            + "VALUES (:job_id, :cpu_usage, :memory_usage)";

            Thread.Sleep(250);
            cmd.Connection = pgSqlConnection;
            cmd.Parameters.AddWithValue("job_id", job_id);
            cmd.Parameters.AddWithValue("cpu_usage", cpu_usage);
            cmd.Parameters.AddWithValue("memory_usage", memory_usage);

            if (pgSqlConnection.State != System.Data.ConnectionState.Open)
              pgSqlConnection.Open();

            var state = pgSqlConnection.State;
            cmd.ExecuteNonQuery();
          }
        }
      }
      catch (Exception ex)
      {
        throw;
      }
    }
Complete Source Code
The complete source code of the CustomJobController is given below for reference:
[Route("api/[controller]")]
    [ApiController]
    public class CustomJobController: ControllerBase
    {
       private readonly ILogger _logger;
       private readonly IRecurringJobManager _recurringJobManager;
       protected static PerformanceCounter cpuCounter;
       protected static PerformanceCounter memoryCounter;
       public CustomJobController(ILogger < CustomJobController > logger,
       IRecurringJobManager recurringJobManager)
          {
             _logger = logger;
             _recurringJobManager = recurringJobManager;
          }
       [HttpGet]
       public IActionResult Get()
       {
          var jobId = Guid.NewGuid().ToString();
          _recurringJobManager.AddOrUpdate(jobId, () => CustomRecurringJob(jobId),
          Cron.Minutely);
          Thread.Sleep(5000);
          return Ok($"Job Id: {jobId} completed...");
       }
       public Task CustomRecurringJob(string job_id)
       {
          _logger.LogInformation($"Executing Job Id: {job_id} at {DateTime.Now}");
          var resourceUsage = GetResourceUsageForProcess();
          string cpu_usage = resourceUsage.CPU.ToString();
          string memory_usage = resourceUsage.RAM.ToString();
          StoreResourceUsageData(job_id, cpu_usage, memory_usage);
          return Task.CompletedTask;
       }
       private dynamic GetResourceUsageForProcess()
       {
          string currentProcessName = Process.GetCurrentProcess().ProcessName;
          PerformanceCounter cpuCounter = new PerformanceCounter
          ("Process", "% Processor Time",
          currentProcessName, true);
          PerformanceCounter memoryCounter = new PerformanceCounter
          ("Process", "Private Bytes",
          currentProcessName, true);
          cpuCounter.NextValue();
          memoryCounter.NextValue();
          Task.Delay(500);
          dynamic result = new ExpandoObject();
          result.CPU = Math.Round(cpuCounter.NextValue() /
          Environment.ProcessorCount, 2);
          result.RAM = Math.Round(memoryCounter.NextValue() / 1024 / 1024, 2);
          return result;
       }
       public void StoreResourceUsageData(string job_id, string cpu_usage,
          string memory_usage)
       {
          try
          {
             using(PgSqlConnection pgSqlConnection = new PgSqlConnection
                             ("User Id = postgres; Password = sa123#;" +
		  "host=localhost;database=demo; license key=Your license key;"))
             {
                using(PgSqlCommand cmd = new PgSqlCommand())
                {
                   cmd.CommandText = "INSERT INTO perfdata “ +
                   “(job_id, cpu_usage, memory_usage) " +
                   "VALUES (:job_id, :cpu_usage, :memory_usage)";
                   Thread.Sleep(250);
                   cmd.Connection = pgSqlConnection;
                   cmd.Parameters.AddWithValue("job_id", job_id);
                   cmd.Parameters.AddWithValue("cpu_usage", cpu_usage);
                   cmd.Parameters.AddWithValue("memory_usage", memory_usage);
                   if (pgSqlConnection.State != System.Data.ConnectionState.Open)
                      pgSqlConnection.Open();
                   var state = pgSqlConnection.State;
                   cmd.ExecuteNonQuery();
                }
             }
          }
          catch (Exception ex)
          {
             throw;
          }
       }
    }
When you run the application, you can see CPU and memory usage information stored in the database table we created earlier.
License Key Validation Error
When you execute the application, you might run into license validation errors if no valid license key is available. If the license key validation fails, you will encounter a Devart.Common.LicenseException. To resolve this error, you must either have a license key and already be a user or install the installation file which will install a trial key into the system.
Summary
Hangfire is an excellent library for integrating jobs into your .NET and .NET Core applications. You can use it to schedule your jobs at specific times, on a regular basis, or based on cron expressions. By using Hangfire, you can improve the responsiveness of your application. With Hangfire and ASP.NET Core, you can efficiently complete time-consuming tasks in the background, thus maximizing your application’s performance and user experience.