")
Advanced queries are the lifeblood of high-performance MySQL applications. Whether you’re debugging legacy code, optimizing for scale, or building dynamic reports, writing complex MySQL queries is a critical skill. However, crafting powerful queries isn’t just about knowing SQL syntax—it’s about understanding how data flows, joins behave, and how query structure impacts performance.
In this guide, we’ll explore the key concepts, practical examples, and optimization tips that every MySQL developer and DBA needs to master. We’ll also show how tools like dbForge Studio for MySQL can help streamline the process of building and tuning advanced queries.
- Utilizing subqueries effectively
- Practical examples of complex queries
- Common mistakes to avoid
- Example of how to build complex MySQL queries in dbForge Studio for MySQL
- Practical examples of complex queries
- Common mistakes to avoid
- Optimizing complex queries with dbForge Query Profiler
- Conclusion
- FAQ
What is a complex MySQL query?
Complex MySQL queries search data using more than one parameter and may comprise a combination of several joins across multiple tables and quite a few nested subqueries (queries nested within another query). Complex queries also frequently involve heavy use of AND and OR clauses.
Complex queries are typically used to retrieve complex data from multiple tables. Advanced queries can also be used for reporting, joining multiple tables, nesting queries, and transaction locking.
Utilizing subqueries effectively
Subqueries are one of the most potent tools in SQL—and the most misused. At their core, subqueries allow you to nest one query inside another, condensing multi-step logic into a single statement.
They can be used in the following ways:
- Scalar subqueries: Return a single value for a condition or assignment.
- Row subqueries: Return a row of values (commonly used in comparisons).
- Table subqueries: These are used in the FROM clause as a temporary table.
- Correlated subqueries: Depend on data from the outer query and run row-by-row (can be inefficient if overused).
Performance tip
Correlated subqueries can severely degrade performance, especially inside WHERE or SELECT clauses. Rewrite them as JOINs or Common Table Expressions (CTEs), mainly when working with large datasets.
Example
SELECT name
FROM customers
WHERE id IN (
    SELECT customer_id
    FROM orders
    WHERE order_total > 1000
);
This is a classic use case: filter customers based on a condition from another table. But in large databases, this is better rewritten as a JOIN with indexing.
Complex MySQL query with multiple SELECT statements
For analytical purposes, it’s often necessary to fetch data from several different tables to form a single result table. Thus, complex MySQL queries with multiple SELECT statements are the most common advanced queries used by DBAs and developers. When you combine the results of multiple SELECT statements, you can choose what to include in the result table. This is exactly what makes them so popular.
Advanced JOIN operations
JOINs are often simple to start with—but they can become highly complex when:
- Multiple JOINs are chained together
- Filtering logic is embedded inside the JOIN condition
- You’re mixing JOIN types (e.g., INNER + LEFT OUTER)
- Performance tuning requires minimizing unnecessary scans
Key JOIN types explained with use cases
INNER JOIN: Use when you only need rows that match in both tables. Efficient and straightforward.
SELECT o.id, c.name
FROM orders o
INNER JOIN customers c ON o.customer_id = c.id; - LEFT JOIN: Use when you need all rows from the left table, even if there are no matches on the right. Useful in audit, logging, or reporting scenarios.
- RIGHT JOIN: Less common but useful in reverse reporting relationships.
- CROSS JOIN: Generates all possible combinations of rows. Used for testing or generating grid values but avoided in production unless necessary.
- FULL OUTER JOIN: Returns all records when there is a match in either left or right table. Use when you want a complete view of both datasets, even if some records don’t have a match. Great for reconciliation reports or comparing datasets.
SELECT o.id, c.name
FROM orders o
FULL OUTER JOIN customers c ON o.customer_id = c.id;
Optimization note
Every JOIN adds to your query’s complexity and runtime cost. Always:
- Ensure JOIN keys are indexed
- Use EXPLAIN to check the order and type of joins
- Eliminate unnecessary joins by restructuring logic
JOINs are the foundation of most complex MySQL queries. But as logic grows, so does understanding how each JOIN behaves.
- INNER JOIN: Only matching rows
- LEFT JOIN: All rows from the left table, matched or not
- RIGHT JOIN: The opposite of LEFT JOIN
- CROSS JOIN: Cartesian product (use with caution)
Practical examples of complex queries
Here are some real-world use cases that apply the concepts above:
1. Customer Lifetime Value (CLV) calculation
SELECT c.id, c.name, SUM(o.order_total) AS lifetime_value
FROM customers c
JOIN orders o ON c.id = o.customer_id
GROUP BY c.id, c.name;
2. Detecting users without recent activity
SELECT u.username
FROM users u
LEFT JOIN logins l ON u.id = l.user_id AND l.login_date > NOW() - INTERVAL 30 DAY
WHERE l.id IS NULL;
3. Inventory restocking report
SELECT p.product_name, s.stock_level
FROM products p
JOIN stock s ON p.id = s.product_id
WHERE s.stock_level < p.reorder_threshold;
Common mistakes to avoid
Understanding the theory is key—but writing robust queries also means avoiding these frequent pitfalls:
- Overusing Correlated Subqueries
Replace with JOINs or CTEs whenever possible. - Missing Indexes
Ensure join columns and filter fields are properly indexed. - Ambiguous Column Names
Always qualify columns when dealing with multiple tables. - **Unnecessary SELECT ***
Fetch only what you need. It improves performance and readability. - Incorrect JOIN Conditions
Double-check ON clauses to avoid Cartesian products or missing rows. - Improper Use of GROUP BY
Make sure all non-aggregated columns are included or use proper aggregates.
Example of how to build complex MySQL queries in dbForge Studio for MySQL
Writing advanced queries can be intimidating and somewhat confusing to a MySQL novice. That’s where dbForge Studio for MySQL comes into help. Its cutting-edge Query Builder functionality comprises an easy-to-learn-and-operate visual query designer that lets you create MySQL queries without manual coding.
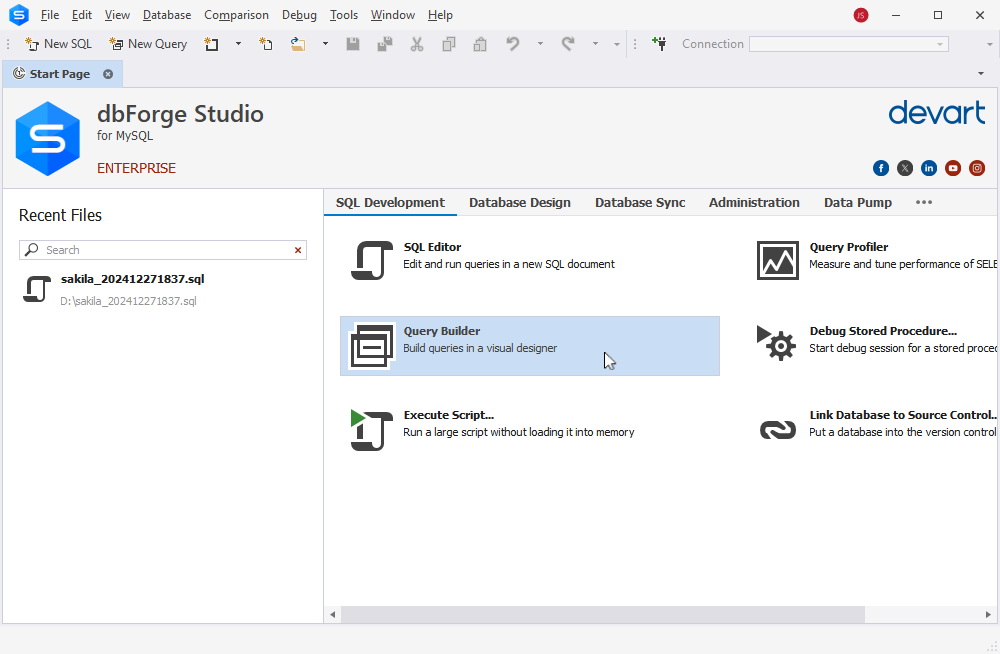
Step 1. Enabling query builder
To start working with Query Builder, select it from the SQL Development tools list on the Start page of the Studio.
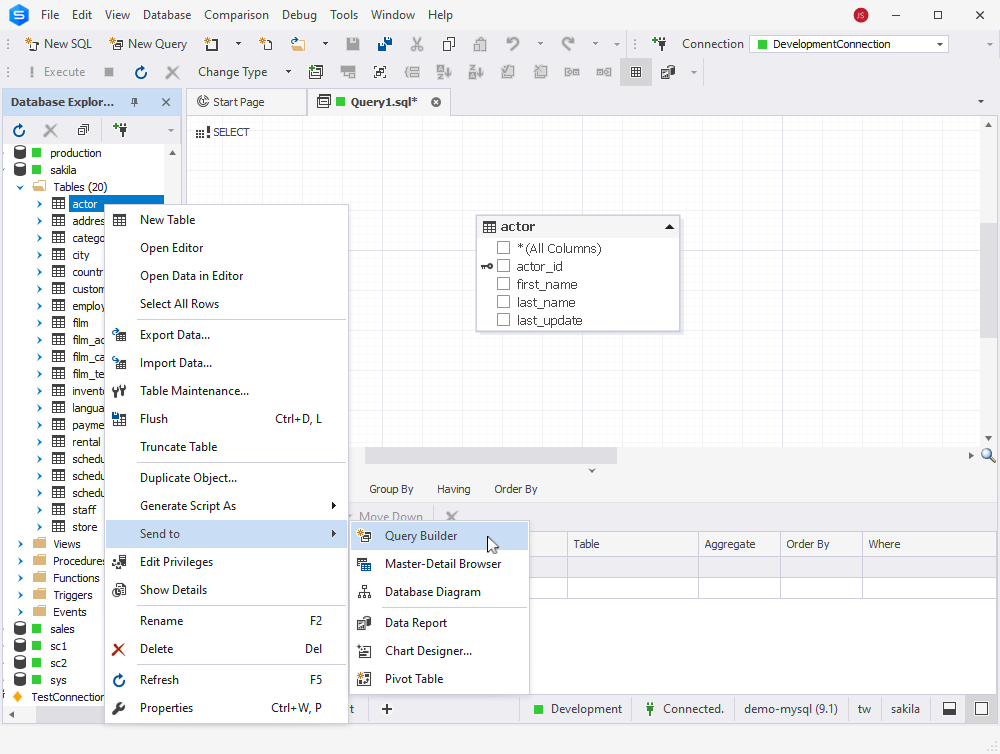
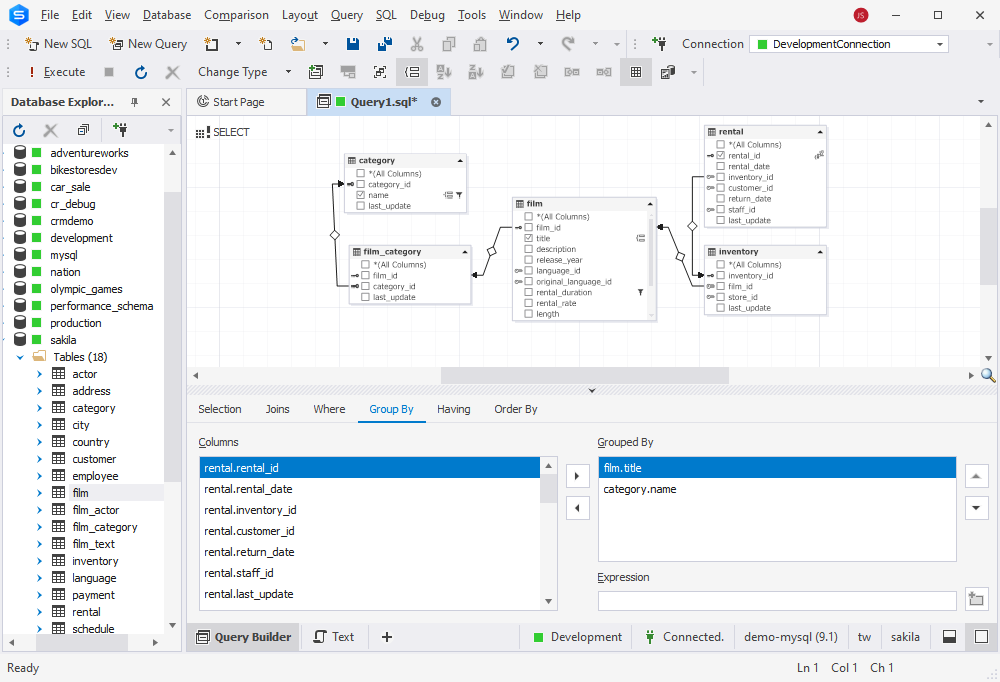
Step 2. Adding tables to the query
To add tables and views to the query, simply drag-and-drop them from the Database Explorer tree to the query diagram. Alternatively, you can right-click the required tables in the Database Explorer, click the Send To command from the shortcut menu, and then select Query Builder.
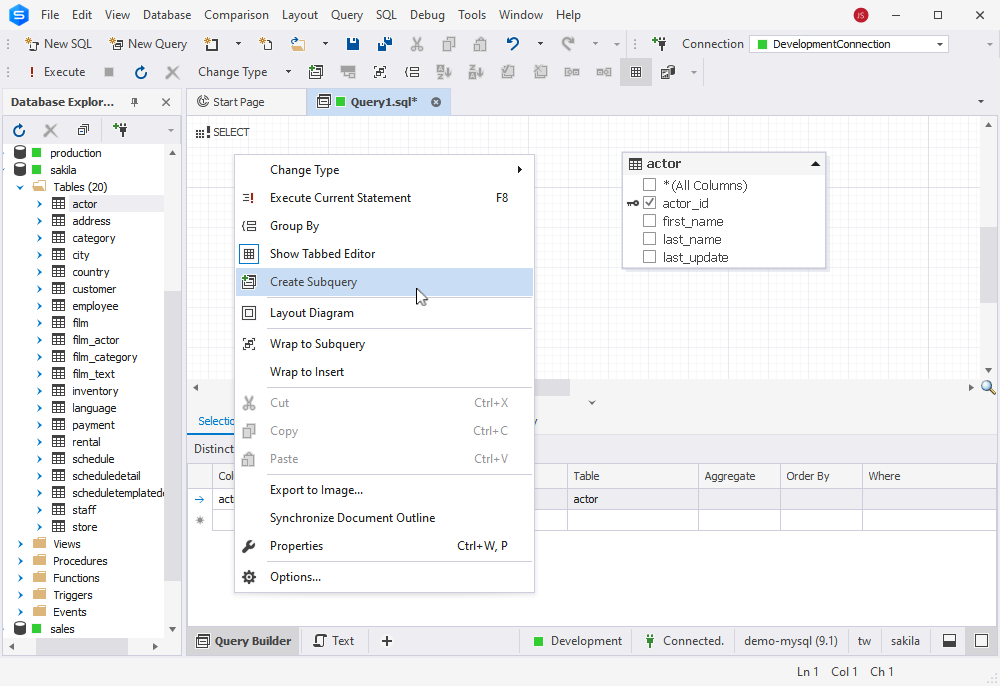
Step 3. Creating subqueries
dbForge Studio offers full support for subqueries in all SELECT statement clauses. Each subquery can have its own subqueries. When you create a subquery or open it for visual editing, a subquery tab of the query document appears. Using these tabs, you can easily navigate between subqueries.
To create a subquery, right-click the diagram body and select Create Subquery command from the shortcut menu.
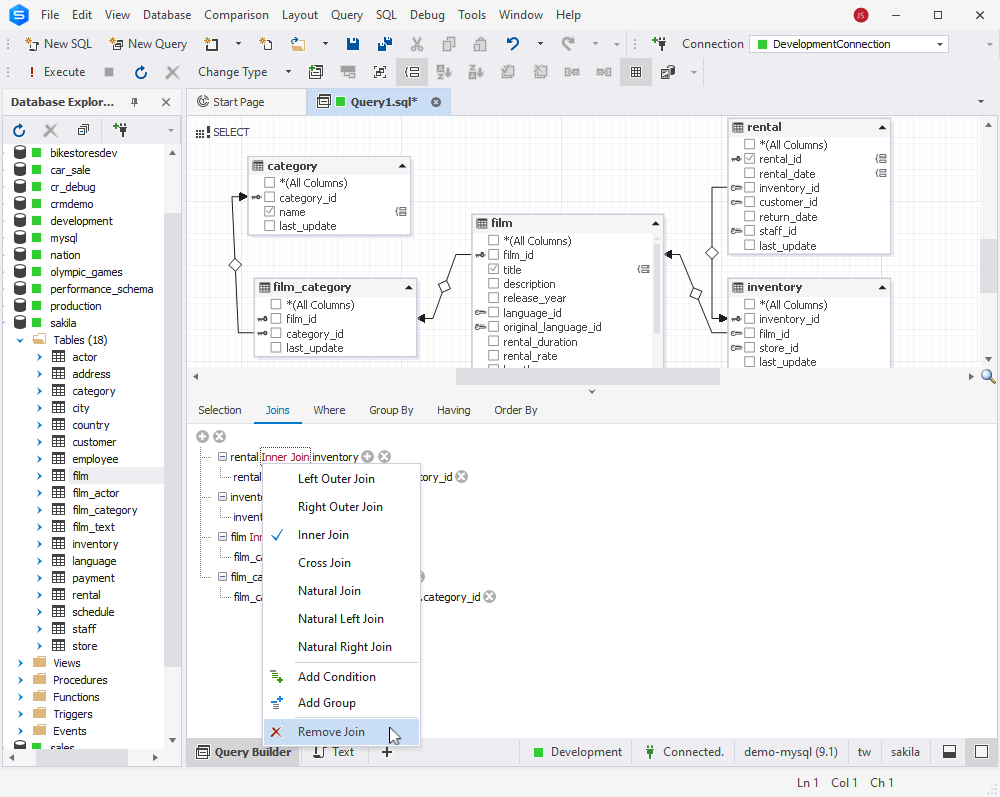
Step 4. Creating JOINs between the tables
dbForge Studio for MySQL allows you to visually create the following JOINs: INNER, LEFT OUTER, RIGHT OUTER, NATURAL, and CROSS JOIN. You can also easily set quite complex conditions for a join of any kind.
Joins are automatically created when a table with a foreign key and its referenced table are placed on the diagram. To add a join, navigate to the Joins tab of the tabbed editor and click the Add button on the top of the tree node. A new empty join with an empty condition will appear. Click the Enter table name field and specify the join tables. Then set the type of the join by clicking the red-colored text link and selecting a required item from the shortcut menu. You can also remove a join by clicking this button.
Step 5. Building WHERE or HAVING clauses if necessary
When retrieving data, you may need to filter or exclude the records. And the best way to achieve that is to use WHERE and HAVING clauses.
To build WHERE and\or HAVING clauses, navigate to the corresponding tabs and make the necessary adjustments using the intuitive interface.
Step 6. Creating GROUP BY or ORDER BY clauses
GROUP BY and ORDER BY clauses are used to organize the output data. To create those clauses, navigate to the relevant tab and select columns for sorting.
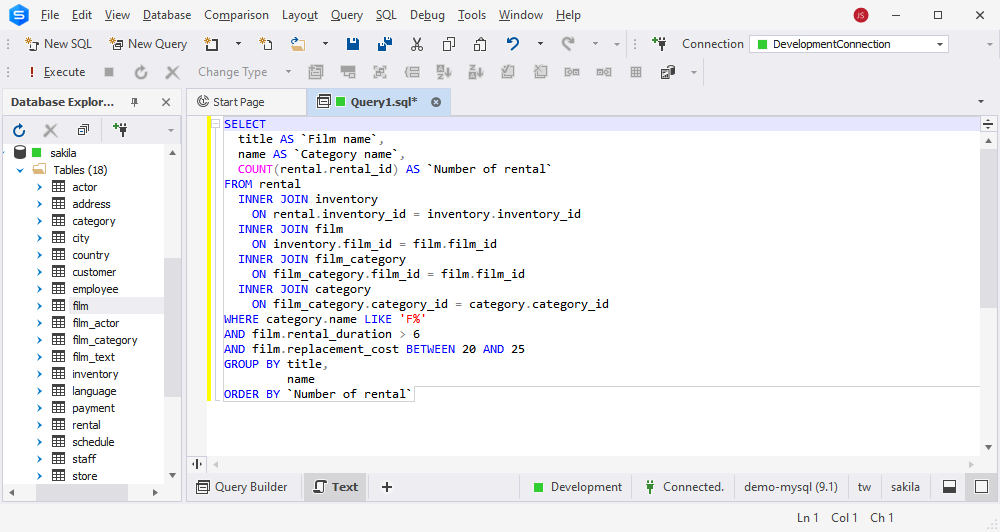
Step 7. Viewing and executing the query
After you’ve made all the necessary adjustments switch to the Text view to inspect the automatically generated query. If you’re satisfied with the result, click the Execute button on the main toolbar to run the script.
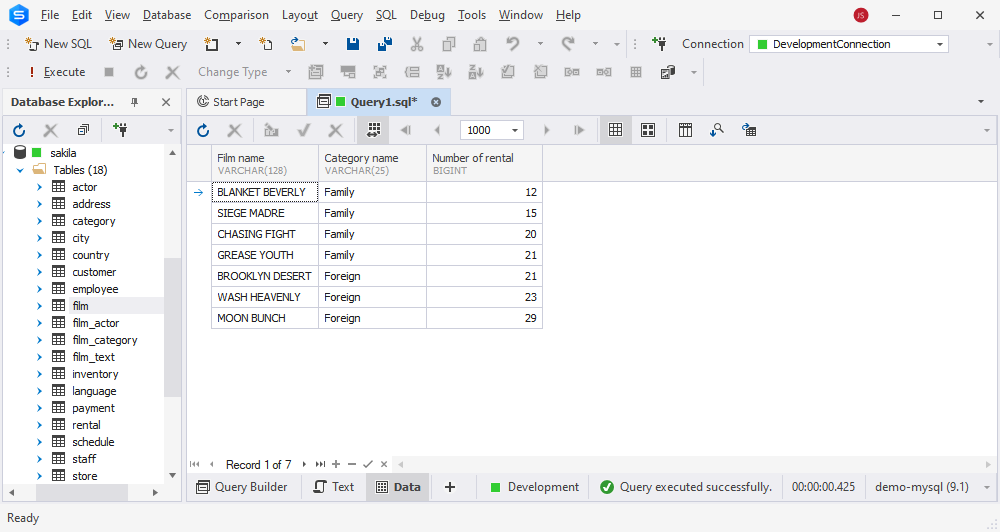
Step 8. Analyzing the result
The query result will be displayed immediately for you to analyze. The Data Editor functionality built into dbForge Studio for MySQL allows manipulating data in the most convenient way.
Practical examples of complex queries
The real power of advanced SQL becomes apparent when applied to practical business needs. Below are three MySQL advanced query examples demonstrating how complex logic can solve real-world problems. Each example includes a breakdown of the query structure and how you can build or optimize it using dbForge tools.
1. User segmentation based on purchase behavior
Use Case: Identify users who have purchased from more than one product category within the last 90 days.
SELECT customer_id
FROM orders
WHERE order_date >= CURDATE() - INTERVAL 90 DAY
GROUP BY customer_id
HAVING COUNT(DISTINCT category_id) > 1;
Within one query, you can filter by date, aggregate by customer, and check for category diversity. This is perfect for behavioral targeting in marketing campaigns.
How Query Builder helps:
Rather than writing this logic manually, you can drag in the orders and categories tables, apply filters visually, and add GROUP BY and HAVING clauses through the UI.
2. Revenue reporting with conditional aggregates
Use Case: Calculate total revenue per region, but split between online and in-store sales channels.
SELECT region,
       SUM(CASE WHEN channel = 'Online' THEN amount ELSE 0 END) AS online_revenue,
       SUM(CASE WHEN channel = 'In-Store' THEN amount ELSE 0 END) AS instore_revenue
FROM sales
GROUP BY region;
This query uses conditional aggregation—often misunderstood by beginners—to create split metrics in a single result.
Optimization tip: If channel or region columns aren’t indexed, you’ll experience slowdowns at scale. Query Profiler will highlight this bottleneck immediately.
3. Inventory Discrepancy Detection
Use Case: Find all products where the number of units sold exceeds the recorded stock quantity (possible mismatch or fraud).
SELECT p.product_id, p.name, p.stock_quantity, SUM(o.quantity) AS sold
FROM products p
JOIN order_items o ON p.product_id = o.product_id
GROUP BY p.product_id, p.name, p.stock_quantity
HAVING sold > p.stock_quantity;
You’re aggregating transactional data and comparing it to a static reference—requiring accurate joins and groupings.
How Query Builder and Profiler assist: The JOIN logic and HAVING clause can be created and tested visually. With Profiler, you can see if a full table scan is triggered due to a missing index.
Common mistakes to avoid
Even experienced developers make costly mistakes when writing MySQL advanced queries. These missteps often go unnoticed until a query slows down the entire application or returns inaccurate data.
Mistake 1: Overusing SELECT *
This leads to unnecessary data transfer, especially when joining large tables. Always specify the columns you need—it improves performance and code clarity.
-- Bad:
SELECT * FROM orders;

-- Better:
SELECT order_id, customer_id, order_total FROM orders;
Mistake 2: Missing indexes on JOIN or WHERE columns
JOINs and filters operate far more efficiently on indexed columns. Without indexing, MySQL may resort to full table scans, which slow down dramatically with scale.
Use EXPLAIN or Query Profiler to inspect whether indexes are used during execution.
It is highly recommended to regularly run ANALYZE TABLE to keep statistics and indexes up-to-date. For details, refer to ANALYZE TABLE MySQL.
Mistake 3: Unbounded result sets
Forgetting to limit or paginate results in production systems can lead to massive performance issues or application crashes.
-- Always prefer:
SELECT ... LIMIT 100;
Mistake 4: Writing correlated subqueries where JOINs would be faster
Correlated subqueries are evaluated row-by-row and can destroy performance. Many such queries can be rewritten using JOINs with GROUP BY or HAVING.
Optimizing complex queries with dbForge Query Profiler
In database engineering, correctness is just the starting point. The real challenge comes after the query runs—when you ask if it runs fast enough, scales well enough, and uses system resources responsibly. A well-structured query that performs poorly under pressure is still a failure. That’s where the real work of optimization begins.
dbForge Query Profiler for MySQL is designed for this exact workflow stage. It shifts performance tuning from reactive guesswork into a repeatable, evidence-based process. Instead of manually deciphering EXPLAIN outputs or troubleshooting production slowdowns post-mortem, developers gain real-time visibility into query behavior—with precision and context.
What dbForge query profiler delivers
Most developers know how to write advanced MySQL queries. However, fewer understand what MySQL does under the hood when executing them. The Profiler closes that knowledge gap by exposing the database’s decision-making process.
Visual execution plans
Instead of raw tree outputs, dbForge renders execution plans visually—clearly showing how tables are joined, which indexes are used, and where MySQL performs filtering, sorting, or aggregation. Each node includes runtime statistics, helping teams pinpoint bottlenecks at a glance.
Bottleneck detection in context
The Profiler automatically flags:
- Full table scans where indexes are expected
- JOIN conditions that bypass keys
- Costly filesorts and temporary table usage
- Scenarios where subqueries slow down execution
Context sets it apart—you don’t just see that an issue exists; you know why it matters and how it impacts the whole query.
Query version comparison
Optimization is rarely a one-and-done process. You might test different indexes, restructure joins, or rewrite a subquery as a CTE. The Profiler lets you compare multiple versions of the same query—side-by-side—across key metrics like execution time, scanned rows, and CPU usage. This isn’t guesswork. It’s iterative tuning with measurable feedback at each step.
See also: How to run queries in SQL Server
Conclusion
When it comes to building complex MySQL queries, working with subqueries, clauses and conditions might seem to be strenuous especially for beginners. The Query Builder functionality that comes with dbForge Studio for MySQL is bound to take away that pain. Intuitive and well-designed GUI significantly simplifies building complex queries and managing JOIN conditions. Also, you can watch this video tutorial:
FAQ: MySQL Advanced Queries
How to visualize complex SQL queries?
Use dbForge Query Builder. It allows you to build queries visually by dragging tables, defining joins, and setting conditions without writing raw SQL.
Are there any tools that can help write and debug complex queries in MySQL more efficiently?
Yes. Query Builder helps write and structure complex queries faster, while Query Profiler identifies performance issues and suggests optimizations.
How can I use MySQL advanced queries to retrieve data from multiple tables efficiently?
Use indexed JOIN keys, reduce the number of scanned rows with precise WHERE clauses, and avoid unnecessary nested logic. Always validate with a profiler.
How do MySQL complex queries differ from simple queries in terms of performance?
Complex queries often involve aggregations, multiple joins, or subqueries. They consume more CPU, memory, and I/O bandwidth without proper indexing and tuning.
How can dbForge Studio for MySQL simplify the process of writing and optimizing MySQL complex queries?
Absolutely. It includes a SQL formatter to standardize indentation, keyword casing, and spacing—great for collaboration and readability.
Can dbForge Studio automatically format MySQL advanced queries for better readability?
Yes, dbForge Studio for MySQL includes a built-in SQL Formatter that can automatically format advanced queries for improved readability. You can customize formatting styles and apply them with a single click or shortcut.