
Struggling with CRM QuickBooks integration? Importing data into QuickBooks Online is essential for building a robust, integrated financial workflow. Whether you’re pulling customer info from external databases, syncing financial records, or automating sales pipeline updates and data migration, it’s a developer’s bread and butter. Yet, QuickBooks Online’s native import features often fall short, with rigid file formats, row limits, and no support for complex data relationships.
While you might want to try QuickBooks Online API and third-party connector applications, the most reliable and direct path to seamless data flow is through an ODBC driver. In this article, we’ll show you how to set up an ODBC connection to QuickBooks Online, walk through the data import process, and compare its performance and flexibility against other common methods.

- What is an ODBC driver and how does it help with QuickBooks Online?
- How to import data into QuickBooks Online with an ODBC driver
- Setting up an ODBC connection to QuickBooks Online
- Comparing ODBC with other data import methods for QuickBooks Online
- Conclusion
What is an ODBC driver and how does it help with QuickBooks Online?
ODBC (Open Database Connectivity) is a standardized API that lets you access databases and CRMs and pull data using a common language: SQL. Instead of dealing with each system’s unique quirks, the ODBC driver translates your queries into the specific protocols each database understands. This means you can directly query, update, and insert data into QuickBooks Online from any ODBC-compatible tool, treating it like any other relational database.
The Devart ODBC Driver for QuickBooks Online takes it up a notch. It provides direct HTTPS access to QuickBooks’ servers and major databases, coupled with local caching for optimized performance. This results in faster data retrieval and more responsive integrations, simplifying your development workflow. Plus, it offers extended SQL syntax for richer querying, compatibility with ETL and BI tools like Tableau and Talend, and cost-effective deployment with affordable, scalable licensing.
How to import data into QuickBooks Online with an ODBC driver
To import data into QuickBooks Online using an ODBC driver, all you need to do is get the driver, set it up on your system, and configure the connection to your specific data source.
For example, to import Excel to QuickBooks, you’d connect Excel as an ODBC data source, then use SQL queries to pull data from your spreadsheet and push it directly into QuickBooks Online. In contrast, QuickBooks import methods rely on manual CSV and Excel file uploads with strict formatting requirements. You also have to map fields by hand before importing, with a 1,000-row limit per import and no automation in sight.
While QuickBooks Online also offers automated bank feeds and some app integrations, these are limited to specific data types and lack the general flexibility of an ODBC driver. In a nutshell, ODBC drivers allow you to automate data workflows, synchronize data in real time, customize queries for advanced use cases, and support scenarios like HubSpot QuickBooks integration without relying on rigid native connectors.
Setting up an ODBC connection to QuickBooks Online
Take a look below to see how you can set up an ODBC connection to QuickBooks Online using the Devart ODBC Driver for QuickBooks Online.
Prerequisites before you start
To get rolling, you’ll need a few essentials:
- A QuickBooks Online account with active login credentials.
- The Devart ODBC Driver for QuickBooks.
- An ODBC-compliant database or application (e.g., MySQL, Excel, Salesforce, Hubspot.)
- API access and proper permissions configured in QuickBooks Online.
- .NET Framework 4.5 or a later version
Installing the Devart ODBC driver for QuickBooks
Installing the Devart ODBC Driver for QuickBooks is a quick process — no complicated hoops to jump through, just a few clicks and you’re good to go. To get started, follow the steps below:
- Download the driver installer from the Devart website. You have two options here: the .exe file or the .msi package, which is perfect for custom configurations. If you opt for the regular installation, simply run the .exe file and follow the on-screen prompts.

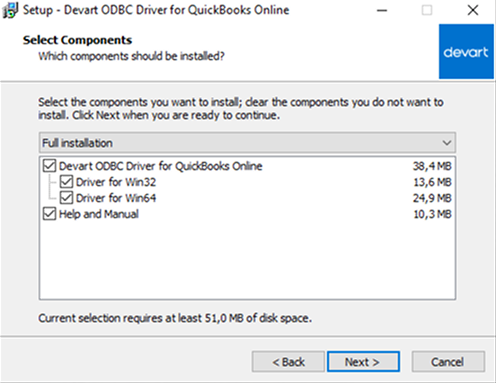
- In the setup wizard, first select your desired installation directory, and then pick the components you want to install in the Select Components dialog box.
- Uncheck the Driver for Win64 box if you don’t need 64-bit support. Also, feel free to skip the Help and Manual option if you’re fine figuring things out on your own or prefer checking the documentation online later. When you’re set, hit Next.
- Next, you’ll see a rundown of your installation choices. Click Install and give it a moment to do its thing.
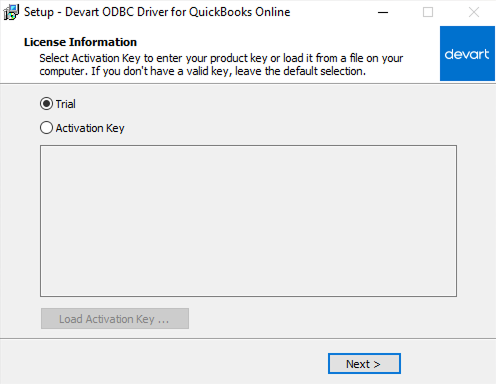
- Once the installation wraps up, the License and Information dialog box will pop up.
- If you don’t have an activation key yet, select the Trial option to use the driver free for 30 days.
- If you’ve purchased it, you should’ve gotten a key in your email. You can also log into your Devart Customer Portal, copy it from there, and paste it into the box.
- Alternatively, if you’ve saved the key as a file, just upload it and click Next.
- You’ll then land on the final screen confirming everything’s ready. Click Finish.
Connecting QuickBooks Online to an external database via ODBC
After installation, you need to configure the driver to establish the connection to QuickBooks Online. Here’s how:
- Open the ODBC Data Source Administrator on Windows. Just type ODBC Data Sources into the search bar near the Start menu. Or, if you prefer, open the Control Panel, search for Administrative Tools and select the ODBC option from there. On older setups like Windows 7 or earlier, it might be labeled as Data Sources (ODBC).
- Another option: run C:\Windows\SysWOW64\odbcad32.exe for a 32-bit setup or C:\Windows\System32\odbcad32.exe for 64-bit.
- Once it’s open, switch to the Drivers tab to confirm the Devart ODBC Driver for QuickBooks is showing up in the list.
- Then, head over to the System DSN or User DSN tab to create a new Data Source Name (DSN) for Quickbooks Online.

- Hit the Add button, and a Create New Data Source window will pop up.
- Scroll to find the Devart ODBC Driver for QuickBooks Online, select it, and click Finish. The driver’s configuration window will appear next.
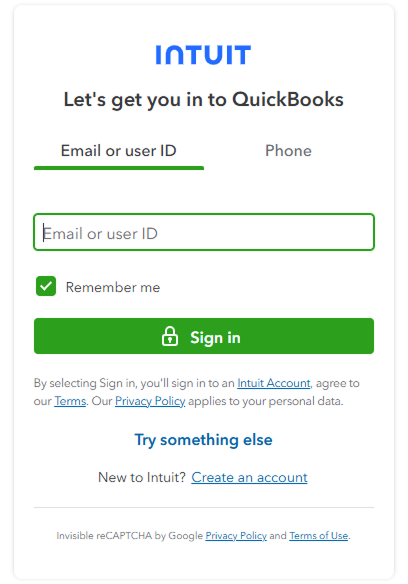
- Click Connect to QuickBooks. The driver uses OAuth 2.0 for secure authentication, which will launch a browser page prompting you to log in. This way, you don’t need to register anything extra to start working with your data. Simply enter your QuickBooks email, user ID, or phone number, then hit Sign in.
- To verify your identity during authentication, you’ll receive a unique code in your email. Type that code into the provided field, hit Continue and then click Connect to allow data access. Once that’s done, your company ID and refresh token will automatically populate in the setup.
- Back in the configuration window, click Test Connection to make sure everything’s working. If it doesn’t connect, double-check your login details, company ID, and API permissions. When it’s all good, click OK to save the DSN.
Now that the connection’s live, you’re ready to sync data between QuickBooks Online and other software. Just open your database or app, point it to the DSN you created, and pull in or push out data as needed.
Comparing ODBC with other data import methods for QuickBooks Online
While we’ve focused on using the QuickBooks ODBC driver to bring data into QuickBooks Online, it’s not the only way to get the job done. Some lean toward alternatives like traditional CSV uploads, API integrations, or third-party apps like CData or Skyvia. Each method comes with trade-offs, so it’s worth digging into the details before picking the one that fits your needs.
Take a look below at the comparison table to see how they stack up against each other.
| Method | Speed | Flexibility | Data Handling Capabilities |
|---|---|---|---|
| ODBC | Very fast;direct database access. | High; SQL-based customization lets you tailor queries to exact needs (e.g., specific fields, joins). | Advanced; handles large datasets, complex relational data, and bidirectional sync with precision. |
| CSV Uploads | Slow; manual upload and no real-time access. | Low; fixed format and limited mapping. | Basic; struggles with volume (>1K rows) and complexity. |
| QuickBooks Integration API | Fast; automated, real-time data transfers once coded. | High; customizable endpoints. | Moderate; rate limits and payload size restrictions. |
| Third-Party Apps (e.g., CData, Skyvia) | Variable; ranges from near real-time to delayed batch syncs, depending on app. | Moderate; limited by predefined features or paid tiers. | Good; though it varies by app .(e.g., Skyvia lags on complex sync or scale). |
The QuickBooks import CSV method is fine for simple tasks like updating a small list. However, if you want to import bank transactions into QuickBooks, sync detailed invoices, or automate credit card transactions imports, you’ll quickly hit a wall.
You might turn to the QuickBooks Integration API for a more powerful solution, but it comes with its own challenges. It requires solid coding skills, constant upkeep to handle authentication and API updates, and can stumble when pushing massive datasets. On the other hand, third-party tools streamline some aspects of CRM Quickbooks integration, but often fall short on customization and performance.
In contrast, ODBC drivers excel with their seamless, bidirectional data synchronization (updates in your external database reflect in QuickBooks Online in real time, and vice versa). They’re built for instant data access, hands-off automation, and managing tricky setups — like complex financial reporting or real-time inventory synchronization — all while scaling easily as your data grows.
Conclusion
ODBC drivers deliver real-time syncing, effortless automation, and the flexibility to scale with your setup, whether managing routine data transfers or a full CRM migration strategy. They also eliminate the manual grind of CSV uploads, reduce the complexity of QuickBooks API coding, and give you more control than third-party tools.
Take the Devart ODBC Driver as an example. It hooks QuickBooks Online straight into your SQL toolkit, letting you automate recurring imports with features like direct HTTPS connections, QuickBooks API support, and connection pooling for reliable, efficient data transfer. Try Devart ODBC Driver for QuickBooks Online and optimize QuickBooks data imports.