
In Continuous Integration and Continuous Development, automation plays a crucial role. It helps development teams make database development and deployment faster and more efficient by automating the building, testing, and deploying of database changes. Furthermore, automation can extend to other routine database tasks, including backups, ensuring a streamlined and reliable workflow.
In the article, we are going to explore the importance of database deployment in MySQL and how automation can enhance this process. In addition, we’ll examine how to deploy database changes using the MySQL Database Projects and synchronize the project with the database using the Schema Comparison/Synchronization functionalities available in dbForge Studio for MySQL.
Contents
- What is deployment in MySQL?
- The importance of deployment automation in MySQL
- Introduction to the Database Project features
- How to set up schema comparison and synchronization
- Automate MySQL deployments using the command line
- MySQL deployment case studies

What is deployment in MySQL?
Deployment refers to implementing changes or updates to a MySQL database such as creating new tables, modifying the data schema, inserting or updating data, etc.
Deployment is an important step in Continuous Integration (CI) and Continuous Deployment (CD) approaches. In the Continuous Integration approach, code changes are committed to a version control repository and are checked if they can be successfully built and tested. If any bugs and conflicts are identified, they should be fixed and tested again before deploying to the production server. In the Continuous Deployment strategy, every code change, if it passes predefined tests successfully, is automatically deployed to a production environment.
In MySQL, deployment can include the following steps:
- Planning and preparation: Define the scope of the deployment and identify the changes to be made.
- Backup: Create a backup of the database to ensure that in case of any unexpected issues, data can be restored to its previous state.
- Testing: Test changes thoroughly in a testing or staging environment to identify and fix any possible issues or bugs that may lead to data failures.
- Implementation of changes: Deploy changes to the production database using the deployment scripts or migration tools.
- Monitoring and validation: Monitor the database to ensure it is functioning properly without any issues.
Depending on whether the deployment is automated or performed manually, it may also include some additional steps:
- Version control: Keeping the database schema and changes under version control allows for easy tracking of modifications, efficient collaboration among team members, and rollback of changes if needed.
- Data migration: It can involve transferring, transforming, or updating data to synchronize the source and target databases.
- Deployment script execution: Scripts can be executed to automatically apply the changes to the database or to automate and schedule the execution of some database tasks.
The importance of deployment automation in MySQL
Let’s outline some benefits you can get when implementing automation to your database deployment when working with different server environments such as sandbox, testing, staging, or production:
- No need for manual intervention.
- Consistency of configuration settings on different servers.
- Scalability that allows for easy deployment of new servers and resources.
- Improved security.
- Automated monitoring systems that can automatically respond to potential server issues and trigger appropriate actions to restore them.
- Quicker response to changing requirements without having to spend a lot of time on manual operations.
- Execution of daily routine tasks faster and more regularly.
- Avoidance of human errors in deployment and management.
Now, let’s see how to deploy the MySQL database using the Database Projects functionality available in dbForge Studio for MySQL, a powerful IDE with rich database development, management, and administration features.
Introduction to the Database Projects features
In dbForge Studio, a database project consists of logically organized SQL scripts and query files that can be used to create a database from scratch or update the existing one. The project can also be managed and configured in an offline mode.
It should be noted that during the project deployment, the database objects are recreated, which may lead to data loss. Therefore, it is recommended to back up the database to be deployed before you start deploying the MySQL project.
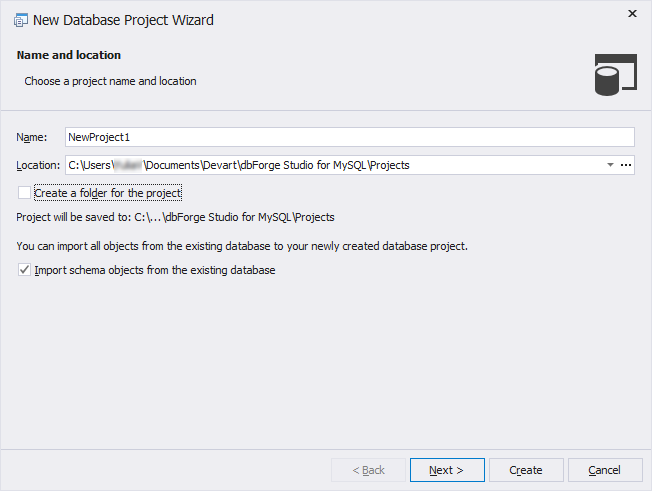
Let’s see how to deploy the database to the server using the Database Projects functionality. In our example, we’ll import schema objects from the existing database to create the project. To get started, open dbForge Studio for MySQL, navigate to the File menu, and select New > Project to open the New Database Project Wizard. Then, specify a project name and location to save the project and select the Import schema objects from the existing database checkbox.
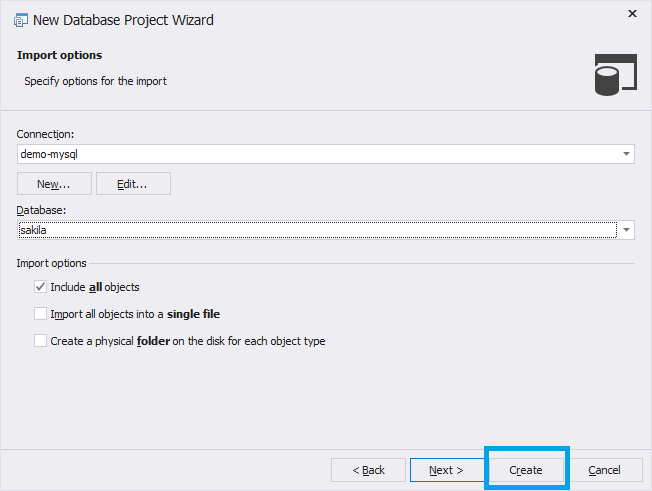
On the Import options page, choose the server connection and database from which you want to import objects and click Create. By default, this connection will be used for the project deployment.
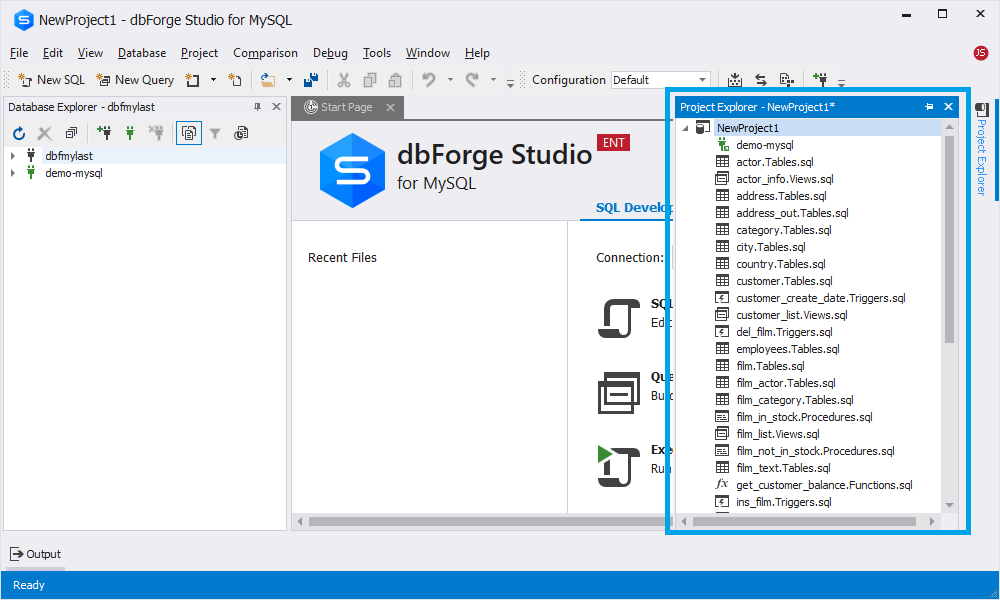
The project with the default settings will appear in Project Explorer.
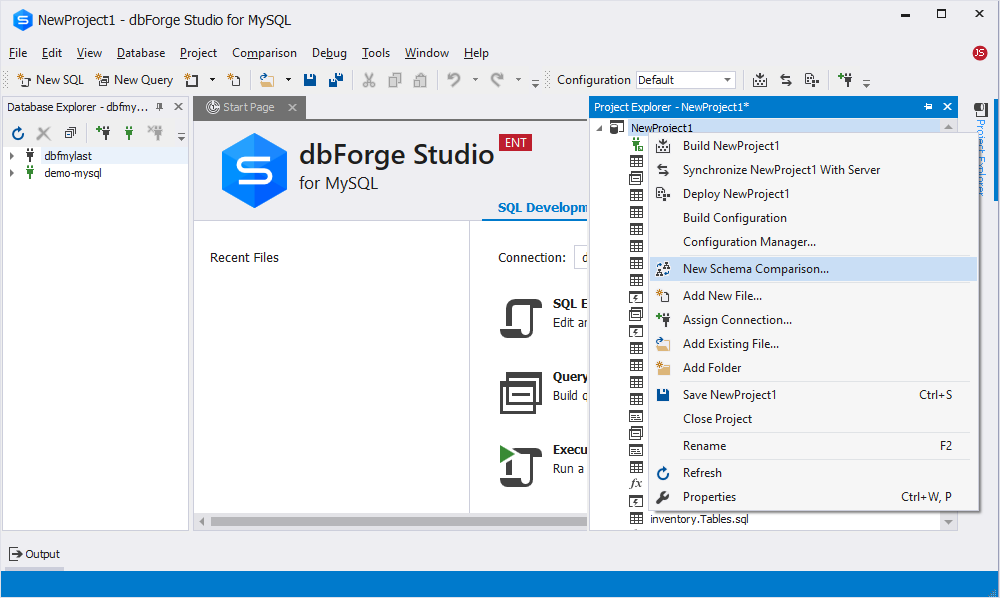
From the shortcut menu, you can manage the files as follows:
- Build and deploy the project
- Synchronize the MySQL project with the server
- Use project configuration to deploy the database to the test or production server
- Add new and existing query files
- Rename or delete database objects
- Edit or delete files in the project
- Add folders and subfolders to the project to distribute multiple files
- Save the project
After the project has been created, you can build it to generate a single script or multiple scripts which can be executed to deploy all the database project changes on the server using the command line. To build the project with the default configuration, select Build [project name] from the shortcut menu.
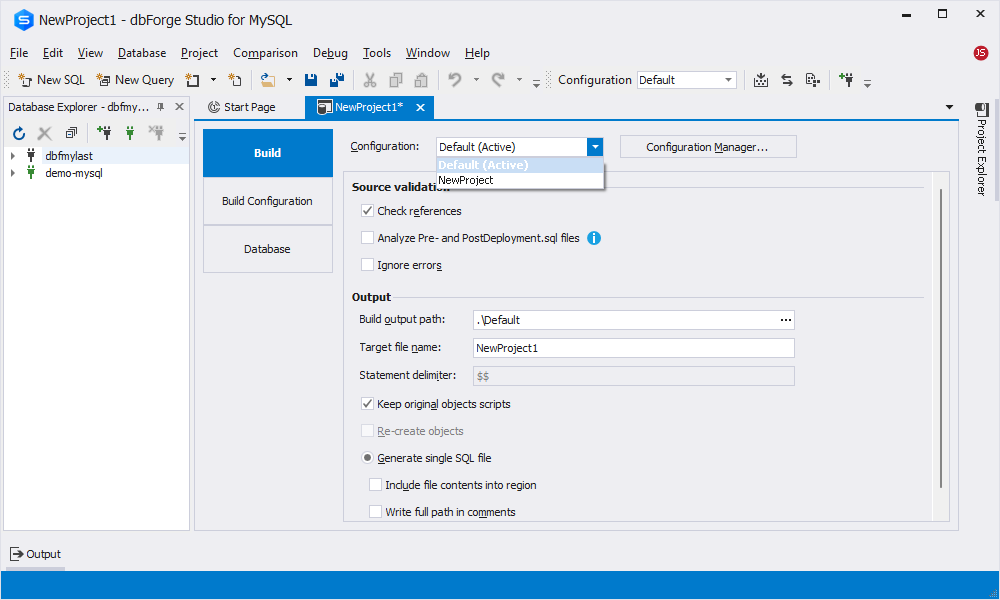
If you want to adjust the build configuration, navigate to the Project menu and select [project name] Properties before building the project. On the Build page, choose the configuration from the Configuration dropdown list. In addition, clicking Connection Manager opens the wizard where you can create, rename, or delete configurations. Adding several configurations will make it possible to deploy the same project to different servers, for example, to the testing and production environments.
On this page, you can also choose whether to generate a single SQL file or a batch script file to automate or schedule some repetitive tasks from the command line.
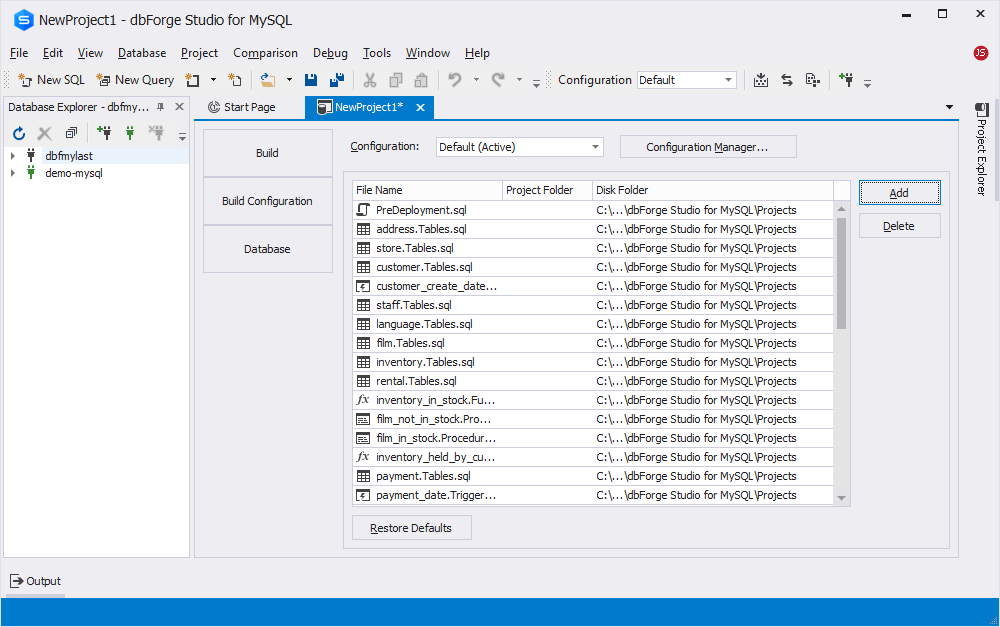
To move on, navigate to the Build Configuration page. Here you can add or delete project files.
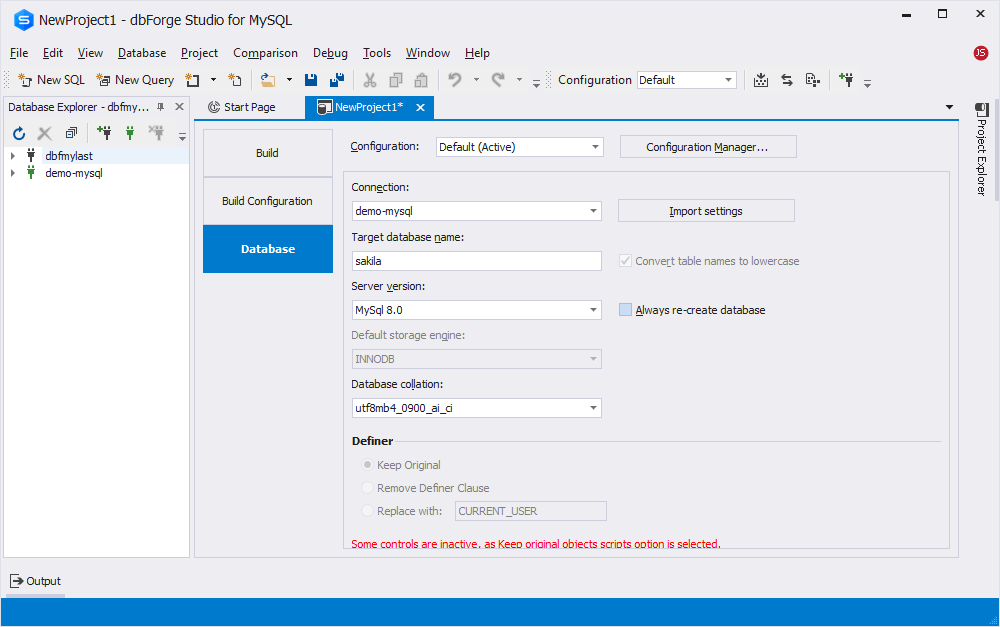
On the Database page, you can set target database settings such as a target database name and a server version. To maintain database integrity, select the Always re-create database checkbox.
Now, you can start the project build by clicking Build. This will generate a script which will be stored in the default subfolder of the project folder. However, you can specify a different folder if needed.
After that, you can deploy the project or only the changes by executing the build script using the project or other connection. To deploy the project, in Project Explorer, right-click the project and select Deploy [project name].

As for deploying the changes made to the project, first, you need to compare your project with the database on the target server and then create a schema synchronization script that will deploy the changes to the server upon execution.
While working with the project on the fly, in Project Explorer, right-click the project and select Synchronize Project with Server. This will run the comparison and open the schema comparison document with comparison results.
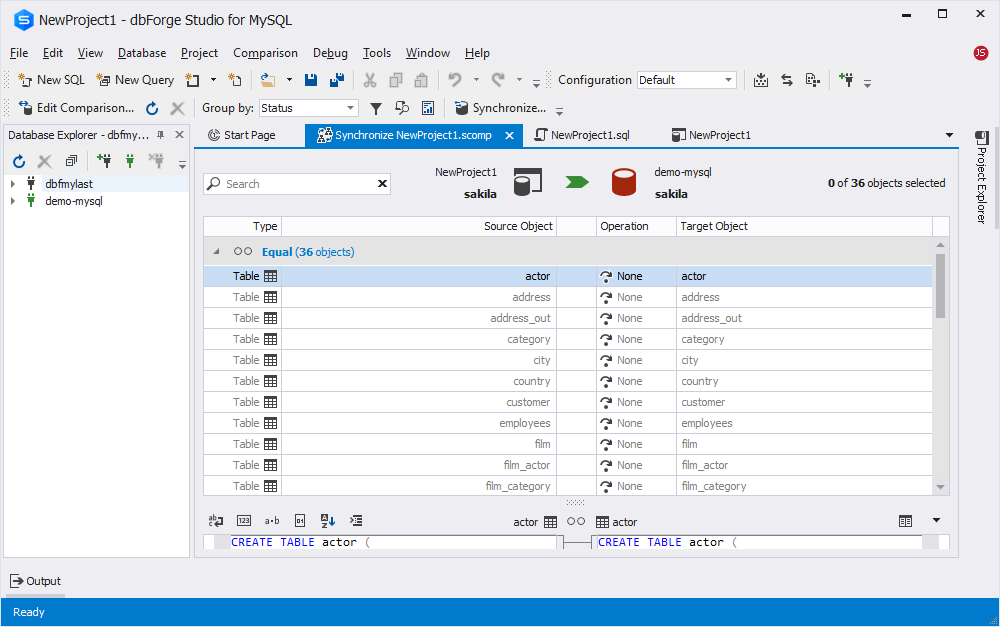
In the document, click Synchronize objects to the target database on top of the schema comparison document and then select Execute the script against the target database in the Schema Synchronization Wizard. To immediately deploy the changes to the database, click Synchronize.
How to set up schema comparison and synchronization
If you need to ensure that the MySQL database project matches the actual database schema on the target server, you can run the synchronization of the database with your project using the Schema Comparison/Synchronization Wizards available in dbForge Studio. The tool will generate a synchronization script to deploy the changes. In addition, the Studio allows for saving the configuration settings for further use in the command line.
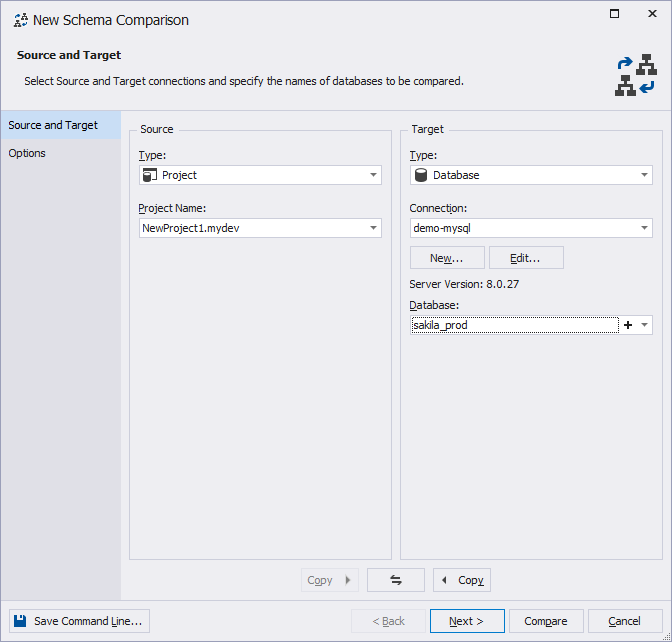
So, to synchronize the project with the database, navigate to the Comparison menu on top and select New Schema Comparison. In the New Schema Comparison wizard, select Project as a source type and Database as a target type. Under Source, choose the project you want to synchronize with the database. Under Target, choose the server connection and the database you want to compare.
If you want to customize default schema comparison options, go to the Options page and select the corresponding checkboxes. To run the comparison, click Compare.
Note that the project is automatically built during comparison. So, in case of any errors, the comparison operation will fail.
After that, the document with the comparison results opens where the changes to the database objects are displayed as groups: Only in Source, Different, and Only in Target. Each group contains the database objects and operations to be performed on them. Clicking the object in the Different group will allow you to view and analyze the differences.
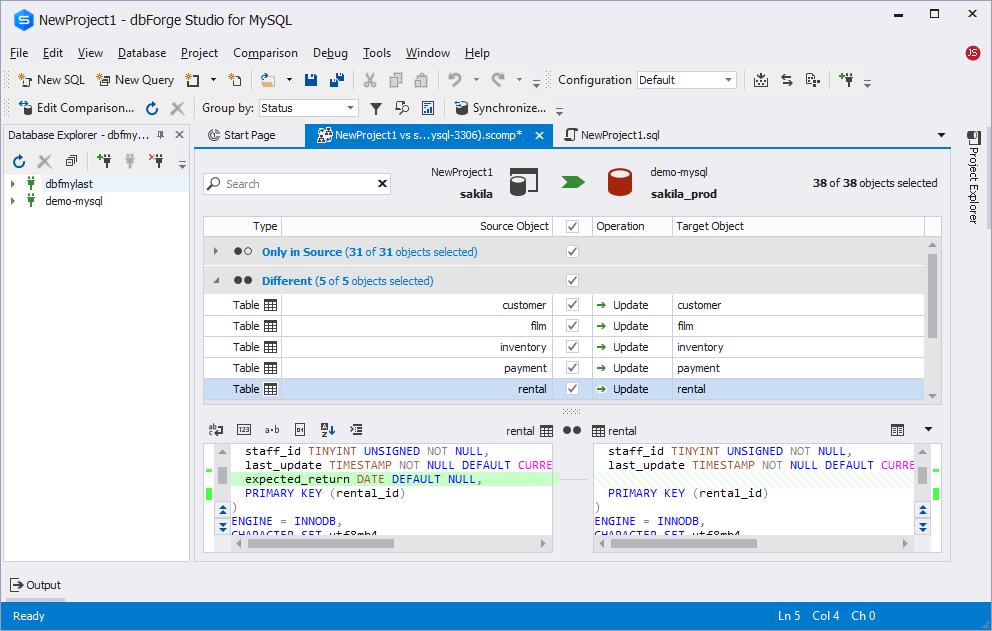
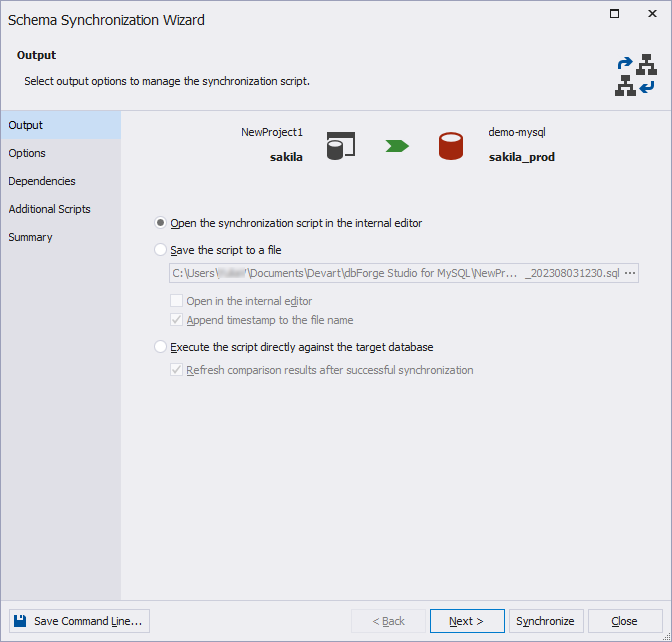
To initiate the synchronization of the project with the database, click Synchronize objects to the target database on top of the document. In the Schema Synchronization Wizard that opens, select the output option to manage the synchronization script, such as opening in a SQL editor, saving for later use, or running against the database immediately. To proceed, click Synchronize.
Automate MySQL deployments using the command line
Alternatively, you can automate and schedule schema comparison and synchronization through the command line. To do this, start the Command Prompt and switch to the dbForge Studio for MySQL installation folder where the dbforgemysql.com file is located. Then, type dbforgemysql.com and all the arguments that represent the actions you want to perform. To run the process, press ENTER.

You can add the arguments in the following ways:
- Type the arguments directly in the Command Prompt:
/schemacompare /source host: database: [port:port] user: [password:password] [charset:charset] /target host: database: [port:port] user: password:password[charset:charset] - Specify a path to the comparison document that contains the connection and comparison settings:
/schemacompare /compfile:file_name.scomp
- Specify the path to the file with the command line arguments. This file can be created in any third-party editor or using the Studio.
/argfile:"file_name.txt"
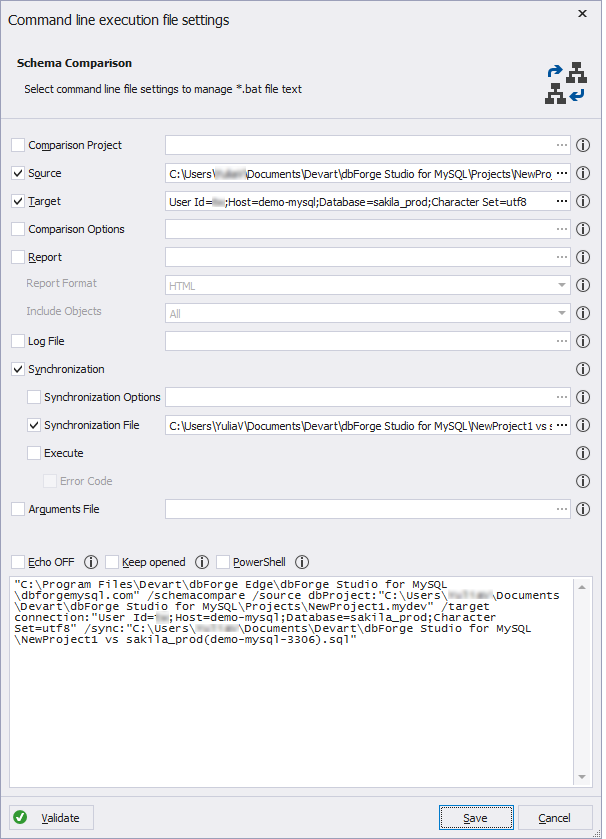
In the latter case, the batch file with the command line arguments is generated. This will help you avoid repeatedly configuring parameters each time you need to perform the task. To generate the file for schema comparison, click Save Command Line in the Schema Synchronization Wizard.
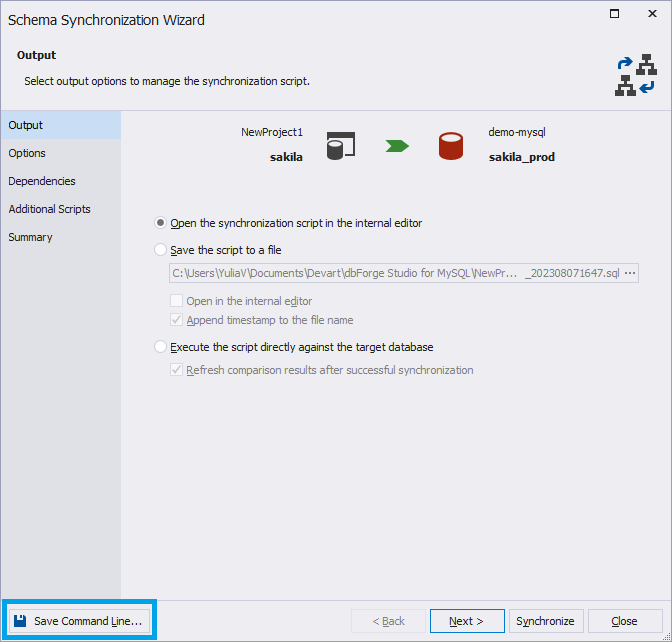
Then, in the Command line execution file settings, select the checkboxes that represent the argument, click Validate to check the validity of the command-line syntax, and save the file. By the way, you can also copy the text with arguments and paste it into the Command Prompt to execute.
MySQL deployment case studies
Now, let’s consider some other cases to deploy the database in MySQL.
Database deployment to the remote MySQL Server
For database deployment, you can also use the mysqldump command-line utility. Before proceeding with the deployment, ensure you have access credentials to the remote MySQL server, including the hostname (or IP address), username, and password. Also, you need to create an empty database on the target server.
To get started, create a backup of the required MySQL database to avoid any potential data loss during the process.
mysqldump --host=dbfmylast --user=root --port=3306 --p --database_name > D:\backup_filename.sqlThis command will generate a backup file of the specified database, including its structure and data, to a backup_filename.sql file. Then, import data from the backup file to the empty database created on the target server by executing the mysql command:
mysql --host=dbfmylast --user=root --port=3306 -p empty_database_name < D:\backup_filename.sqlAzure Database deployment for MySQL Server
With dbForge Studio for MySQL, you can configure, save, deploy, and automate database transfer to Azure databases. To achieve this, open the Studio and connect to Azure Database for MySQL. After that, depending on the goals of your transfer, you can implement the database transfer using different functionalities available in dbForge Studio:
- The Backup and Restore functionality allows you to create a backup of the MySQL database and then restore it in Azure Database for MySQL.
- The Copy Databases functionality helps you migrate several databases to Azure databases.
- Schema Comparison and Data Comparison functionality helps you move specific tables and data to the Azure database. First, you create an empty database in Azure Database for MySQL and then synchronize it with the source MySQL database using the Schema Comparison functionality and the Data Comparison functionality to migrate the schemas and data.
Conclusion
In the article, we have made a brief overview of the database deployment in MySQL. We have covered how to deploy MySQL databases using dbForge Studio for MySQL, namely the Database Projects feature and Schema Comparison/Synchronization wizards. Also, we examined how to automate database deployment using a synchronization script generated with the help of the Studio.
Try the ultimate and versatile functionalities that dbForge Studio has to offer by downloading our trial version. Enjoy the full-featured IDE for free, available to you for 30 days.