
Before we discuss how to migrate from Oracle to SQL Server, let us understand what data migration is and when it may be used. This process involves exporting data from the source location, modifying if needed, and then transferring it to a destination location. In other words, data migration is moving data between database objects or servers.
Data migration serves different purposes, one of which is optimizing performance. For example, organizations might need to move data to other storage systems or reorganize database structures to improve query performance. In addition, an increasing number of database migrations from on-premises servers to cloud-based platforms are driven by cost reduction, scalability improvements, and enhanced disaster recovery capabilities.
During the data transfer, companies often use migration or data import/export tools, such as dbForge Studio, whose distinctive feature among migration multiple tools is importing data from various sources, including ODBC connections.
In the article, we’ll examine how to move data from Oracle to a SQL Server database using dbForge Edge and Devart ODBC Driver for Oracle.
Contents
- Prerequisites
- Understanding ODBC and its role in data migration
- Setting up the connection
- Preparing for data import
- Selecting the data source and destination
- Configuring the data import settings
- Generating SQL scripts with data import
- Executing the data migration
Prerequisites
To ensure a smooth migration of a schema, a table, and data, download and install the following tools:
- dbForge Edge, a perfect solution for those developers who often work with multiple database management systems simultaneously. It includes four Studios: dbForge Studio for SQL Server, dbForge Studio for Oracle, dbForge Studio for MySQL, and dbForge Studio for PostgreSQL. So, instead of downloading each IDE separately, users can opt for dbForge Edge, which is packed with all these Studios.
- Devart ODBC Driver for Oracle, a simple tool to access Oracle databases from ODBC-compatible tools on 32-bit and 64-bit Windows, macOS, and Linux. After downloading the driver, install it using the instructions from the How to Install and Configure ODBC Drivers on Windows blog article.
Understanding ODBC and its role in data migration
Let us first identify how ODBC can influence data migration. ODBC acts as a bridge between the source and target databases, allowing them to interact with each other. Its platform-independent interface enables applications to access data regardless of the database management system used. This flexibility also applies when working with customer platforms. Teams might begin with a zendesk export to retrieve support data before migrating it into SQL Server or other databases.
This means you can migrate data between different DBMS platforms, for example, from Oracle to SQL Server, using ODBC without the need to rewrite code for each system.
Here are more points on how ODBC operates in data migration:
- ODBC facilitates data extraction from the source database, allowing applications to send SQL queries to retrieve specific datasets. The extracted data can then be prepared for migration to the target database.
- ODBC supports data transformation by enabling applications to modify data retrieved from the source database before loading it into the target database.
- ODBC facilitates the loading of transformed data into the target database by providing methods for inserting, updating, or deleting records.
- ODBC drivers help speed up the transfer of large volumes of data between databases, reduce downtime, and improve overall efficiency.
- ODBC is widely supported by database management tools, ETL (Extract, Transform, Load) software, and programming languages, making it versatile and compatible with various technologies commonly used in data migration projects.
To sum up, data migration without ODBC would be like trying to communicate in a foreign language without a translator – confusing and prone to errors.
Setting up the connection
Let us begin by configuring a data source name (DSN) for the ODBC driver, which will serve as a connection to the Oracle server during data import using dbForge Studio for SQL Server, which is a part of dbForge Edge.
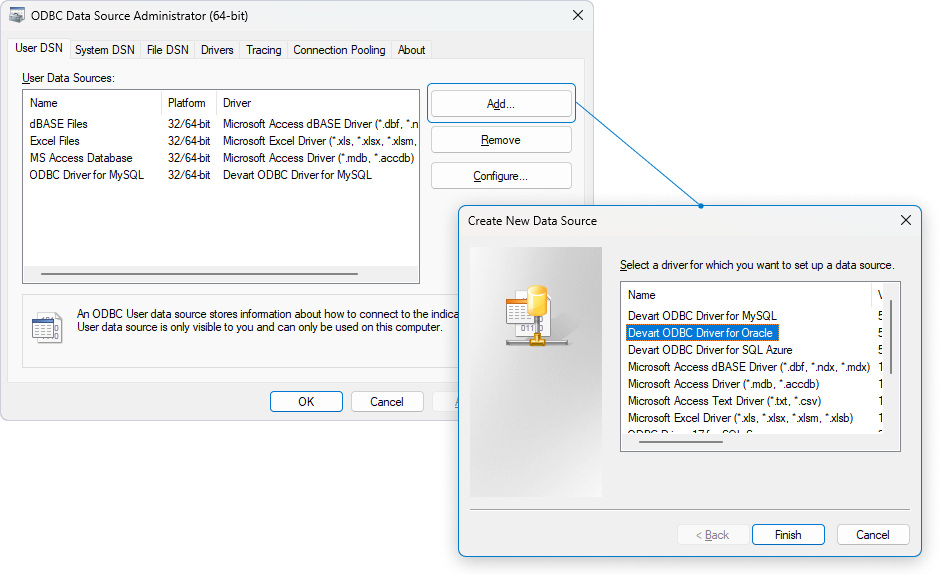
To proceed, open the Data Source Administrator utility. In our example, we use the 64-bit version of the ODBC Data Source Administrator to create a DSN for our ODBC driver.
In the dialog that opens, navigate to User DSN to limit access to DSN only to the user who created it in the system, or go to System DSN to make it accessible to any user logged in to the system. Then, click Add to select a driver you want to set up a data source. In the window that opens, choose Devart ODBC Driver for Oracle and click Finish.
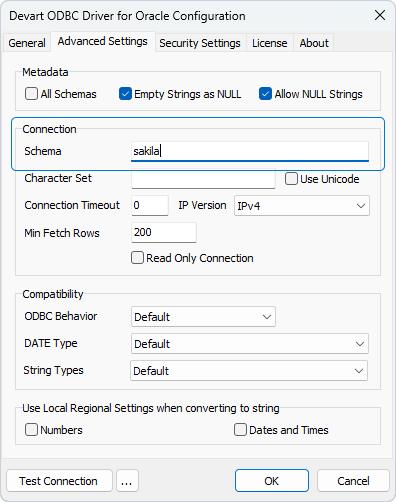
This will open the Devart ODBC Driver for Oracle Configuration dialog, where you need to enter a name for the data source and specify the Oracle hostname or IP address, port number, database name, username, and password.
The Advanced Settings tab allows you to specify the required Oracle schema to exclude unnecessary data and display only specific tables from a single schema.
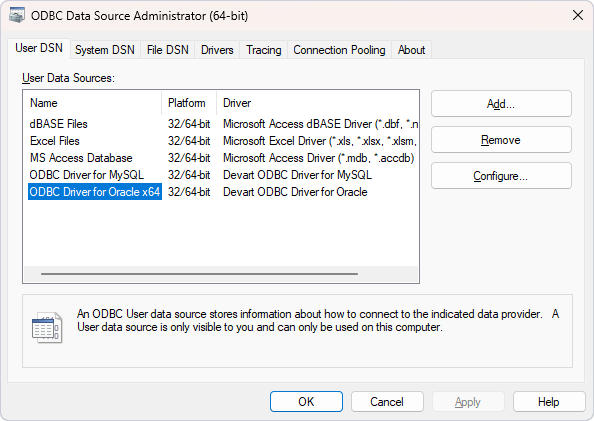
To verify that the connection has been correctly installed and configured, click Test Connection and click OK in the pop-up window. To save the DSN, click OK.

The DSN you created will appear in the ODBC Data Source Administrator utility. Click OK to close the dialog.
We have set up the connection, and now we can proceed with the data import process. In this article, we’ll use two Studios from dbForge Edge: dbForge Studio for Oracle and dbForge Studio for SQL Server. Within the Studio for Oracle, we’ve already set up and populated a sample source table – STUDENTS – from which we’ll import data. Meanwhile, the Studio for SQL Server will be used for the whole process of data migration from Oracle to the target oracle_data database.
Preparing for data import
Using dbForge for Oracle, let us now review the data we are going to import into a SQL Server table from the Oracle table.

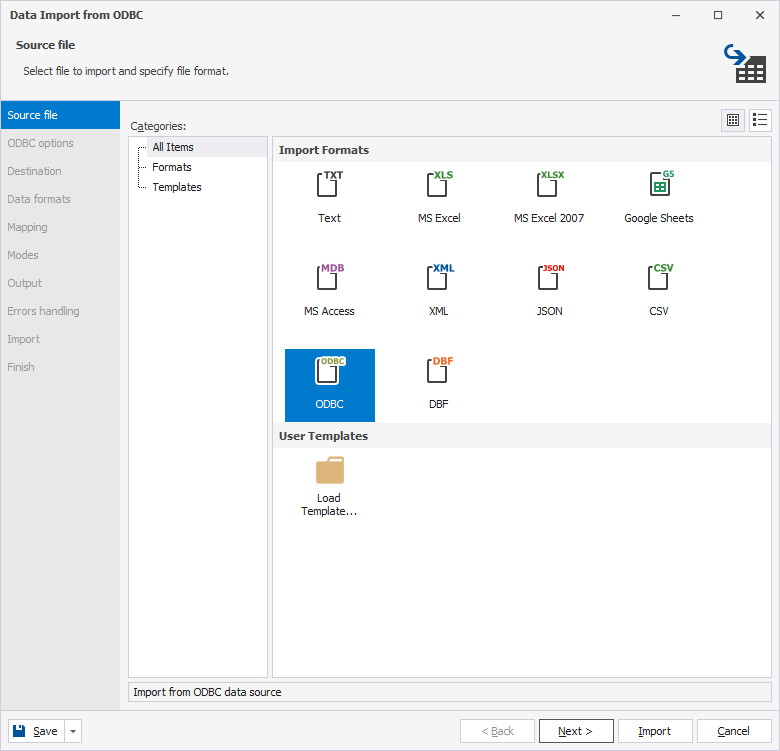
To proceed, open dbForge Studio for SQL Server. The Data Import wizard allows transferring data to a new or existing database. In our example, we’ll migrate Oracle data to a new SQL database – oracle_data.
In Database Explorer, right-click the database into which you want to import data and select Tools > Import Data to open the Data Import wizard.

Selecting the data source and destination
On the Source file page of the wizard that opens, select the ODBC file format and click Next.
On the ODBC options page, set ODBC data providers options for imported data:
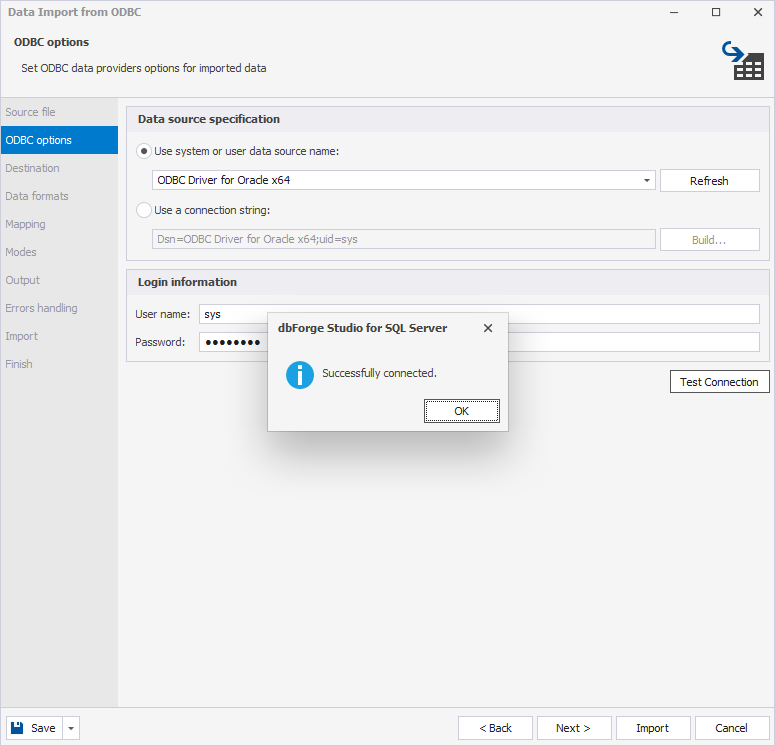
- Under Data source specification, select Use system or user data source name and then select the ODBC driver you’ve configured from the dropdown list.
- Under Login information, enter the username and password to the Oracle server to which the ODBC driver is connected.
- Click Test Connection to verify that the connection has been successfully established. Then, click OK to close the pop-up window.
- Click Next to switch to the next page.
On the Destination page, choose a target table for data import:
- Under Source, select the Oracle source table from which you want to import data.
- Under Target, specify the connection, database, and new or existing table to which you want to transfer data from the source table. Note that if you invoked the Data Import wizard from Database Explorer, the connection and database will be set by default.
- Click Next.

Configuring the data import settings
On the Data formats page, you can adjust data formats or column settings.

On the Mapping page, dbForge Studio automatically maps the columns with the same names. If they are different, you’ll have to map them manually. Since we are migrating the data to a new table, dbForge Studio automatically creates and maps all the columns.
On this page, you can also view the mapped columns with the assigned data types and preview the table with the data to be imported.
If you want to modify the data type, double-click the required column. In the Column Properties window that opens, choose the required data type and click OK to save the changes. For example, double-click the STUDENTID column, change the float data type to the integer data type, and click OK. Here you can also assign a primary key or unique values.

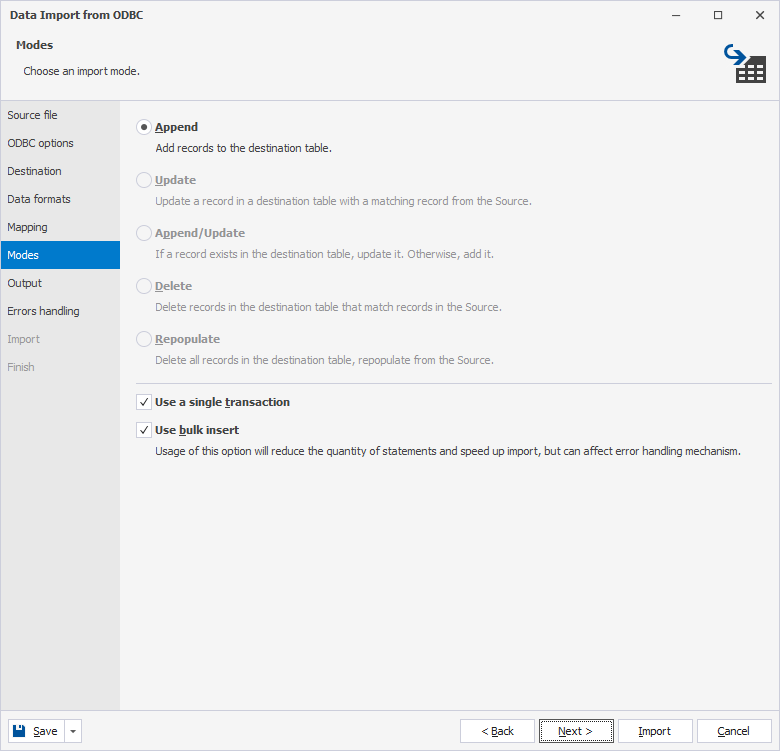
When the data types are mapped, you can specify the import mode on the Modes page, which will define how the data will be imported. If you migrate data to a new table, only the Append mode will be available.
When you transfer data to an existing table, you can choose one of the following modes to import data:
- Append, which adds records to the target table.
- Update, which updates a record in the target table with a matching record from the source table.
- Append/Update, which updates a record if it exists in the target table; otherwise, it adds a record.
- Delete, which deletes records in the target table that match records in the source table.
- Repopulate, which deletes all records in the target table and repopulates them from the source.
Generating SQL scripts with data import
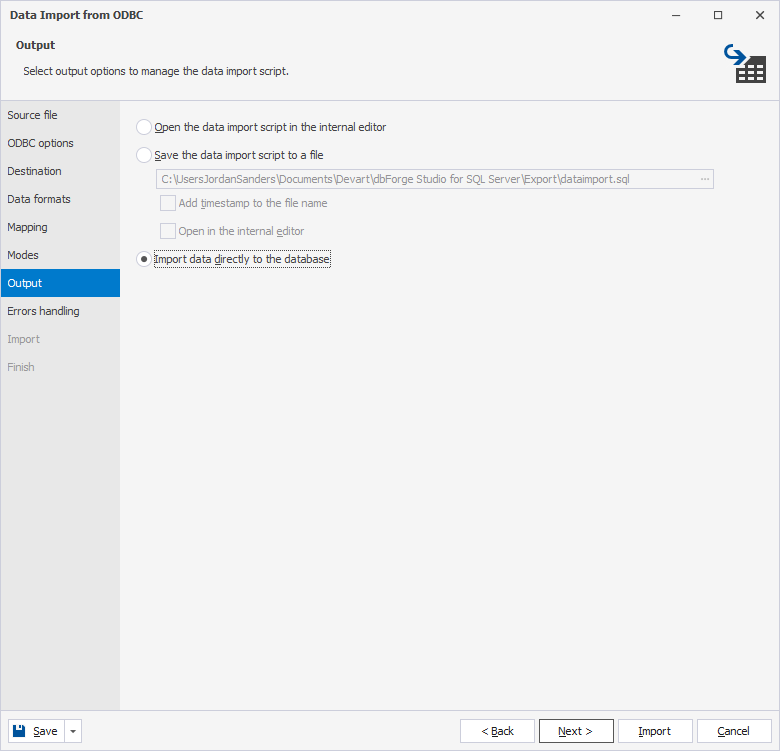
Finally, you need to decide on the data output method. The Data Import wizard allows you not only to populate the table with data but also to generate SQL scripts without modifying the database.
On the Output page of the wizard, there are three options to populate the table with data:
- Open the data import script in the internal editor: After the data import is complete, the tool will open the script generated for data migration in the editor, which you can view, edit, or save for later use.
- Save the data import script to a file: This option will save the generated script to a specified folder. Here you can also add date and time to the file name or open the script in the internal editor after the data import is ended.
- Import data directly to the database: The target table gets populated directly with data from the source table.
So, select one of the options and click Import to run the data import process.
Executing the data migration
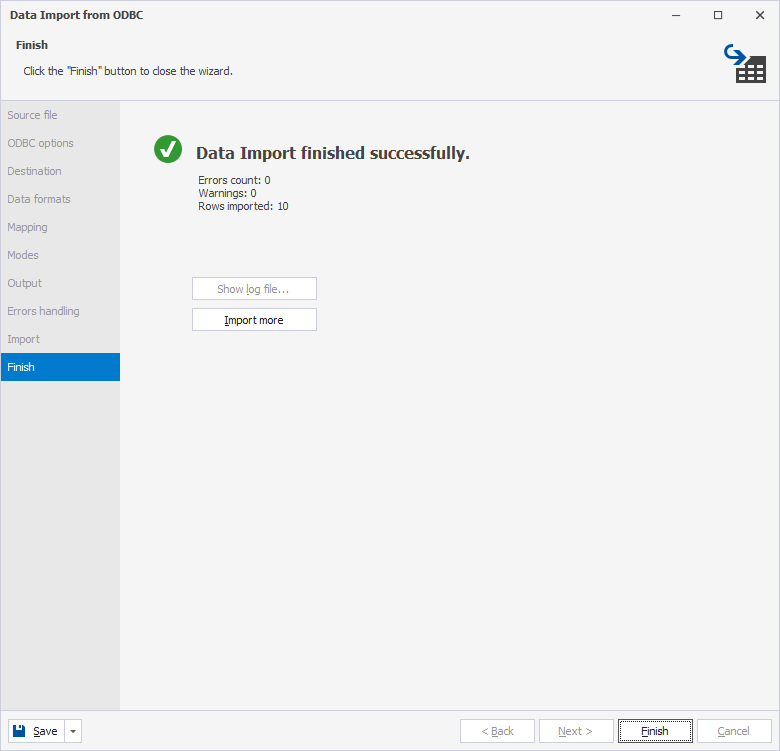
When the data import is over, you’ll see the result, including the number of errors and warnings that might occur and the number of rows imported into the table. Click Finish to close the wizard.
Let us now retrieve the data from the STUDENTS table in the oracle_data SQL Server database to ensure that it has been successfully migrated.

Great! The results grid displays the data transferred from the Oracle table.
Conclusion
In summary, using the Devart ODBC driver for Oracle along with dbForge Edge makes data migration from Oracle to SQL Server easier and faster. dbForge Edge enhances this migration by offering a powerful set of tools, including the Data Import wizard, which facilitates efficient data import and export. This wizard simplifies the transfer process for developers and ensures that data is migrated quickly and with minimal errors.
So, don’t hesitate to download and install these tools to explore their features and capabilities within a 30-day trial period. You’ll discover that they are invaluable assets for your daily database development, administration, management, and deployment tasks.
