
In SQL, triggers allow developers to automate actions based on events within the database, such as INSERT, UPDATE, or DELETE operations. They can also be useful for maintaining database integrity and maintaining code accuracy. Still, you should be careful when using them since they may impact database performance.
In this article, we’ll make a brief overview of SQL triggers and events that can initiate them. We’ll also explore how to create and manage triggers in SQL using dbForge Studio for SQL Server and review some scenarios where triggers might be handy.
Contents:
- What are SQL triggers?
- Understanding trigger events
- Creating and managing triggers in SQL Server
- Managing triggers with dbForge Studio
- Advanced trigger use cases
- Common pitfalls and best practices
What are SQL triggers?
SQL triggers are database objects that automatically execute a defined set of SQL statements when certain events occur on a table or view. For example, you can create a trigger that updates the inventory count in a products table when a new order is inserted into the orders table.
Triggers are also considered a fundamental part of SQL basics for interview preparation, as they demonstrate how relational databases handle automation and maintain data integrity behind the scenes. If a tied table or view is deleted from the database, all associated triggers are also removed.
Now, let’s explore the types of triggers SQL supports based on the events they respond to. These include:
DML (Data Manipulation Language) triggers
They are fired when an associated data manipulation event occurs, such as INSERT, UPDATE, or DELETE operations. The triggers can be divided into:
- AFTER triggers, which are executed after updating database data. They are often used for logging or auditing tasks.
- BEFORE triggers, which are activated before updating database data. They are used for validating data or addressing rules before the data is committed to the database.
- INSTEAD OF triggers, which skip a DML statement and execute instead other statements defined in the trigger.
DDL (Data Definition Language) triggers
They respond to changes in the database structure. The CREATE, ALTER, or DROP events can launch these triggers.
Logon triggers
They are fired in response to a user logging into the SQL Server. The LOGON event can initiate these triggers.
Stored procedures can also automate database-related tasks as triggers do. They both enhance business logic, making it reusable and easier to manage, as well as control access and maintain consistency within the database. Still, they differ significantly in how they are executed and used:
- Triggers are run automatically and implicitly when you perform the INSERT, UPDATE, or DELETE operation, while stored procedures must be explicitly called by a user, application, or another stored procedure.
- Triggers are tied to specific tables, views, or events and cannot be activated independently. In contrast, stored procedures are not required to be bound to any defined database object.
- Triggers do not accept parameters; they operate within the context of the event that fired them. However, stored procedures can accept input and output parameters, which allows for more dynamic and flexible operations.
- If the transaction rolls back, the trigger actions are also rolled back. In contrast, stored procedures can explicitly manage transactions, including BEGIN, COMMIT, and ROLLBACK operations.
Understanding trigger events
The following events can initiate triggers:
- INSERT that occurs when a user adds a new record to a table. Triggers set on this event can perform operations, such as validating data, updating related tables, or logging the insertion.
- UPDATE that is triggered when a user modifies data in a table. Triggers for this event are commonly used to ensure data consistency, calculate derived values, or track changes by recording them in an audit table.
- DELETE that occurs when a user removes a record from a table. Triggers on this event can be used to prevent deletions under specific conditions or log the deletion activity.
Creating and managing triggers in SQL Server
Let us move on from theory to practice and see how to create and manage triggers in SQL. To create a DML, DDL, or logon trigger, you can use a CREATE TRIGGER statement. The syntax would be as follows:
CREATE TRIGGER [schema_name.]trigger_name
ON table_name
{FOR | AFTER | INSTEAD OF} {[INSERT] [,] [UPDATE] [,] [DELETE]}
AS
{sql_statements}
where:
schema_nameis the name of the schema to which a DML trigger belongs. Note thatschema_namecannot be used for DDL and LOGON triggers.trigger_nameis the name of the trigger you want to create. Note that it must be unique within the schema.table_nameis the table or view to which the trigger is tied.{FOR | AFTER | INSTEAD OF}are keywords that define when the trigger is executed in relation to the triggering event.FOR | AFTERspecifies that the DML trigger executes after the INSERT, UPDATE, or DELETE operation has been completed successfully. Note that theAFTERtriggers cannot be defined on views.INSTEAD OFspecifies that the DML trigger executes instead of the triggering SQL statement, thus, overriding the actions of the triggering statements. Note thatINSTEAD OFcannot be defined for DDL or logon triggers.{ [ DELETE ] [ , ] [ INSERT ] [ , ] [ UPDATE ] }specifies the events that will fire the execution of the trigger. Note that at least one option must be set.{sql_statements}are SQL statements that will be executed when the defined DML, DDL, or logon events occur, provided the conditions within these statements are met.
To update the trigger, you can use the ALTER TRIGGER statement:
ALTER TRIGGER trigger_name
ON table_name
[AFTER | INSTEAD OF] [INSERT, UPDATE, DELETE]
AS
BEGIN
    -- Trigger logic here
END;
To stop the execution of the trigger, you can use the DROP TRIGGER statement, which requires only the name of the trigger you want to remove:
DROP TRIGGER trigger_name;Let us see how to create and update a trigger in SQL Server.
Worked example: How to create a SQL trigger
Suppose we want to record any changes entered into the TotalDue column of the Sales.SalesOrderHeader table and insert them into the Sales.SalesOrderAudit table. To do this, we create a trigger by executing the CREATE TRIGGER query:
CREATE TRIGGER trgLogTotalDueChanges
ON Sales.SalesOrderHeader
AFTER UPDATE
AS
BEGIN
    -- Insert records into Audit table for any updates to TotalDue
    INSERT INTO Sales.SalesOrderAudit (SalesOrderID, OldTotalDue, NewTotalDue, ChangeDate)
    SELECT
        i.SalesOrderID,
        d.TotalDue AS OldTotalDue,
        i.TotalDue AS NewTotalDue,
        GETDATE() AS ChangeDate
    FROM
        inserted i
    INNER JOIN
        deleted d ON i.SalesOrderID = d.SalesOrderID
    WHERE
        i.TotalDue <> d.TotalDue;
END;
So, when you modify the existing values in the TotalDue column of the Sales.SalesOrderHeader table, the trigger is fired. It checks if the TotalDue value has been changed by comparing the old TotalDue value (from the deleted table) with the new TotalDue value (from the inserted table). If the TotalDue value has been updated, the trigger adds a new record to the Sales.SalesOrderAudit table.
For example, we need to alter the created trigger so it inserts the TotalDue values into the Sales.SalesOrderAudit table only if the difference in TotalDue between the new and old values is greater than 10. To do this, execute the following query:
ALTER TRIGGER trgLogTotalDueChanges
ON Sales.SalesOrderHeader
AFTER UPDATE
AS
BEGIN
    -- Example: Additional condition to check if the change is significant
    -- Only log if the difference in TotalDue is greater than 10
    IF EXISTS (
        SELECT 1
        FROM inserted i
        INNER JOIN deleted d ON i.SalesOrderID = d.SalesOrderID
        WHERE i.TotalDue <> d.TotalDue
        AND ABS(i.TotalDue - d.TotalDue) > 10
    )
    BEGIN
        -- Insert records into Audit table for significant updates to TotalDue
        INSERT INTO Sales.SalesOrderAudit (SalesOrderID, OldTotalDue, NewTotalDue, ChangeDate)
        SELECT
            i.SalesOrderID,
            d.TotalDue AS OldTotalDue,
            i.TotalDue AS NewTotalDue,
            GETDATE() AS ChangeDate
        FROM
            inserted i
        INNER JOIN
            deleted d ON i.SalesOrderID = d.SalesOrderID
        WHERE
            i.TotalDue <> d.TotalDue
            AND ABS(i.TotalDue - d.TotalDue) > 10;
    END;
END;
Managing triggers with dbForge Studio
Now let us see how easy it is to create, modify, or delete a trigger in dbForge Studio for SQL Server. Before you start, ensure that the following permissions are met:
- TRIGGER privilege on the proper database
- SELECT, INSERT, ALTER, UPDATE, SELECT, and DELETE privileges on the proper table(s).
You can create a trigger using the following ways:
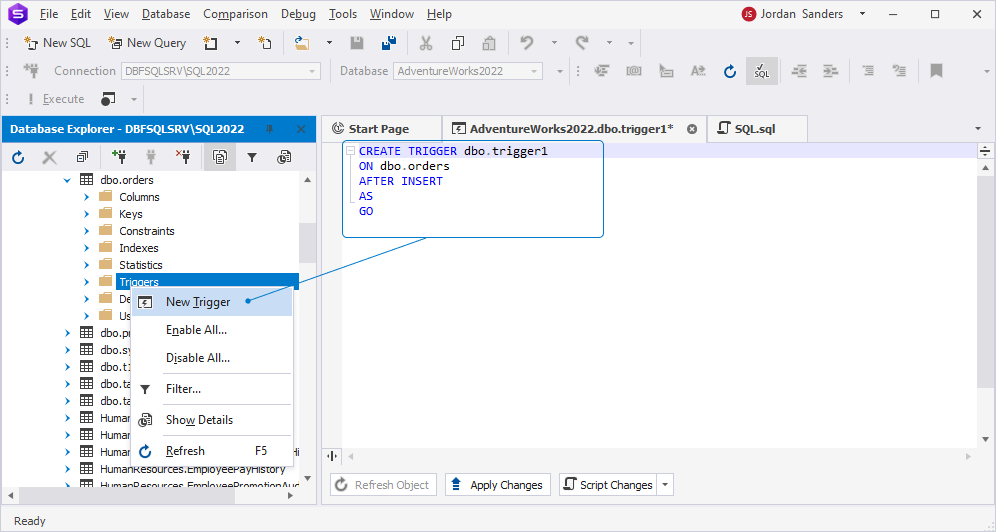
- CREATE TRIGGER statement:
In Database Explorer, expand the table node on which you want to create a trigger, right-click the Triggers folder, and select New Trigger. This will open a Code Editor document, where you need to enter a trigger name and fill in the body of the script to define the trigger.
- CreateTrigger snippet:
On the standard toolbar, click New SQL to open the Code Editor document. Then, right-click anywhere in the document and select Insert Snippet. In the snippets list that appears, double-click CreateTrigger.
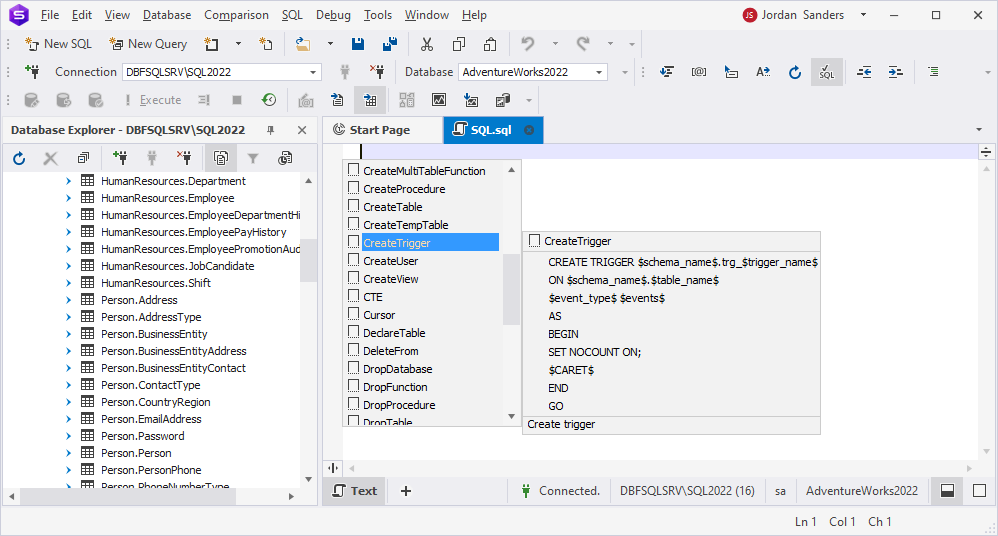
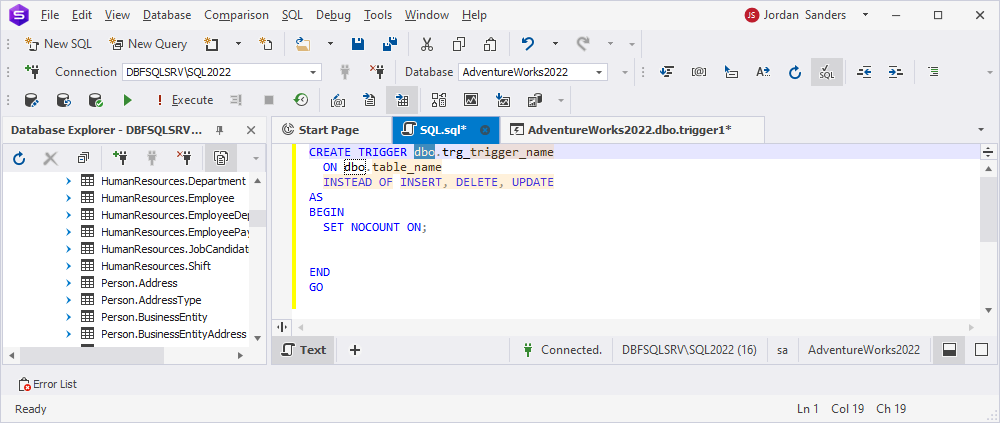
This will insert the following code into the document, which you can modify per your needs and then save the changes:
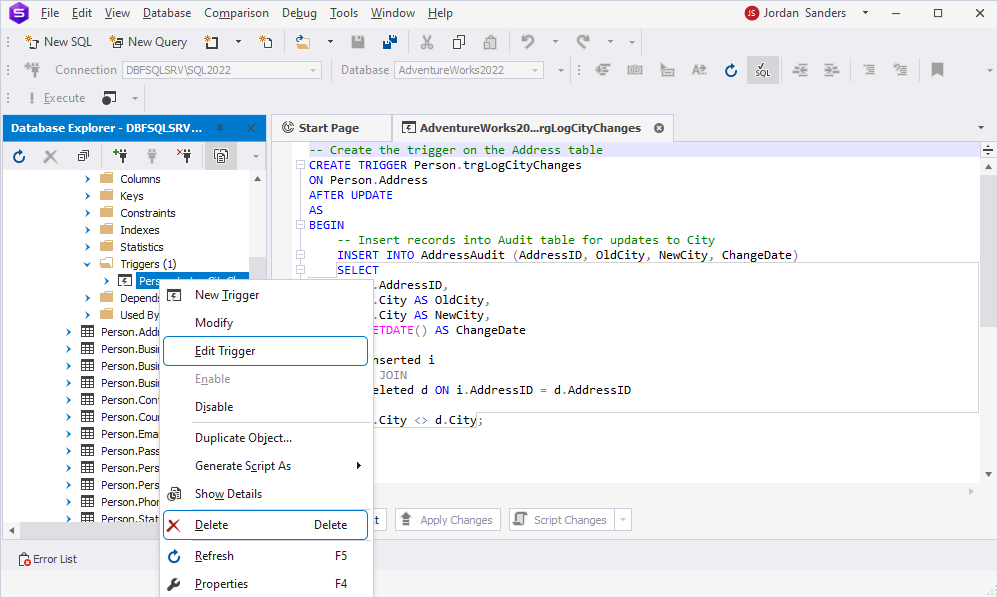
If you want to edit or delete a trigger, in Database Explorer, expand the table folder on which the trigger to edit exists. Then, expand the Triggers table, right-click the trigger to modify, and select Edit Trigger. The trigger will open in a new SQL document, where you can update the query. Save the document to apply the changes. To drop a trigger, right-click the trigger to drop and click Delete.
To enable or disable all triggers, select Enable All or Disable All on Database Explorer > database_name > table_name > Triggers folder.
In addition to code snippets, dbForge Studio offers other advanced features that make it a perfect tool for database administrators, developers, and analysts, including:
- Intelligent code completion and syntax highlighting, which help users write SQL queries accurately and errorlessly.
- Visual Query Builder that allows users to create complex SQL queries without writing code using a drag-and-drop feature.
- Database Diagram that allows visually creating databases.
- Data Import/Export, which allows importing and exporting data between different formats, such as TXT, XLS/XLSX, XML, CSV, JSON, HTML, RTF, and others.
- Data/Schema Compare tools that allow users to detect differences between data/schemas and synchronize them.
- Data Generator that can automatically generate large datasets for testing purposes.
- Source Control that can integrate with popular source control systems, such as Git, SVN, and TFS, in order to manage and track database changes.
- Query Profiler that analyzes and visualizes query performance, helping to identify and address slow-running queries.
- DevOps Automation tool that allows automating the database development process and speeding up the deployment of database changes.
Advanced trigger use cases
In this block, we’ll provide some scenarios that show how triggers can improve productivity and performance.
Scenario 1: Track all promotions of employees by logging changes in their job titles.
First, create an audit table that will store promotion details about employees:
CREATE TABLE HumanResources.EmployeePromotionAudit (
    EmployeeID INT,
    OldJobTitle NVARCHAR(50),
    NewJobTitle NVARCHAR(50),
    PromotionDate DATETIME
);
Then, create the trigger on the Employee table that contains all details about employees:
CREATE TRIGGER trgTrackPromotions
ON HumanResources.Employee
AFTER UPDATE
AS
BEGIN
INSERT INTO HumanResources.EmployeePromotionAudit (EmployeeID, OldJobTitle, NewJobTitle, PromotionDate)
SELECT
d.BusinessEntityID,
d.JobTitle AS OldJobTitle,
i.JobTitle AS NewJobTitle,
GETDATE() AS PromotionDate
FROM
inserted i
INNER JOIN
deleted d ON i.BusinessEntityID = d.BusinessEntityID
WHERE
i.JobTitle <> d.JobTitle;
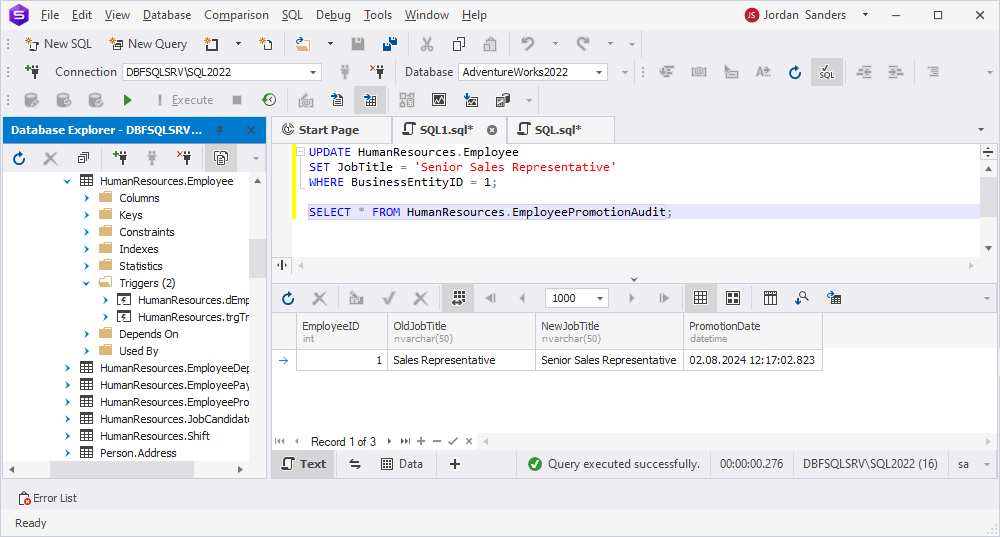
END;Next, update the job title of the employee with BusinessEntityID 1 in the HumanResources.Employee table: the employee was Sales Representative and was promoted to Senior Sales representative:
UPDATE HumanResources.Employee
SET JobTitle = 'Senior Sales Representative'
WHERE BusinessEntityID = 1;
Finally, check the HumanResources.EmployeePromotionAudit table to ensure that the promotion was logged. To do this, retrieve the data from the table:
SELECT * FROM HumanResources.EmployeePromotionAudit;In the output, we see that the HumanResources.EmployeePromotionAudit table now contains an updated job title for the employee with the EmployeeID #1:
Scenario 2: Automatically update shipment status to Shipped when an order is completed.
Begin with creating the trigger to update the shipment status automatically:
CREATE TRIGGER trgUpdateShipmentStatus
ON Sales.SalesOrder
AFTER UPDATE
AS
BEGIN
UPDATE Sales.SalesOrder
SET ShipmentStatus = 'Shipped'
WHERE SalesOrderID IN (
SELECT SalesOrderID
FROM inserted
WHERE Status = 'Completed'
);
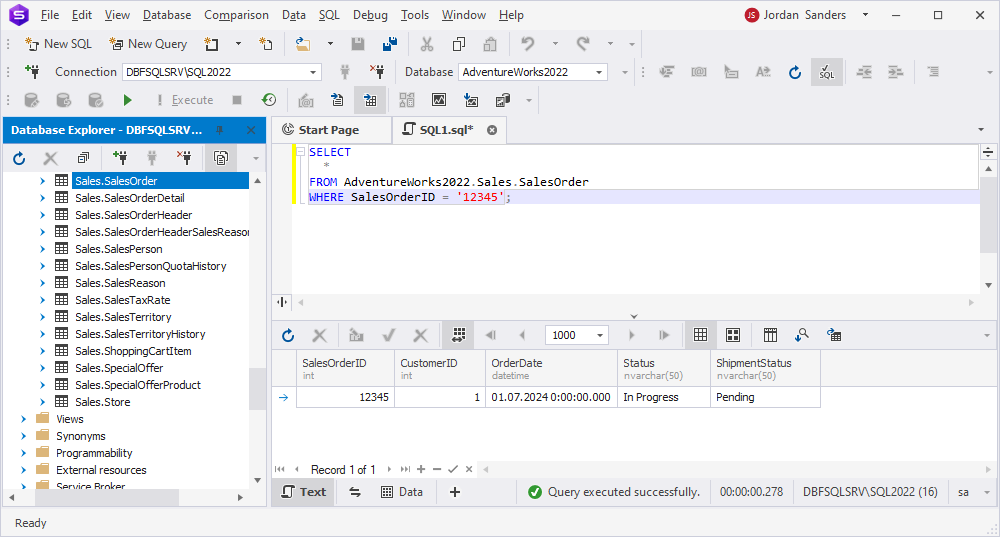
END;Next, check the order status with the SalesOrderID = 12345. As you can see, the order status is In Progress, and the shipment status is Pending.
Now, we update the order status from In Progress to Completed because order #12345 has been delivered:
UPDATE Sales.SalesOrder
SET Status = 'Completed'
WHERE SalesOrderID = 12345;
To check that the trigger has been activated and updated the shipment status in the SalesOrder table, execute the SELECT query:
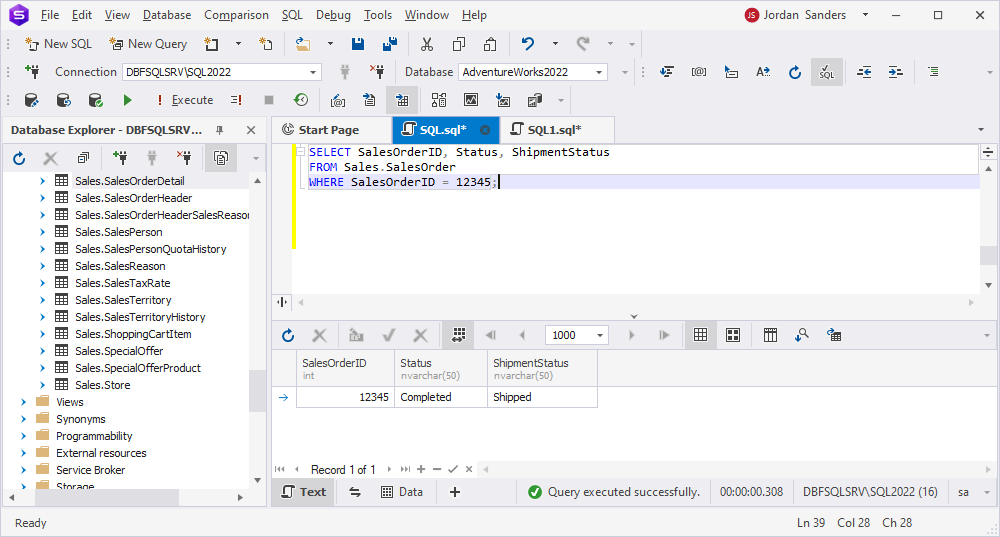
As you can see from these examples, triggers greatly improve the process of updating details. They prevent us from the need to manually enter order information multiple times. Instead, updating a single entry automatically triggers the DML operation, which in turn updates the relevant data in another row, thus, ensuring data consistency in the database.
Common pitfalls and best practices
By following common pitfalls and the best practices of SQL triggers, you can effectively use triggers to automate your database operations and increase your productivity, maintain data integrity, and reduce the risk of errors:
Common pitfalls
- Triggers may affect database performance, especially when using DML operations with complex logic or multiple tables involved.
- Triggers can cause locks on the database, which, if not managed properly, might lead to delays or even deadlocks.
- Extensive calculations or large dataset operations within triggers can consume a lot of CPU and memory resources.
Best practices
- Design triggers to perform minimal and efficient processing to avoid unnecessary overhead.
- Ensure relevant columns are indexed to speed up operations performed by triggers.
- Avoid nested triggers.
- Use conditions to ensure triggers only run when necessary, reducing unnecessary executions.
- Prevent infinite loops by turning off recursive triggers if your database supports it.
- Set limits on trigger nesting to avoid performance issues.
- Use triggers only when required and consider alternative methods, like application-level logic or scheduled tasks, for tasks that don’t require immediate execution.
Conclusion
To sum up, if you want to automate data manipulation operations and keep your database data consistent, it is a good idea to understand SQL triggers, the issues they may cause, and best practices to efficiently apply them.
Finally, we invite you to get access to a 30-day free trial version of SQL Studio for SQL Server to experience the full range of its advanced features and capabilities.