
MySQL is a popular relational database management system to organize and store data. Depending on your specific use cases and preferences, you can connect to a MySQL Server through a command-line interface, using GUI tools, such as dbForge Studio for MySQL, programming languages or via web-based interfaces such as phpMyAdmin. In addition, you can connect to a MySQL server remotely using SSH or VPN tunnels to ensure a secure connection.
In this article, we’ll give a brief overview of SSH protocol and tunnel, as well as explore how to connect to a MySQL server remotely using the SSH tunnel and SSL created with the help of dbForge Studio for MySQL.
Contents
- Introduction to SSH tunnel
- What is PuTTY?
- PuTTY: Pros and Cons
- Advantages of MySQL secure connection
- How to access a MySQL server remotely by creating an SSH tunnel with PuTTY
- How to connect to the MySQL server through PuTTY using dbForge Studio for MySQL
- Benefits of using a GUI tool to connect to MySQL

Introduction to SSH tunnel
SSH, also known as Secure Shell, is a network communication protocol to connect to a remote host over the internet in an encrypted manner.
The SSH protocol operates on the client-server model, which means that the connection to the SSH server is created by the SSH client directly without being intercepted by third parties. The protocol uses authentication to enable communication between two remote systems – host and client – through a secure encrypted channel. The host is the remote server to access, while the client is the computer to be used to access the host.

SSH tunnelling, also known as SSH port forwarding, is a technique that uses SSH to create an encrypted connection between a client and a server. Users specify a source port on their local machine and a target port on the remote machine and configure the SSH client to forward traffic from the source port to the target port via the encrypted tunnel.
Some SSH clients include OpenSSH, a free and open-source implementation of the SSH protocol available on most Linux-based systems, and PuTTY, a popular SSH client for Windows. Let’s dive into a better understanding of PuTTY, its advantages and disadvantages, and how to connect a MySQL server remotely using PuTTY and dbForge Studio for MySQL.
What is PuTTY?
PuTTY is a free and open-source client application that supports multiple network protocols including SSH, Telnet, rlogin, and SCP. It is mostly used on Windows computers to connect users to other network devices such as switches, routers, or remote servers.
In other words, PuTTY can be used to transfer commands to the server. That is you connect to the server using the configured PuTTY, enter a command, and then the server executes it.
Due to its simplicity, reliability, and ease of use, it is a popular choice among system administrators whose work often includes the remote management of servers and network devices.
Prior to connecting to the remote server, an SSH tunnel must be set up.
PuTTY: Pros and Cons
Before we proceed, let’s consider the advantages and disadvantages of PuTTY.
Advantages
- Secure and reliable connection to the remote server.
- Free and open-source application that enables developers to easily modify and customize the software.
- Flexible configuration of the remote host.
- Lightweight and fast tool that does not require much system resources to work.
- User-friendly GUI.
- Cross-platform application that allows developers to run it on various operating systems.
- Support for multiple protocols such as SSH, Telnet, rlogin, and SCP.
- Quick and easy transfer of large files between two systems.
- Log files tracking.
Disadvantages
- Only the username is saved during the session.
- The copy/paste operation cannot be used.
- The application supports basic functionality.
- Non-text files cannot be transferred.
Advantages of MySQL secure connection
When you work with a MySQL database located on a remote server and want to transmit confidential data, such as any personal or financial data, it is critical to establish an encrypted secure TCP/IP connection between a MySQL server and a MySQL client. To achieve this, an SSH tunnel can be created with the help of PuTTY, which encrypts all traffic between the PuTTY client and the server.
Also, you can access your database host through an SSH tunnel if you want to connect to the database in an encrypted way from any third-party database tool, such as dbForge Studio for MySQL, MySQL Workbench.
In all these cases, you can run dbForge Studio for MySQL from your local computer and access the remote database instance through an encrypted connection.
Additionally, you can use SSH tunnels to set up offsite replication for your database.
Shortly speaking, if you want to establish a secure and encrypted connection to a MySQL server which is not directly accessible, use an SSH connection, created with PuTTY, over IP/TCP.
How to access a MySQL server remotely by creating an SSH tunnel with PuTTY
Let’s put aside the boring but necessary theory and get down to practice! So, in this block, we’ll provide a step-by-step procedure on how to create an SSH tunnel on Windows to access a remote MySQL server using PuTTY.
Before we start, make sure the following prerequisites are met:
- PuTTY is installed on your computer. If you don’t have it installed, download it from the official website. Then, run the PuTTY installer and follow the instructions. Once done, click Finish to close the installer.
- Ensure that SSH is properly installed on your server based on your operating system. For detailed instructions, refer to the How to Install SSH guide and follow the instructions specific to your OS.
Now, we can set up an SSH tunnel.
1. Go to the directory that stores the PuTTY execution file – putty.exe – and double-click it to set up an SSH tunnel. The PuTTY Configuration window opens.
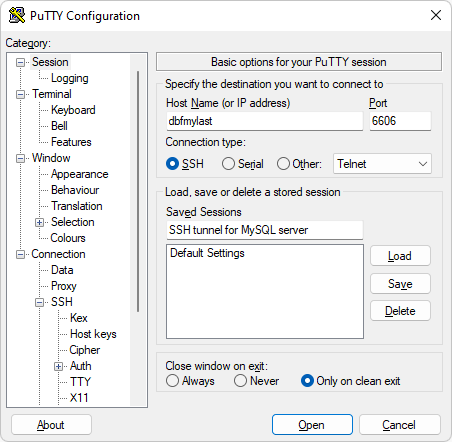
2. In the Session category, do the following:
- Select SSH as a connection type.
- In the Host Name (or IP address) field, enter the hostname or the IP address of the remote server on which you have SSH configured.
- In the Port field, set the port of the remote server.
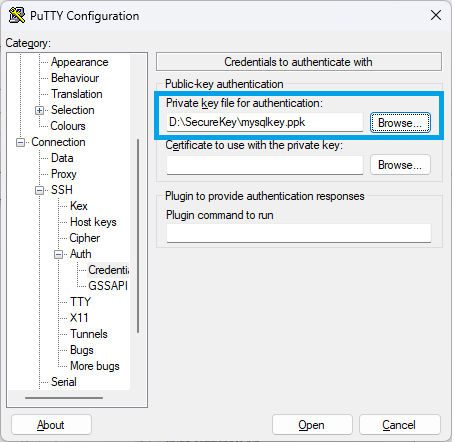
Note: If you want to establish SSH server connection that uses a public-key authentication, you need to perform some additional steps and specify the private key in the PuTTY configuration:
2.1. Navigate to the Connection > SSH > Auth > Credentials subcategory and click Browse to search for your PuTTY Private Key.
2.2. In the Select private key file window that opens, select the private key and click Open to enter it.
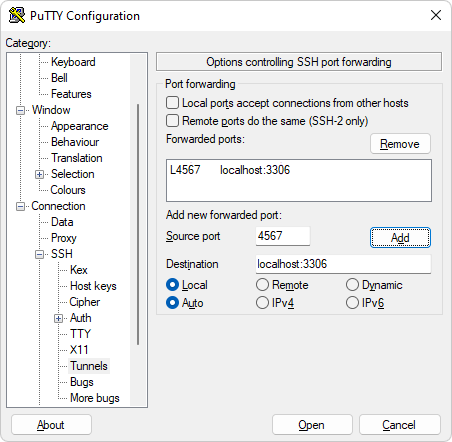
3. Go to the Connection > SSH > Tunnels category and specify the details about your local machine as follows:
- Under Add new forwarded port:
- In the Source port field, specify any free port of your local computer, for example, 4567.
- In the Destination field, enter the hostname of your local machine and the port on which your remote MySQL server is running separated by a colon, for example, localhost:3306.
Note: We use localhost since the MySQL and SSH servers are hosted on the same server. If the MySQL server is installed on a different server than SSH, specify its IP address.
- Click Add to add the forwarded port.
4. Go to the Session category, enter a name for your session in the Saved Sessions field, and then click Save to keep the changes. To connect to the remote MySQL server, click Open.
Note: If you haven’t logged in to this system with PuTTY before, you will receive an alert message that the host key is not cached for the given server. Verify that this is the server you want to connect to and then click Yes.
In the PuTTY command-line interface, you’ll be prompted to enter the SSH username and password.
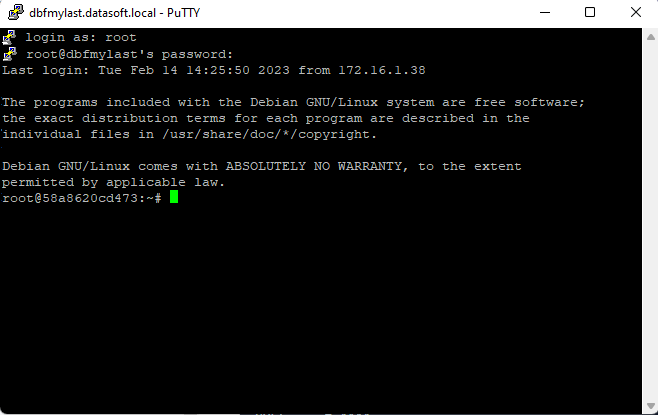
Once done, the SSH tunnel is established.
How to connect to the MySQL server through PuTTY using dbForge Studio for MySQL
After we have created the SSH tunnel, let’s see how to set up a MySQL SSL connection with the help of dbForge Studio for MySQL. It is a powerful integrated development environment (IDE) with feature-rich tools and functionalities that streamline MySQL database development, management, and administration. With dbForge Studio for MySQL, you can easily write SQL code, debug stored procedures, generate ER diagrams, and more.
To get started, launch the Studio to create a connection to the MySQL database.
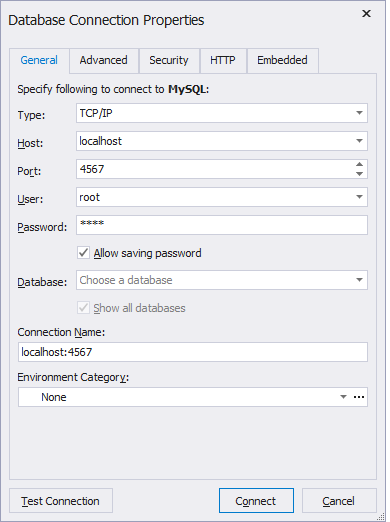
In the Database Explorer, click New Connection. In the Database Connection Properties window that opens, on the General tab, enter the information that refers to the MySQL server you want to connect to:
- Host: IP address or host name where the MySQL server you want to connect to is installed
- Login: Database username
- Password: Database user password
- Database: Database name
- Port number: The one that you specified in the Source port field in PuTTY
Then, go to the Security tab and do the following:
- Select SSL as the security protocol.
- Specify the client key, client certificate, and authority certificate in the corresponding fields.
Click Connect to establish the connection to the server.

Benefits of using a GUI tool to connect to MySQL
A GUI tool can provide a lot of benefits over the usage of a command-line interface, for example:
- User-friendly interface which makes it easier to work with databases for newbies.
- Better productivity by automating repetitive tasks and using shortcuts or pre-defined templates for common tasks.
- Visual editors that allow users to represent database structure and data, as well as build relationships between tables and create queries.
- Built-in features for managing databases, such as backup and restore, query optimization, performance monitoring, query builder, etc.
- Cross-platform support that enables tools to run on multiple operating systems, including Windows, Linux, and macOS.
dbForge Studio for MySQL is a full-featured and cross-platform GUI tool packed with extensive visual database development and management tools that ensure the best user experience and developer productivity, optimized query performance, easy testing and reporting analysis, as well as maintain database integrity and data consistency.
- Supported platforms: Windows, macOS, and Linux.
- Intelligent SQL coding features, such as code completion, formatting, MySQL prompt, syntax check, and code navigation that maximize coding.
- Query Profiler that enables to identify errors and fine-tune query and database performance.
- Query Builder to quickly generate queries of any complexity and build the relationship between them.
- Import and export tools to export/import data in/from multiple data formats.
- Data Generator to populate databases with random and testing data in a wink.
- Comparison and synchronization tools that make it easier to analyze differences between data and schemas.
- Backup and restore functionalities to effectively migrate databases between two instances.
And it is not a full list of advanced tools that dbForge Studio for MySQL can offer. That’s why the Studio takes the leading place among database development and management tools. No more words, download a free 30-day trial version to see the tool’s features and functionalities in action!

Conclusion
To sum it up, connecting to a remote MySQL server through an SSH tunnel is a secure and reliable way to access your database and ensure the safety of your data to transmit.
In the article, we have explored how to create an SSH tunnel and connect to your MySQL server using any MySQL client. Also, we have provided two methods to connect to a remote MySQL server using dbForge Studio for MySQL. So, whether you’re connecting to a new remote database or have just migrated an Access database to MySQL, don’t hesitate to use dbForge Studio to explore its advanced capabilities for secure access and development.