
The article gives a deep insight into how to restore MySQL database from a backup file using the mysqldump utility and third-party backup and restore tools, such as dbForge Studio for MySQL, MySQL Workbench, and phpMyAdmin.
Contents
- Restore all databases in MySQL
- Restore a specific table in a MySQL database
- Restore a MySQL database using Workbench
- Back up and restore MySQL databases easily with dbForge Studio for MySQL
- Restore a MySQL database using phpMyAdmin
- Restore a MySQL database using the binary log
- Restore a MySQL database from .ibd and .frm files
There may be situations when data gets lost or corrupted, for example, when users accidentally deleted or overwrote data. For these reasons, it is recommended to make a backup on a regular basis. Through this process, you can ensure data consistency in your databases and be sure that nothing critical happens to your data and it won’t be lost irrevocably. In addition, regular data backups help keep data up-to-date and allow you to restore it at any time.
MySQL creates many files that are used to back up the data, structure, and indexes of MySQL databases. Some of them include the following:
- my.cnf file that stores MySQL configuration settings.
- .frm file that stores a schema and a definition of the table.
- (for the MyISAM engine only) .myd file that stores table data.
- (for the MyISAM engine only) .myi file that stores table indexes.
- (for the InnoDB engine only) .ibd file stores table data and indexes.
So, to avoid data loss, the above-mentioned files should not be deleted.
Note that you can also export a MySQL database and thus get a backup that can be imported back.
Restore all databases in MySQL
In MySQL, you can use the mysql command to restore the database from a dump file.
mysqldump is a command-line utility used to generate a MySQL logical database backup as a single .sql file with a set of SQL statements. The utility helps you dump MySQL tables, multiple databases, or their objects. Keep in mind that it is not possible to back up MySQL databases or data to separate .sql files with the mysqldump utility. For more information about how to back up MySQL databases and data, see Different Ways to Back up MySQL Databases and Tables.
Besides, you must have access to the running MySQL server to use the mysqldump and mysql commands.
Now, it is time to see how to restore the MySQL database. First, you need to create an empty MySQL database and then restore a MySQL dump file.
Step 1: Create the database
In the command prompt, connect to the MySQL server on which you want to create the database and run the mysql command:
Note: The database name should be the same as the database you want to restore.
mysql> create database sakila;This will create the database into which you will be able to import database structure and data from the dump file.
Step 2: Restore the database
Now, we can restore the MySQL database from the dump file. The syntax for the command is as follows:
mysql -u [user name] –p [target_database_name] < [dumpfilename.sql]The parameters include:
-u[user name]is a username to connect to a MySQL server.-
-pis a password for the username you use to connect to the server. -
target_database_nameis the name of the empty database into which you want to load data from the backup file. <is a parameter that refers to the process of a database restore.[dumpfilename.sql]is the path to the dump file.
Thus, to restore the sakila database, execute the following command:
mysql --host=dbfmylast --user=root --port=3306 -p sakila < D:\sakila.sqlwhere dbfmylast is the target server with the empty database into which we’ll load data from the sakila.sql dump file.
To check the result, run the following:
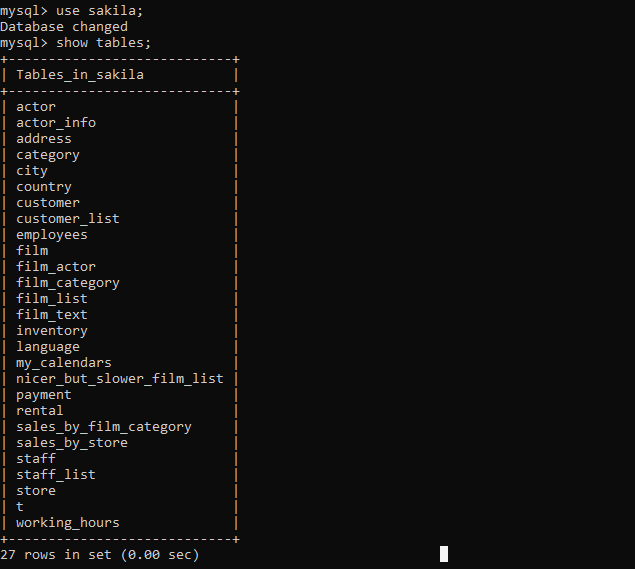
mysql> use sakila;
...
mysql> show tables;
In the output, you will see the list of tables located in the sakila database.
Restore all databases with the mysqldump utility
With the mysqldump utility, you can restore not only a single database but all databases on the server in bulk.
The syntax to restore all MySQL databases from a dump file is as follows:
mysql -u root -p < alldatabases.sqlwhere alldatabases.sql is a path to the dump file containing a backup of all databases on the server.
For example, we are going to restore all MySQL databases from the backup_all_databases.sql dump file. For this, we are running the following command:
mysql -u root -p < D:\backup_all_databases.sqlRestore a specific table in a MySQL database
Under some circumstances, it may be required to restore a specific MySQL table from the database – when someone dropped the table or overwrote its data.
For demo purposes, make a backup copy of the working_hours table from the sakila database by executing the mysqldump command. The backup_working_hours_table.sql file is the output file that will contain the backup of the table.
mysqldump --host=dbfmylast --user=root --port=3306 -p sakila working_hours > D:\backup_working_hours_table.sqlAfter the backup was created, drop the working_hours table with the DROP TABLE statement.
mysql> drop table working_hours;Verify that the table was removed from the sakila database:
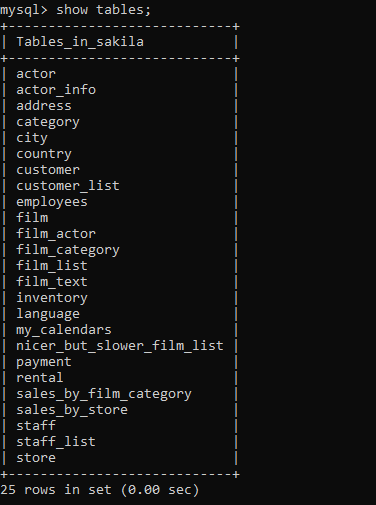
mysql> use sakila;
...
mysql> show tables;
The command lists MySQL tables available in the database. As you can see, there is no working_hours table.
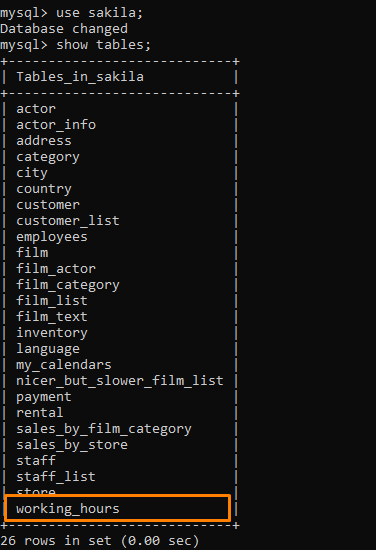
Now, restore the backup of the working_hours table into the sakila database by executing the mysql command:
mysql --host=dbfmylast --user=root --port=3306 -p sakila < D:\backup_working_hours_table.sqlThe table will be imported into the sakila database:
Restore a MySQL database using Workbench
This section explains how to restore a MySQL database from the .sql file using the MySQL Workbench tool. Prior to restoring the database, create an empty database on the server you want to connect to.
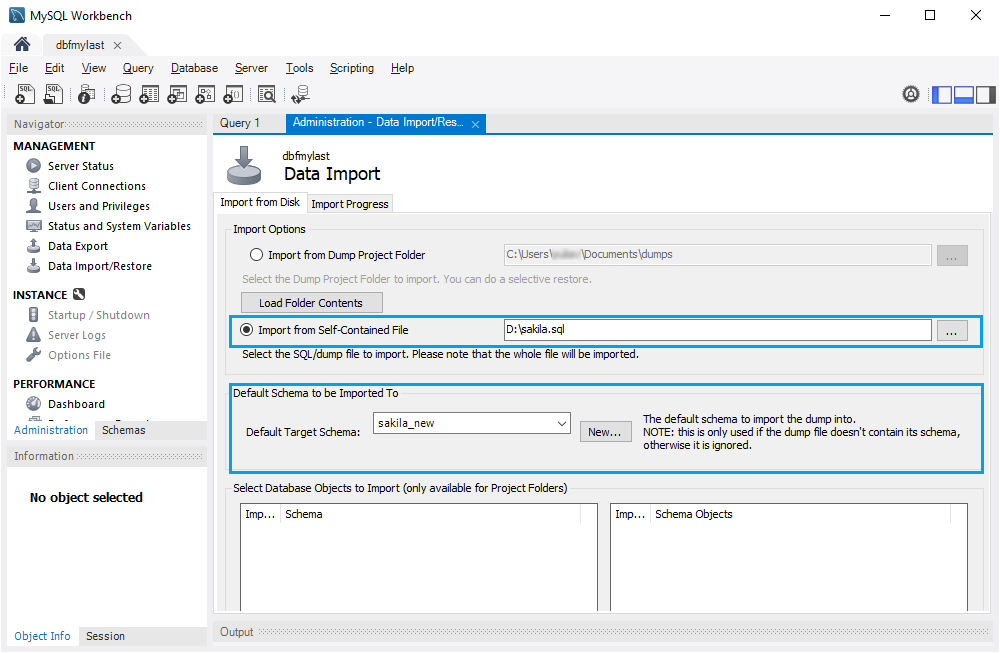
Open MySQL Workbench and click Data Import/Restore in Navigator.
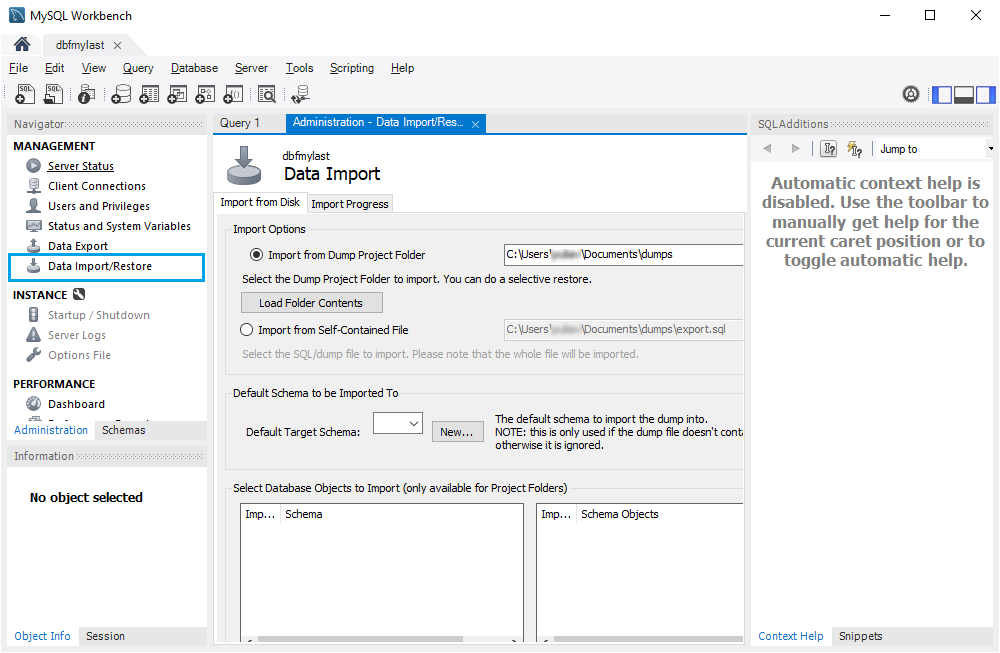
In the Administration – Data Import/Restore document, select Import from the Self-Contained File and browse for the .sql file containing the backup of the sakila database. Then, under Default Schema to be Imported To, select the target database into which the backup of the source database with its structure and data will be loaded.
At the bottom of the document, select Dump Structure and Data from the drop-down list to restore the database structure and data.
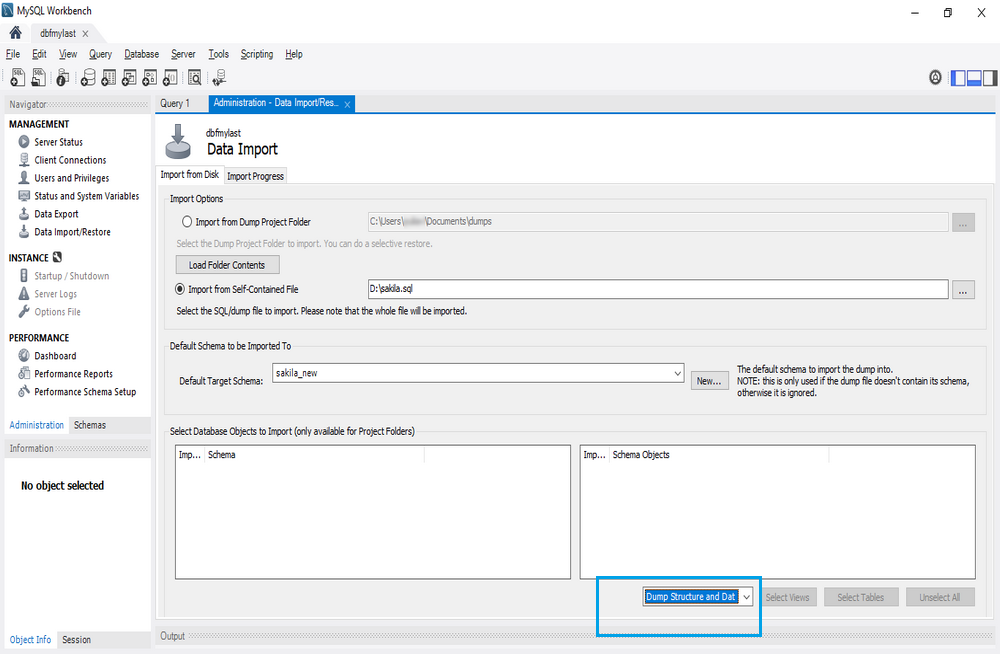
When all the parameters are set up, switch to the Import Progress tab and click Start Import. After the import is completed, you can close the tool.

Back up and restore MySQL databases with dbForge Studio for MySQL
In the previous sections, we have already examined how to restore MySQL databases using the command line, MySQL Workbench, and phpMyAdmin. Now, it is time to go through the step-by-step process of database recovery with dbForge Studio for MySQL. It is the MySQL and MariaDB database development, administration, and management tool that allows you to perform multiple tasks in one IDE due to its cutting-edge features and capabilities.
dbForge Studio for MySQL provides the built-in MySQL backup tool to back up and restore MySQL databases using its automating features easily and quickly.
Back up the database
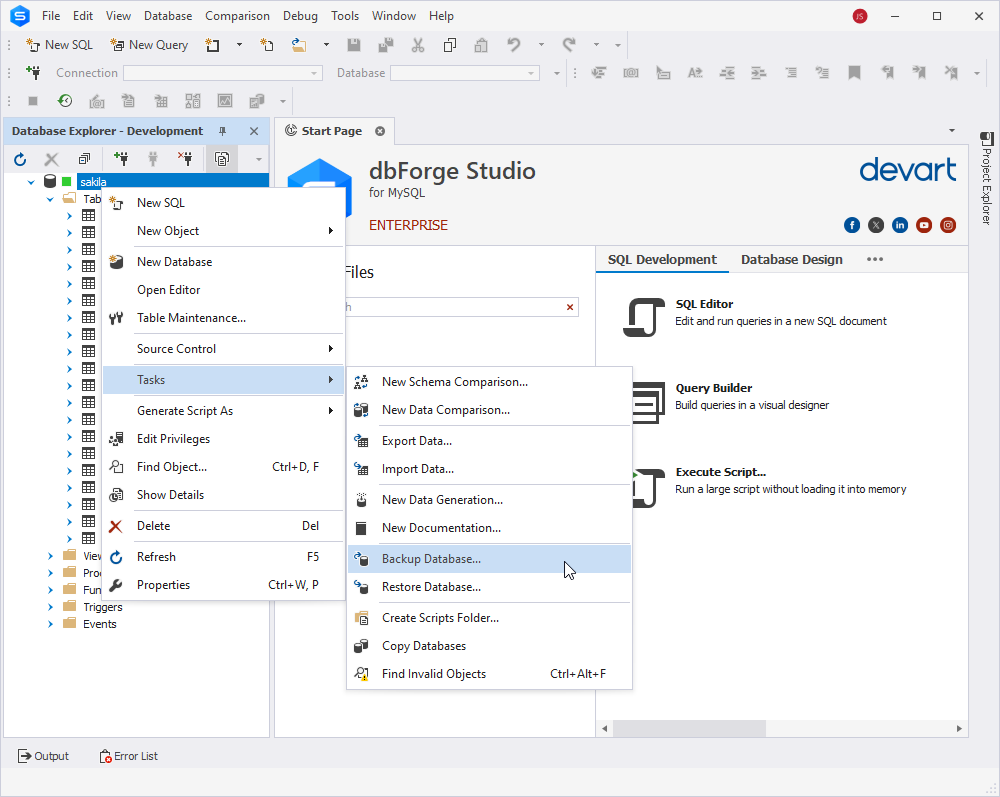
To back up the MySQL database, open dbForge Studio for MySQL and connect to the server on which you are going to make a backup of the database. In Database Explorer, right-click the database and select Backup and Restore > Backup Database.
In the Database Backup Wizard, select the database, specify a path to the backup file, and enter the name of the output file.
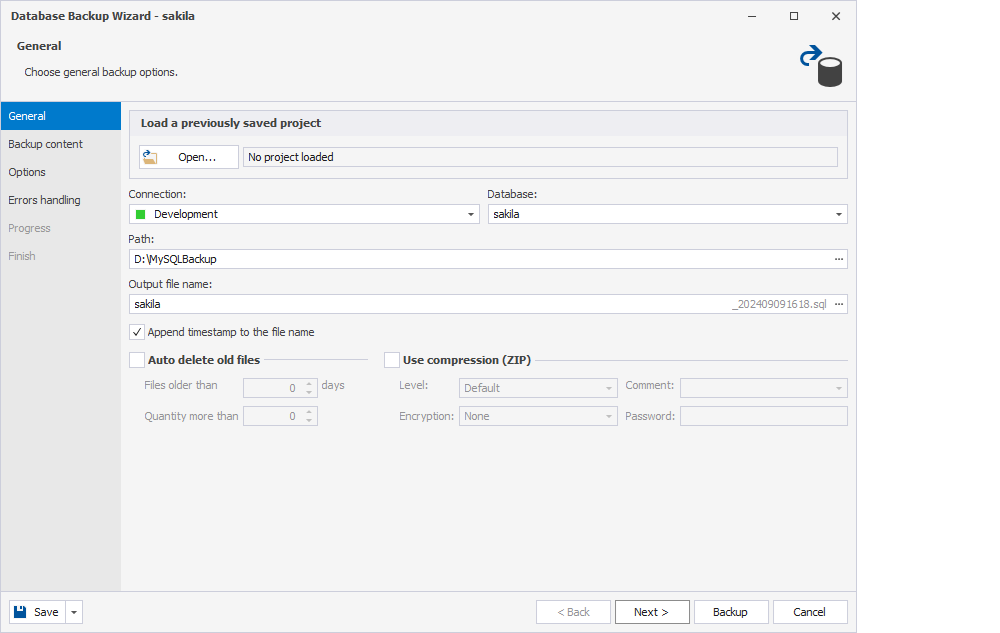
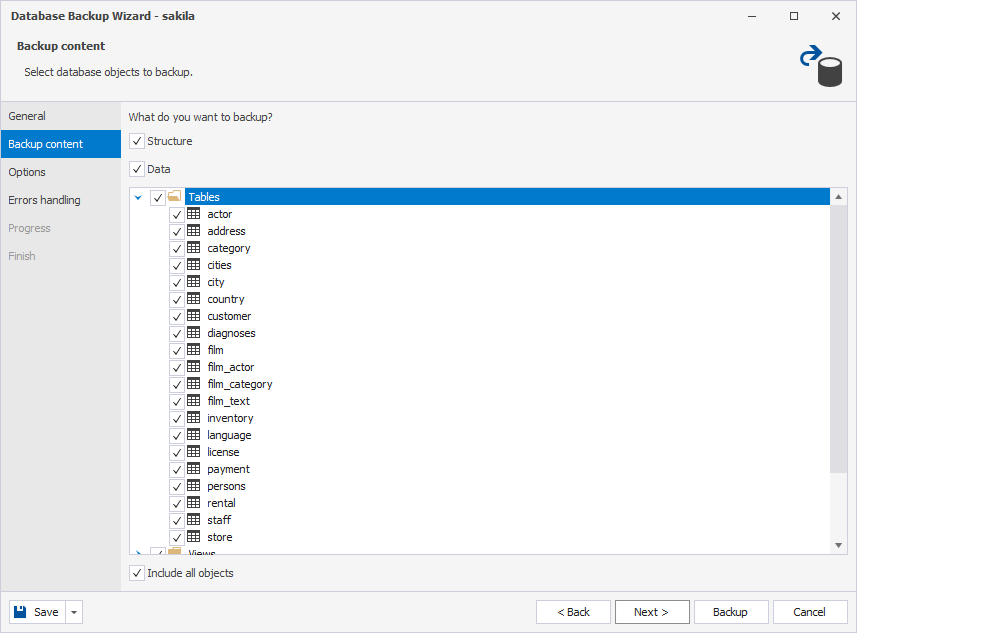
Then, switch to the Backup Content page to select structure, data, and database objects to back up.
If you want to set additional options or configure error handling behavior, switch to the corresponding pages in the wizard. To start the database backup, click Backup. After the backup is complete, the corresponding notification is displayed and you can close the wizard.
Besides, you can schedule MySQL daily backups through the command line. This will help you automate your daily operations and, thus, save your time and increase productivity.
Restore the database
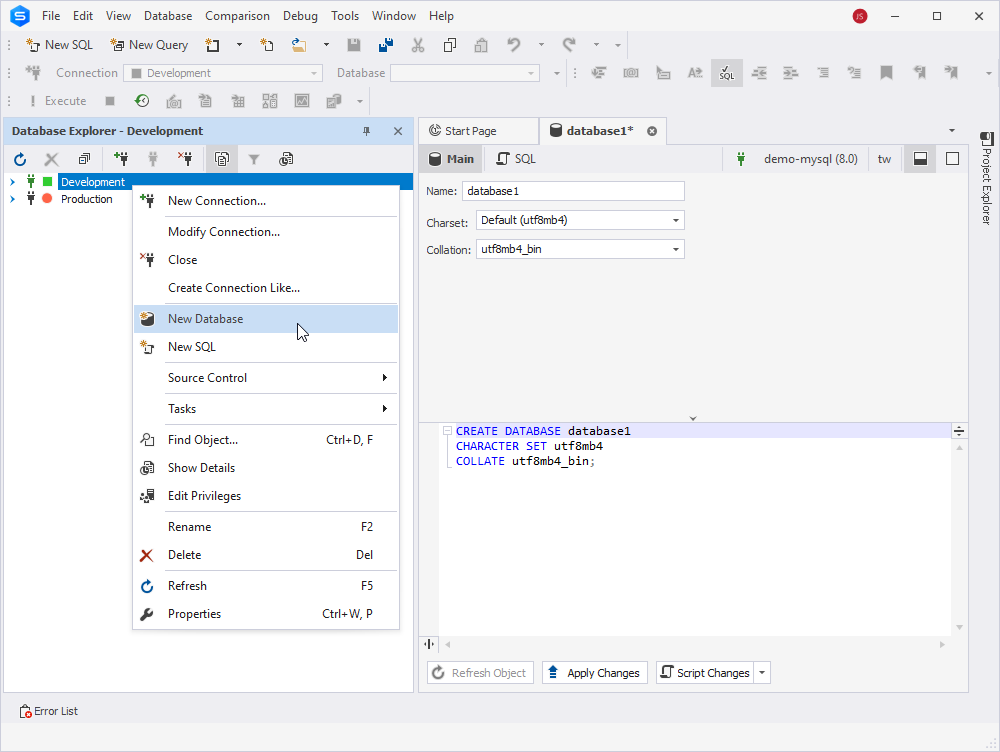
To restore the database, first, you need to create an empty database into which the backup database will be imported. For this, right-click the connection on which you are going to restore the database backup and select New Database. In the document that opens, enter the name of the database, set charset and collation options, and save the changes.
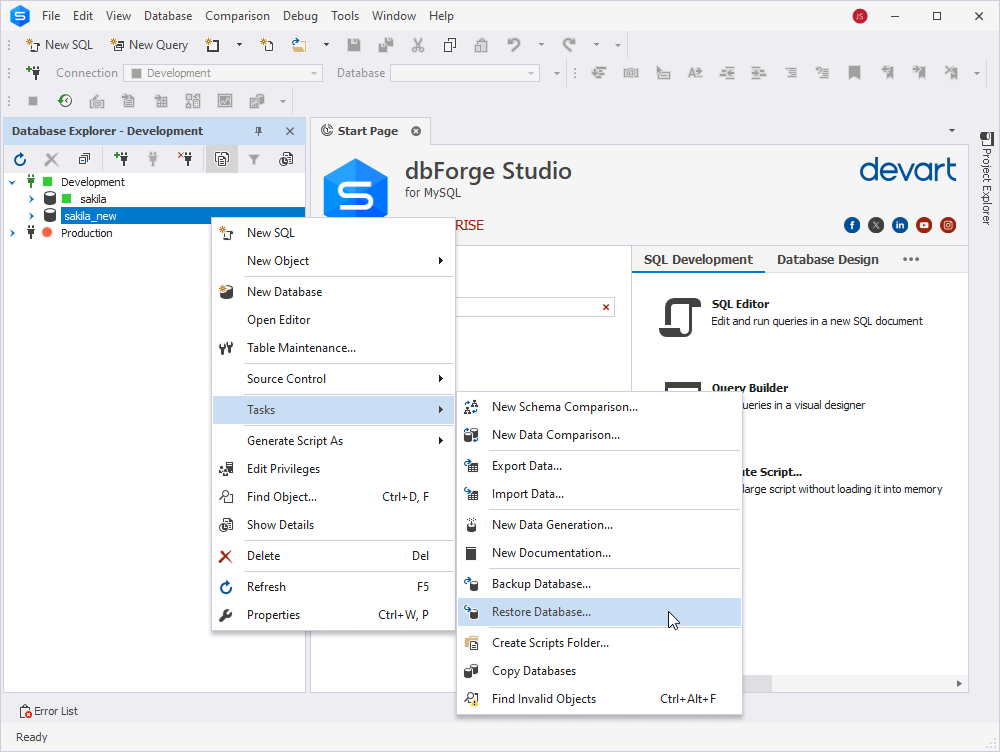
In Database Explorer, right-click the server connection on which you want to restore the database and select Backup and Restore > Restore Database.
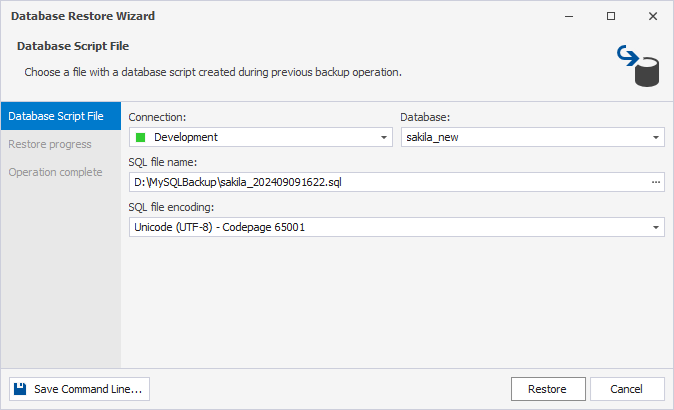
In the Database Restore Wizard, select the backup file and click Restore. If you are going to load the database to the target database with a distinctive name, enter its name in the Database field.
As a result, you have restored the MySQL database without any errors. To close the wizard, click Finish.
Then, refresh Database Explorer to check that the database was restored.
You will find handy video instructions on our YouTube channel:
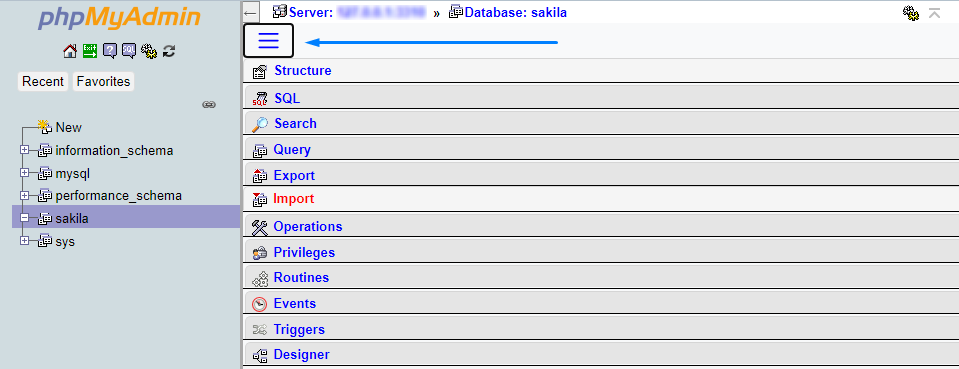
Restore a MySQL database using phpMyAdmin
If you got used to working with phpMyAdmin, you can easily recover the deleted table or copy a MySQL database to another server.
For MySQL database backup and restoration, you need to use the Export and Import tools respectively.
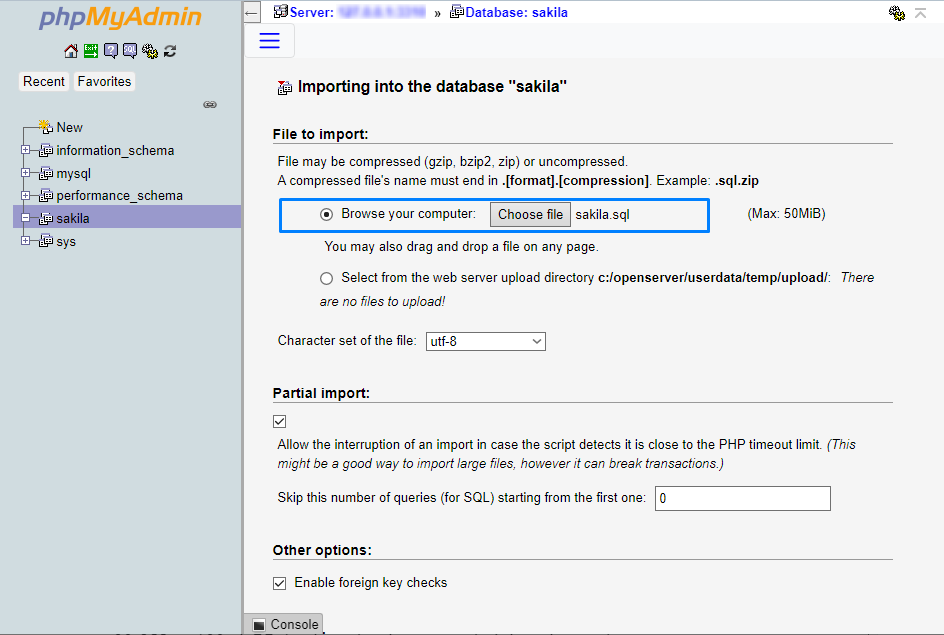
To restore a MySQL database, open phpMyAdmin and create an empty database to which the database will be exported. For this, switch to the Databases tab, enter the database name, select the same collation as in the backup database, and click Create.

The database will appear in the Navigation panel. Then, click the hamburger menu and select Import.
On the Importing into the database “sakila” page, under File to Import:, click Choose File to select the file with the database backup. At the bottom of the page, click Go to start restoring the database.
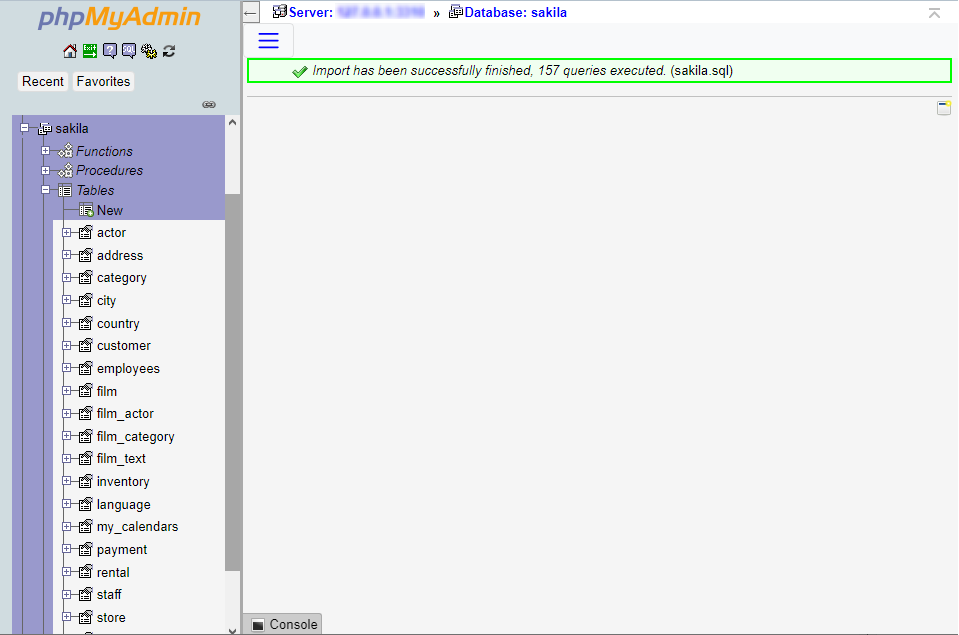
Once done, the sakila database will be populated with the MySQL tables and other database objects.
Restore a MySQL database using the binary log
MySQL binary logging allows you to record all the changes made to your MySQL database, helping you with such tasks as point-in-time recovery, replication, and backup:
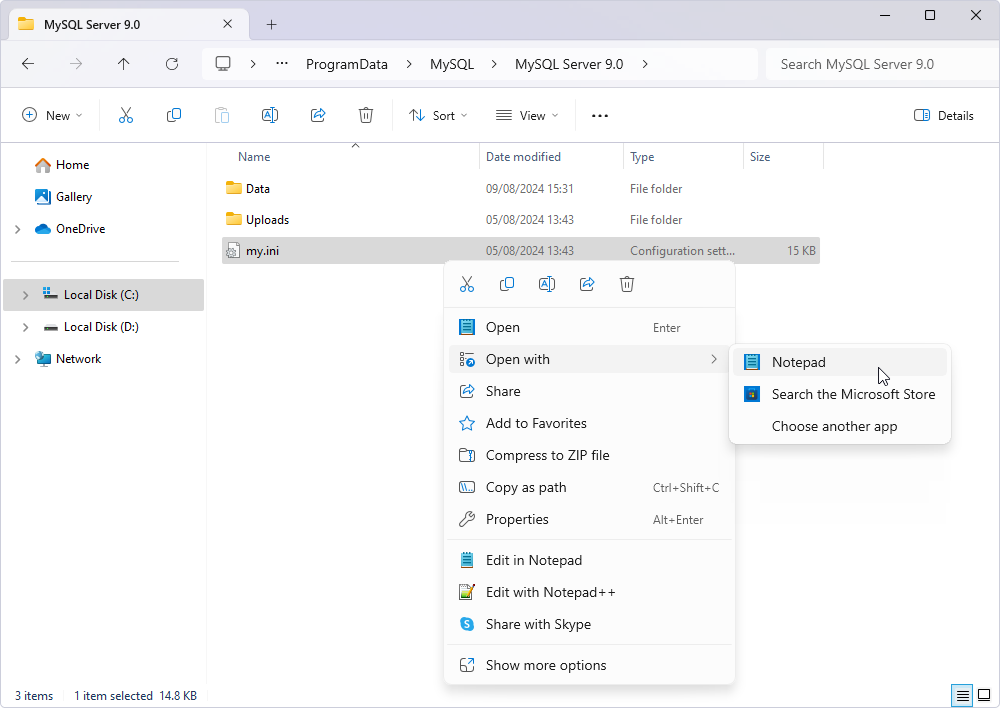
1. Find the my.ini file. By default, it is located in the C:/ProgramData/MySQL/MySQL Server 9.0/my.ini directory.
2. Right-click the file and open it with a text editor of your liking. We will stick to the classics and open it with Notepad:
3. Inside the file, find the [mysqld] section. Here, add the following parameters:
log_bin="bin.log"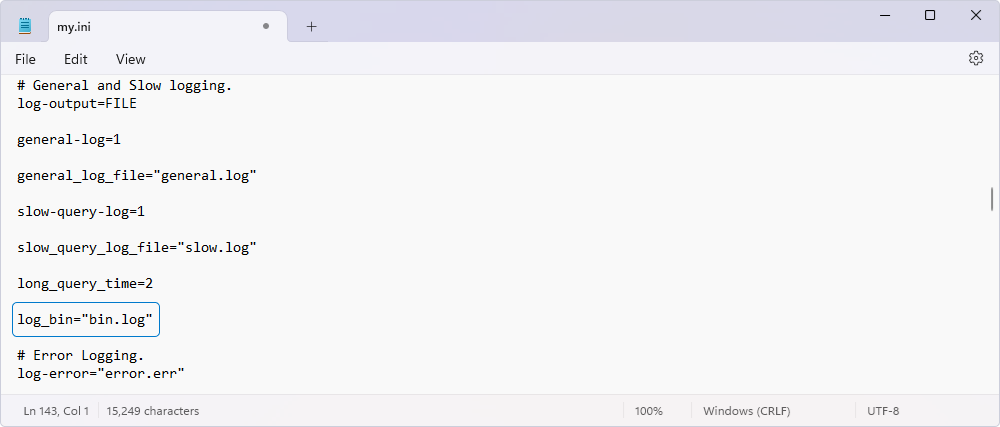
4. Save and close the file.
5. Restart the MySQL service to apply the changes.
6. You can check if the binary logging has been enabled successfully by executing this command:
SHOW VARIABLES LIKE 'log_bin%';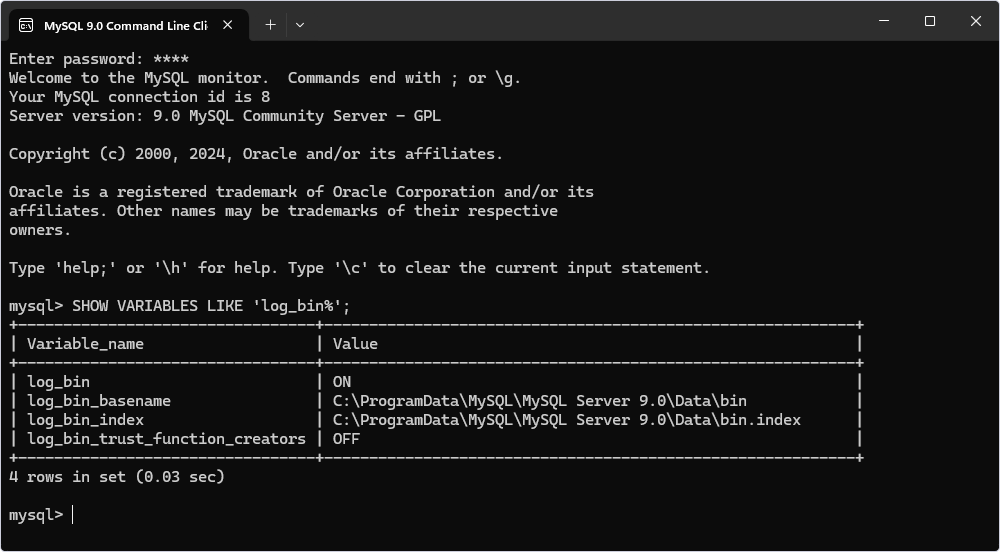
7. Then, you need to copy the binary log files to another location manually.
Alternatively, you can use the mysqlbinlog tool to extract SQL statements from the binary logs and save them to a file:
mysqlbinlog mysql-bin.00000 > backup.sqlMake sure to Replace bin.00000 with the binary log file name.
Explore MySQL query log types, best practices of using them, and learn how to see MySQL logs from this article.
Restore a MySQL database from .ibd and .frm files
When you use InnoDB storage engine in MySQL Server, it stores table schema in the .frm file and the data and indexes in the .ibd file. If, for some reason, the tables in your database get deleted or corrupted, you can use these files for recovery.
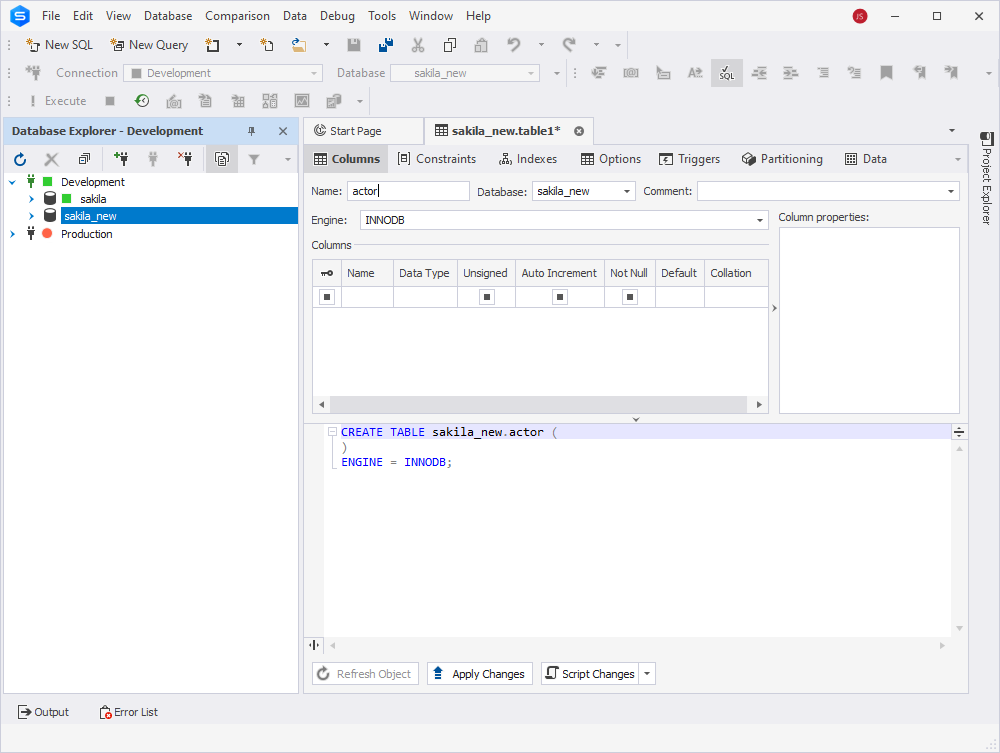
1. The first step in this case would be creating a new database. You can do it in dbForge Studio for MySQL as we described in the Restore the database section of this article.
2. Since the newly created database is completely empty, the next step would be to create a table:
- Right-click the database, point to New Object, and select Table.
- In the Name text box, enter a table name.
- In the grid below, enter the column names and data types.
- Once done, click Apply Changes.
Keep in mind that you can always create a new table with the help of an SQL query.
3. As soon as a table is created in our database, the new .frm and .ibd files are created as well.
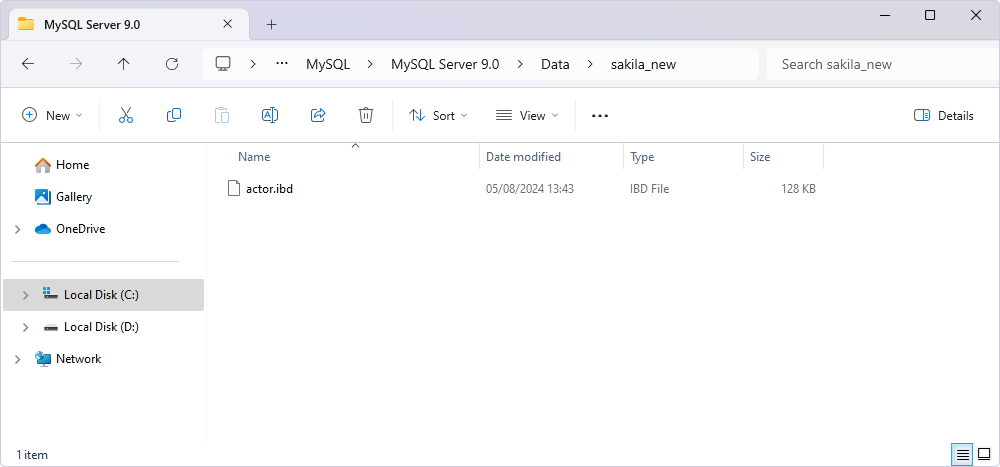
You need to locate the new .ibd file and delete it. It is usually located in this directory: C:\ProgramData\MySQL\MySQL Server 9.0\Data\databasename.
4. Discard the tablespace in the created table:
ALTER TABLE tablename DISCARD TABLESPACE;5. Now, you need to copy the original .ibd file and paste it in the new database.
6. Restore the link between the MySQL table and the tablespace:
ALTER TABLE tablename IMPORT TABLESPACE;Conclusion
In the article, we have provided step-by-step procedures about how to restore MySQL databases and tables using the command line, MySQL Workbench, phpMyAdmin, and dbForge Studio for MySQL.
With dbForge Studio, you can double your productivity and take your user experience to the next level, and you will no longer want to return to other similar tools.
Download and install a 30-day free trial version to evaluate the features of dbForge Studio for MySQL. After it expires, consider the purchase of the full license of the Studio to improve your productivity during the MySQL database backup/restoration and other database development and administration operations.