
Today, accessing and managing databases remotely is a fundamental skill for developers, system administrators, and anyone working with data-driven applications. In this article, we will demonstrate how to establish an SSH connection to a MySQL database on a DigitalOcean Droplet—a virtual private server that can host various applications and databases.
Prioritizing secure database management is essential for preserving data confidentiality, integrity, and availability, as it safeguards the interests of the organization and its stakeholders. Protecting sensitive information and maintaining the integrity of organizational data is paramount for any company today. A secure database ensures that only authorized users have access to critical data, shielding it from unauthorized access, data breaches, and malicious activities.
There are two primary methods for working with MySQL on DigitalOcean:
1. Managed Databases for MySQL. Managed Databases for MySQL is a fully managed database service offered by DigitalOcean. It provides automated backups, scaling, updates, and monitoring, relieving users of much of the administrative burden associated with database management. With Managed Databases for MySQL, users can easily deploy and manage MySQL database instances directly from the DigitalOcean Control Panel or API. This option is suitable for users who prefer a hands-off approach to database management and want the convenience of automated maintenance and scaling.
2. Installing MySQL Server on a Droplet. Alternatively, users can install and configure a MySQL server manually on a DigitalOcean Droplet. This method offers greater flexibility and control over the database environment, allowing users to customize the server configuration according to their specific requirements. By installing MySQL on a Droplet, users have full administrative access to the server and can install additional software, configure security settings, and optimize performance as needed. This option is ideal for those who require fine-grained control over their MySQL deployment and want the flexibility to customize the server environment to meet their unique needs.
In this article, we will demonstrate how to connect to MySQL instances hosted using both methods. We will cover both SSH connections and direct connections.
Why SSH? Connecting to MySQL in a DigitalOcean Droplet via SSH further enhances security by providing a secure way to access and manage the database remotely. SSH (Secure Shell) ensures encrypted communication between the local machine and the Droplet, significantly reducing the risk of interception and unauthorized access to sensitive data during transmission. Additionally, SSH authentication mechanisms, such as public key cryptography, strengthen the security posture by verifying the identity of users and preventing unauthorized access to the Droplet. By leveraging SSH for database management tasks, organizations can mitigate security risks associated with traditional unencrypted connections and protect their data assets effectively.
Contents
- What is a DigitalOcean Droplet
- Connecting to a MySQL database hosted on a DigitalOcean Droplet
- Establishing a connection to MySQL database on a DigitalOcean Droplet using dbForge Studio
- Connecting to a Droplet with SSH
- Conclusion
What is a DigitalOcean Droplet
A DigitalOcean Droplet is a Linux-based virtual private server (VPS) offered by DigitalOcean, a cloud computing platform. Droplets are designed to provide developers and businesses with scalable and flexible computing resources in the cloud. Users can create, deploy, and manage Droplets through DigitalOcean’s user-friendly interface or via APIs. Droplets come with various pre-configured operating systems (such as Ubuntu, CentOS, and Debian) and can be customized to suit specific application requirements. They are commonly used for hosting websites, applications, databases, and other services in the cloud, offering high performance, reliability, and affordability. DigitalOcean Droplets are known for their simplicity, ease of use, and developer-friendly features, making them a popular choice among individuals and businesses for deploying and managing their online infrastructure.
Use cases of DigitalOcean Droplets
DigitalOcean Droplets offer a wide range of use cases within cloud infrastructure due to their versatility, scalability, and ease of use. Some common use cases include:
Web hosting
Droplets can host websites and web applications, providing reliable and scalable infrastructure for serving content to users worldwide.
Application hosting
Developers can deploy and run various applications, including content management systems (CMS), e-commerce platforms, and custom applications, on Droplets to provide services to their users.
Development and testing
Droplets are ideal for development and testing environments, allowing developers to experiment with different configurations, test code changes, and prototype applications without affecting production systems.
Data storage and backup
Droplets can be used to store and backup data, either as standalone storage servers or as part of a distributed storage solution. This enables users to securely store and access their data in the cloud.
Database hosting
Droplets can host databases such as MySQL, PostgreSQL, MongoDB, and Redis, providing scalable and reliable infrastructure for storing and managing data.
CI/CD pipelines
Droplets can be used as build servers or runners in continuous integration and continuous deployment (CI/CD) pipelines, automating the process of building, testing, and deploying applications.
Container hosting
Droplets can host containerized applications using Docker or Kubernetes, providing a platform for deploying and managing containerized workloads in the cloud.
VPN and proxy servers
Droplets can be configured as virtual private network (VPN) servers or proxy servers, allowing users to securely access resources or browse the internet privately.
Monitoring and logging
Droplets can run monitoring and logging software such as Prometheus, Grafana, and ELK stack, providing insights into system performance, application metrics, and logs.
Key benefits of DigitalOcean Droplets
Scalability: Droplets can be easily scaled up or down to accommodate changing workloads and resource requirements. Users can choose from a variety of Droplet plans with different CPU, memory, and storage configurations, allowing them to scale their infrastructure as needed.
Affordability: DigitalOcean Droplets are cost-effective, with transparent pricing and a pay-as-you-go model. Users only pay for the resources they use, making it easy to manage costs and optimize spending.
Ease of use: Droplets are designed to be user-friendly, with a simple and intuitive interface that makes it easy to create, deploy, and manage virtual servers. Users can launch Droplets in minutes and manage them through DigitalOcean’s web-based control panel or APIs.
Security: Droplets are deployed in secure data centers and are protected by DigitalOcean’s robust security measures, including firewalls, DDoS protection, and regular security updates. Users can also implement additional security measures such as SSH key authentication and two-factor authentication for added protection.
DigitalOcean Droplets features
Choice of operating systems. DigitalOcean Droplets offer a wide selection of pre-configured operating systems, including various versions of Linux distributions such as Ubuntu, CentOS, Debian, and Fedora, as well as application-specific images like WordPress and Docker.
SSD storage. DigitalOcean Droplets are backed by SSD (Solid State Drive) storage, providing fast read/write speeds and improved performance for applications and data storage.
Customizable resources. Users have the flexibility to customize their Droplets by selecting the desired amount of CPU, memory (RAM), and storage, allowing them to tailor the virtual server to their specific requirements.
Security features. DigitalOcean Droplets come with built-in security features such as firewalls, DDoS protection, and optional two-factor authentication (2FA) to ensure the security and integrity of user data and applications.
API access. DigitalOcean Droplets can be managed programmatically via APIs, allowing users to automate deployment, scaling, and management tasks using their preferred programming language or automation tool.
Snapshots and backups. Users can create snapshots and backups of their Droplets, enabling them to capture a point-in-time image of the server’s disk or schedule regular backups to protect against data loss. Additionally, DigitalOcean offers automated backups as an optional feature, providing users with a hassle-free solution for automatically backing up their Droplets on a regular basis.
Monitoring and alerts. DigitalOcean provides monitoring and alerting tools that allow users to track Droplet performance metrics such as CPU usage, memory usage, and disk I/O, and receive notifications when thresholds are exceeded.
Pricing
DigitalOcean Droplets offer a transparent and straightforward pricing structure, allowing users to choose from a variety of plans based on their specific needs and budget. The pricing is primarily based on the resources allocated to the Droplets, such as CPU, memory (RAM), and storage. Users can opt for a pay-as-you-go model, where they are billed hourly for the resources consumed, or choose fixed plans with monthly billing cycles for predictable costs.
When comparing the cost-effectiveness of DigitalOcean Droplets with other cloud services, factors such as performance, reliability, and support should also be considered. While some competitors may offer similar pricing structures, DigitalOcean stands out for its simplicity, ease of use, and developer-friendly features, making it a popular choice among startups, SMBs, and individual developers.
Connecting to a MySQL database hosted on a DigitalOcean Droplet
Let’s look at how you can manually install and configure a MySQL server on a DigitalOcean Droplet. Afterward, we’ll demonstrate two methods to connect to a MySQL database hosted in this manner: using PuTTY and dbForge Studio for MySQL.
Setting up MySQL on a DigitalOcean Droplet
Step 1: Access the Droplet console
You can access the Droplet Console from the DigitalOcean Control Panel. First, click the name of the Droplet you wish to access. You will be navigated to your Droplet’s detail page. There, select Access on the left-hand menu.
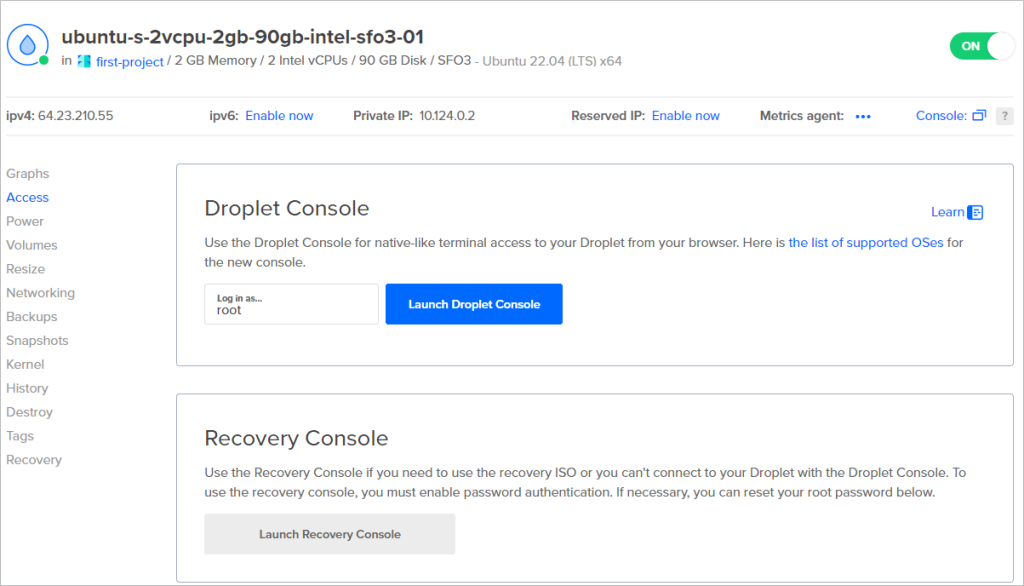
Click Launch Droplet Console to open the console.
Step 2: Install MySQL server
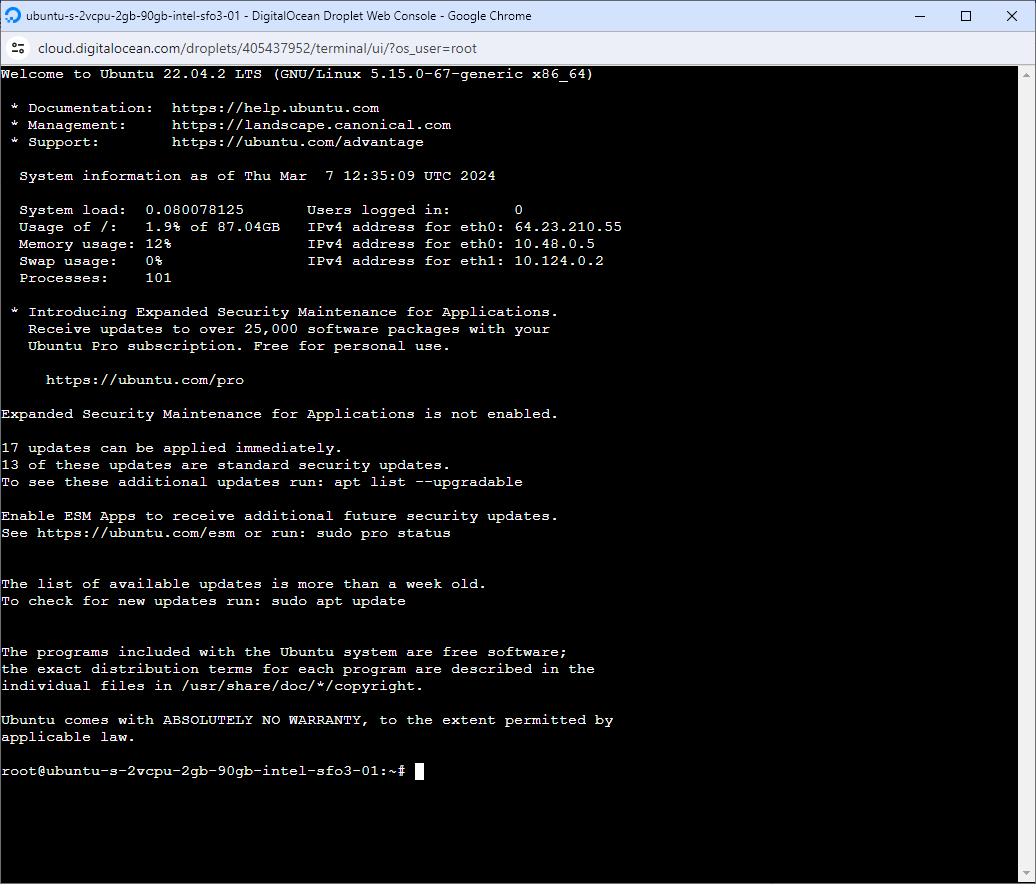
Before installing MySQL, it’s a good practice to update the package index of your Droplet. You can do this by running the following command.
sudo apt updateNote
When executing commands as the sudo user, the sudo command is not required.
Once the package index is updated, you can install the MySQL server package. In Ubuntu, you can do this with this command.
sudo apt install mysql-serverAfter the installation is complete, you should run the MySQL security script to secure your installation.
sudo mysql_secure_installationOnce MySQL is installed, you can verify its status to ensure it’s running correctly. This will guide you through setting up the root password, removing anonymous users, etc. Follow the prompts and answer accordingly.
sudo systemctl status mysqlIf MySQL is active and running, you should see an output indicating its status.
Now, you can manage the MySQL service using systemctl. For example:
sudo systemctl start mysql    # Start MySQL service
sudo systemctl stop mysql     # Stop MySQL service
sudo systemctl restart mysql  # Restart MySQL service
After you have installed MySQL on your DigitalOcean Droplet, you can run the MySQL command-line client.
mysql -u root -pAfter you’ve logged in to the MySQL command-line client, you can check the MySQL version by running the following command.
SELECT VERSION();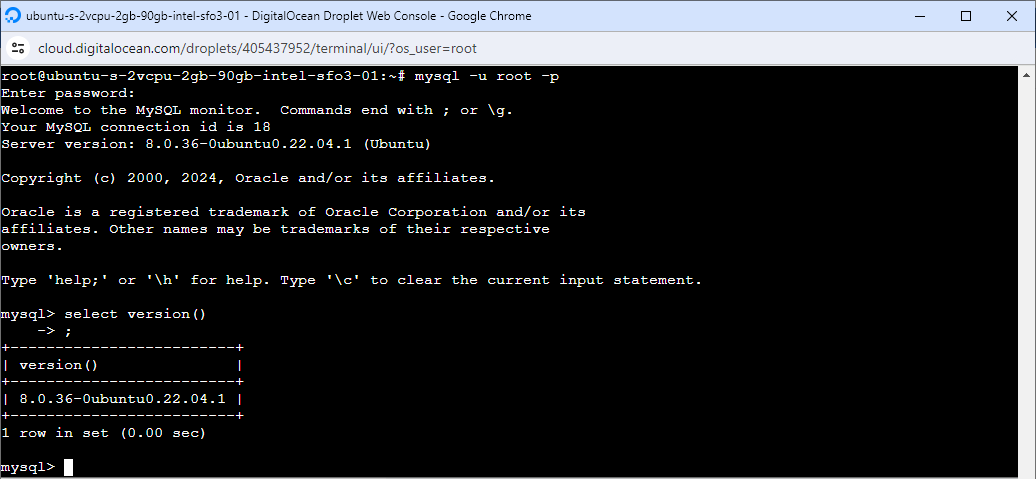
Connecting to a MySQL database hosted on a Droplet via PuTTY
To establish a secure SSH connection to a MySQL database hosted on a DigitalOcean Droplet using PuTTY, do the following.
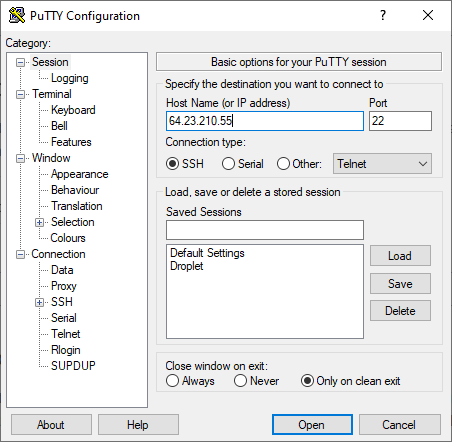
1. Launch PuTTY: Open PuTTY on your Windows computer.
2. Enter Droplet IP: In the Host Name (or IP address) field, enter the IP address of your Droplet.
3. Specify Port: By default, the SSH port is 22. If you’ve configured SSH to use a different port, enter that port in the Port field.
4. Select SSH: Ensure that the connection type selected is SSH.
5. Open Connection: Click Open to initiate the connection.
6. Launch MySQL Client: Once logged in, enter the following command to launch the MySQL client:
mysql -u your_username -p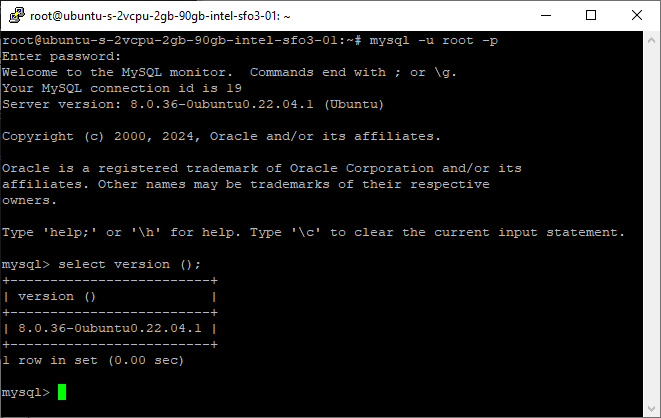
Connecting to a MySQL database hosted on a Droplet via SSH using dbForge Studio for MySQL
GUI tools simplify the process of remotely accessing servers or devices by providing a graphical interface rather than relying solely on command-line interfaces. These tools typically cater to a wide range of users, from beginners to advanced users, offering convenience and flexibility in managing server connections.
In this part, we will show you how to establish a secure SSH connection to a MySQL database hosted on a Droplet using a superb GUI tool for developing, managing, and administering MySQL and MariaDB databases – dbForge Studio for MySQL.
dbForge Studio for MySQL supports SSH tunneling for secure connections to remote MySQL databases. Through SSH tunneling, you can establish a secure connection to your MySQL database hosted on a Droplet, ensuring data privacy and security during data transmission.
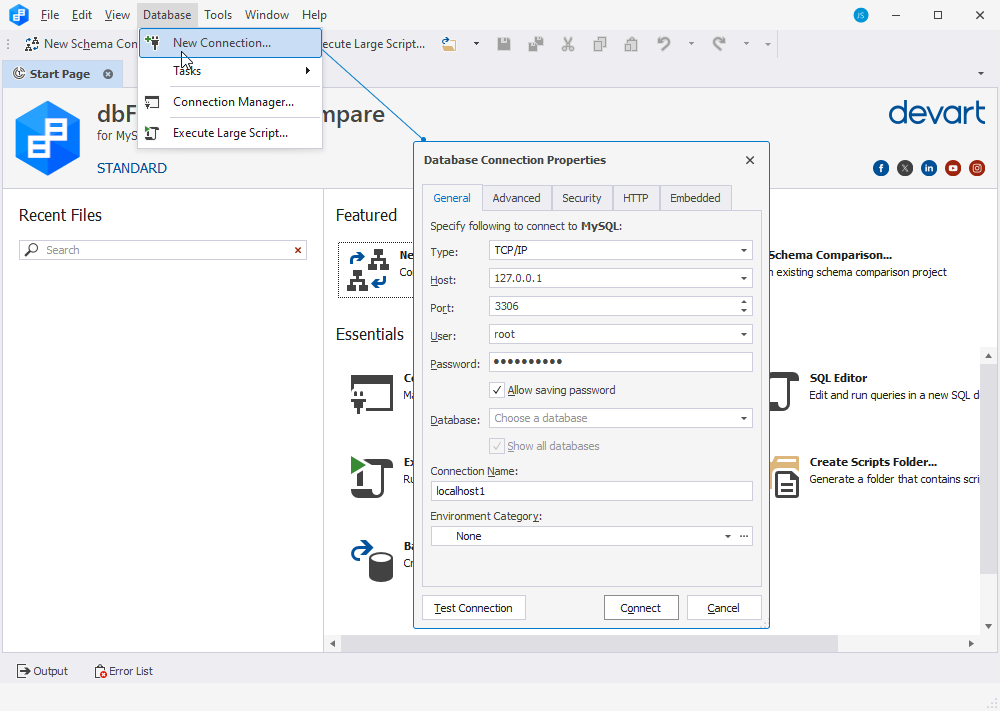
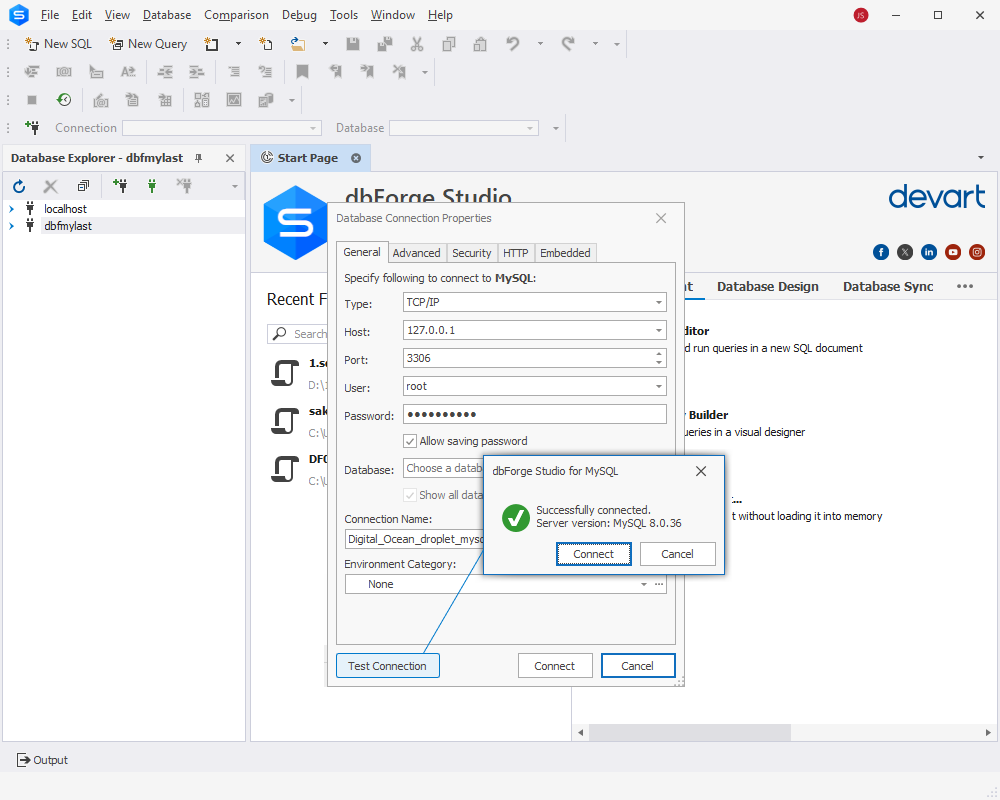
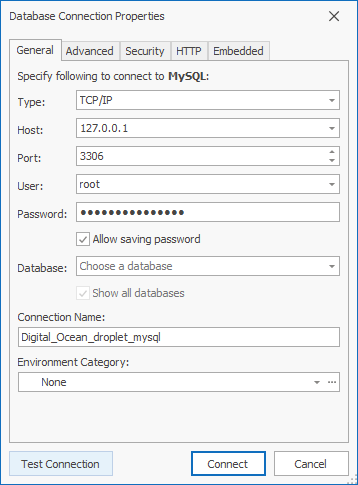
To establish an SSH connection from dbForge Studio for MySQL, go to Database > New Connection. On the General tab of the Database Connection Properties dialog that opens, specify the connection parameters to connect to the MySQL database.
Then, switch to the Security tab to enable SSH tunneling and configure SSH settings. For this, under Use security protocol, select SSH. Then, specify the connection parameters to the DigitalOcean Droplet.
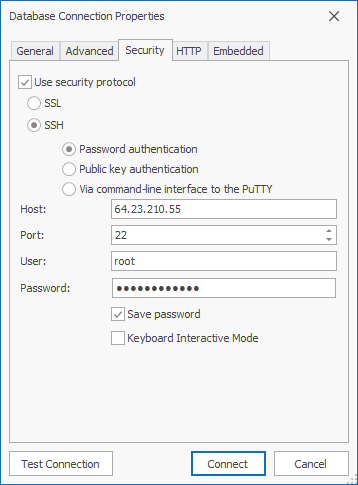
Once done, click Test Connection to check whether the configurations you entered are valid.
Connecting to a MySQL database on a Droplet via dbForge Studio’s plink
Plink is a command-line tool provided by PuTTY, a popular SSH client for Windows. With Plink integration, users can configure the SSH connection settings within dbForge Studio to establish a secure channel for communication with the remote MySQL server. This ensures that data transmitted between the local machine and the remote server is encrypted, enhancing security, especially when accessing databases over untrusted networks like the internet. By utilizing Plink for SSH tunneling, dbForge Studio users can securely connect to and manage databases hosted on remote servers without exposing sensitive information to potential threats.
To establish a connection using this method, you’ll need a SSH key pair. The public key is registered on the server, while the private key is used for authentication. To learn more, refer to How to Add SSH Keys to New or Existing Droplets.
To establish a SSH connection from dbForge Studio for MySQL using plink, go to Database > New Connection. On the General tab, in the Host field, enter 127.0.0.1 and then provide the credentials to connect to your database hosted in Droplet.
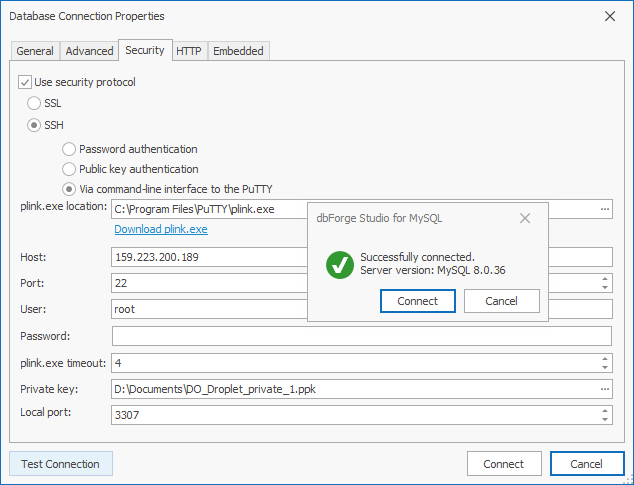
Then, switch to the Security tab and under Use security protocol, select SSH > Via command-line interface to the PuTTY. Next, provide the plink.exe location, enter the host name, port number, local port number, and user name. Finally, upload the generated Private key. To ensure the connection details are correct, click Test Connection.
Note
The host and port number specify the location of the server where the MySQL service is hosted. The local port number designates the port on your local machine that will serve as the entry point for creating a tunnel to the remote server via SSH.
Establishing a connection to MySQL database on a DigitalOcean Droplet using dbForge Studio
In this part, we will demonstrate how to establish a connection to a MySQL instance hosted through Managed Databases for MySQL using dbForge Studio for MySQL.
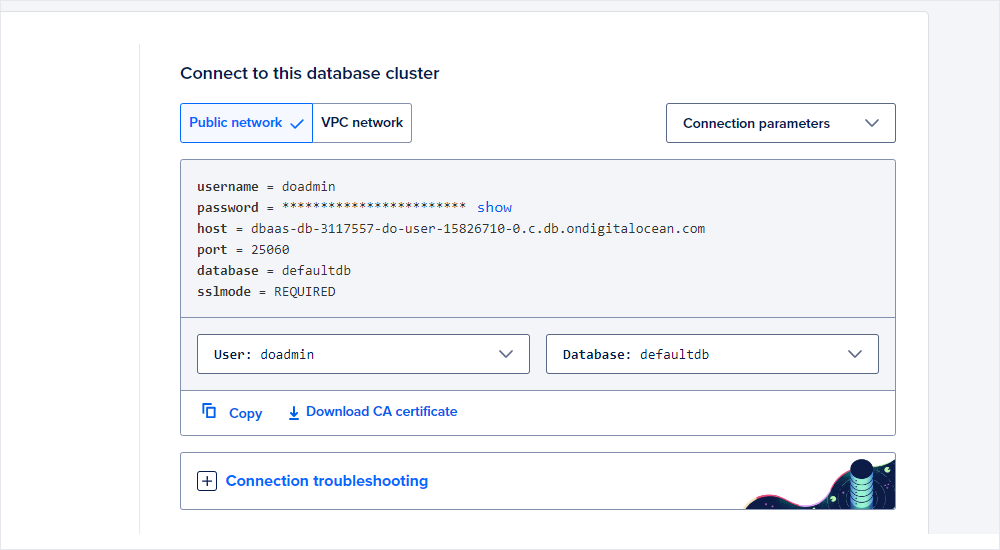
To connect to a MySQL database hosted on DigitalOcean, you’ll need the following:
- Your Droplet’s host name and port number
- Default username on the server
- Default password for that username
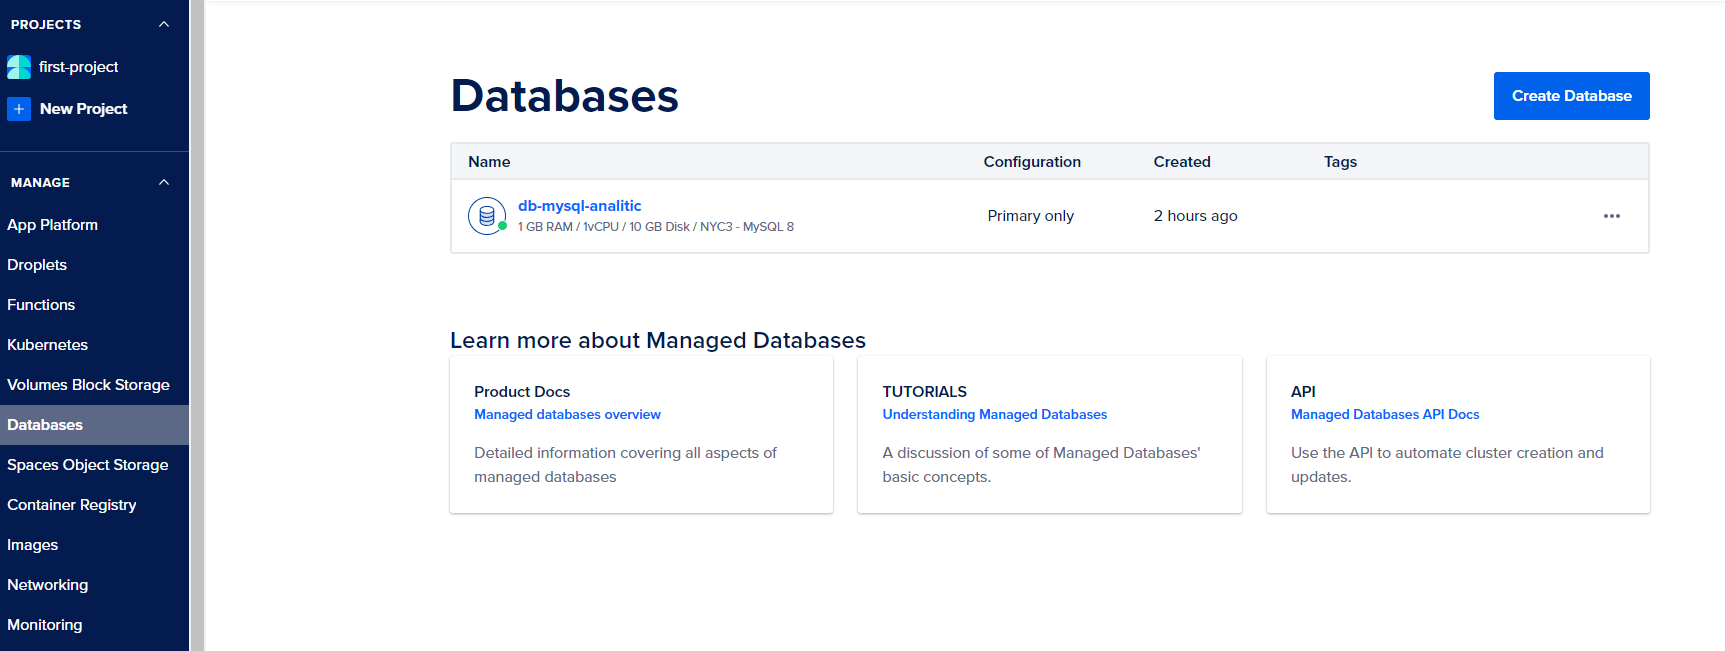
You can find all the connection details in the Database Clusters section.
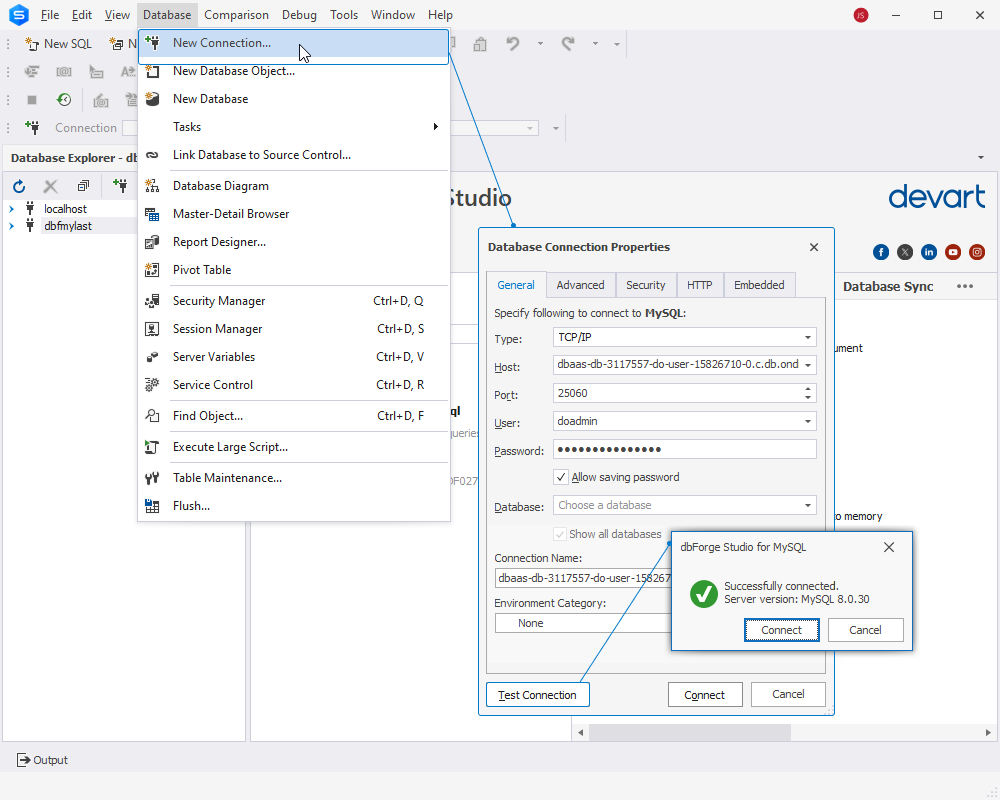
Now, you need to launch dbForge Studio and create a new connection using these credentials. To do this, navigate to the menu ribbon, click Database, and then select New Connection. Next, in the Database Connection Properties dialog that opens, enter the credentials required to connect to a MySQL database hosted on a DigitalOcean Droplet. To verify the credentials, click Test Connection. If everything is correct, click Connect.
Connecting to a Droplet with SSH via PuTTY
In this section of the article, we will demonstrate how to establish an SSH connection to a MySQL database hosted via Managed Databases for MySQL from a DigitalOcean Droplet. We will connect to the Droplet using PuTTY, an open-source SSH and Telnet client for Windows that enables secure connections to remote servers from a local Windows computer. Then, from the Droplet, we will connect to the MySQL instance.
Step 1: Configure PuTTY
On the PuTTY Configuration page, input your Droplet’s IP address into the Host Name (or IP address) field. Verify that the Port is configured to 22 and select the SSH Connection type.

Next, navigate to the SSH section under Connection on the left sidebar. Ensure that 2 is selected for the SSH protocol version. Then, within the Data configuration section, provide your server’s username in the Auto-login username field.
Finally, to save these preferences and avoid manual typing in the future, navigate to the Session section in the left sidebar. Enter a name for your session in the text box under Saved Sessions and click Save.
Once you have configured PuTTY, click Open to connect to your Droplet. After PuTTY starts, you’ll be prompted to type in the root password that you chose when you created the Droplet. Enter the password to proceed with the SSH connection. After successful authentication, you’ll be connected to your Droplet.
Step 2: Use Terminal to connect to MySQL instance
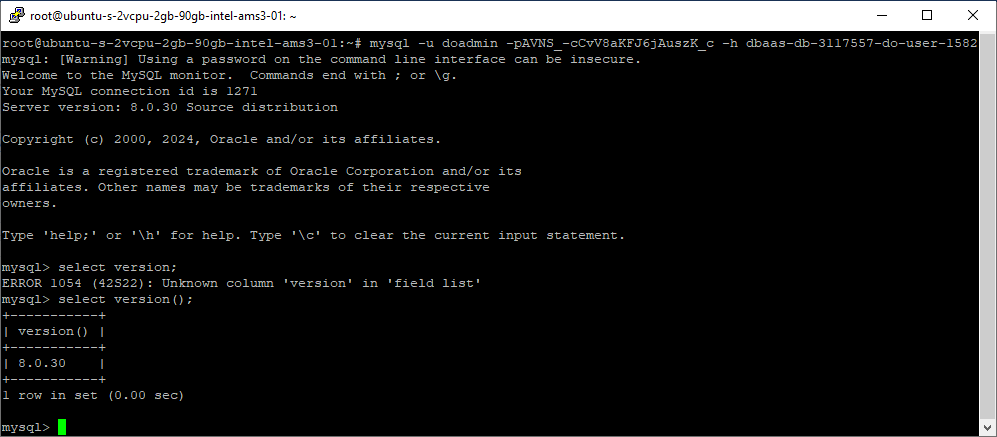
Now that you have connected to your Droplet with PuTTY, you can use your Droplet’s Linux terminal to connect to a remote MySQL database.
mysql -u doadmin -pAVNS_-cCvV8aKFJ6jAuszK_c -h dbaas-db-3117557-do-user-15826710-0.c.db.ondigitalocean.com -P 25060Where:
mysqlis the command-line client for MySQL, used to interact with MySQL databases.-u doadminspecifies the username to connect to the MySQL server. In this case, the username is “doadmin”.-pAVNS_-cCvV8aKFJ6jAuszK_cis used to specify the password for the user. The password provided here is “AVNS_-cCvV8aKFJ6jAuszK_c”.-h dbaas-db-3117557-do-user-15826710-0.c.db.ondigitalocean.comspecifies the hostname or IP address of the MySQL server. In this case, it’s “dbaas-db-3117557-do-user-15826710-0.c.db.ondigitalocean.com”.-P 25060specifies the port number to connect to on the MySQL server. In this case, it’s port number 25060.
Conclusion
Mastering remote database management is vital for professionals dealing with data-driven applications. This article highlights the importance of establishing a secure SSH connection to a MySQL database on a DigitalOcean Droplet, underlining the necessity of secure practices to maintain data integrity and confidentiality. DigitalOcean provides two key approaches for MySQL database management: Managed Databases, offering automated management features, and manual installation of MySQL server on Droplets for those who seek more customization. We have demonstrated how to connect to MySQL instances hosted both ways using PuTTY and dbForge Studio for MySQL which allows for direct connection, SSH password authentication, and connection via Plink.
To explore the full capabilities of dbForge Studio for MySQL and improve your database management experience, we invite you to download a free 30-day trial of the Studio. This trial offers access to a comprehensive set of features designed to significantly simplify your database management routine.