
Amazon cloud storage offers a scalable and secure way to keep and access data across multiple devices. As to Amazon RDS (Relational Database Service), it provides automated backups, software patching, and scaling without the need for manual intervention. In this guide, we are going to walk you through the process of transferring a database from a local machine or a traditional server to AWS with the help of the command line as well as with a convenient GUI – dbForge Studio for MySQL.
Contents
- What is Amazon RDS?
- Amazon RDS vs. Amazon Aurora: What’s the difference?
- The benefits of using Amazon RDS
- 2 ways to migrate a MySQL database to Amazon RDS or Aurora
- Migration using the command line
- Migration using a MySQL GUI tool
- The best tool for migration from RDS for MySQL/MariaDB to Aurora MySQL
- Additional benefits of using dbForge Edge with AWS RDS
- Conclusion
What is Amazon RDS?
Amazon RDS handles the most common tasks related to managing relational databases in the cloud, allowing you to easily create, configure, scale, and administer databases without the need for manual intervention. This includes automated backups, software updates, performance monitoring, and high availability.
The main principles of the Amazon RDS architecture focus on fault tolerance and security. The service employs multi-availability zone (Multi-AZ) deployments, providing automatic database replication across different availability zones to enhance failure resistance. Data encryption, both at rest and in transit, ensures high-level security, along with support for Virtual Private Clouds (VPC) to isolate resources.
For more information about AWS RDS, including its key features, advantages, and connection guide, please refer to the related blog article.
Amazon RDS vs. Amazon Aurora: What’s the difference?
| Feature | Amazon RDS | Amazon Aurora |
| Database engines | Support for multiple engines: MySQL, PostgreSQL, MariaDB, Oracle, and SQL Server | Support for MySQL and PostgreSQL |
| Performance | Standard performance based on the selected engine | Higher performance through advanced optimization |
| Scalability | Manual scaling with read replicas | Auto-scaling with up to 15 read replicas and shared storage |
| Pricing | Depends on the chosen database engine, instance size, and storage | Is typically more expensive but provides better performance |
| Storage auto-healing | Standard storage and backup mechanisms | Automatic recovery from disk failures, ensuring minimal data loss |
| Replication | Synchronous replication in Multi-AZ deployments | Efficient, automatic replication across 6 copies in 3 availability zones |
| Backup and recovery | Automated backups, snapshots, and point-in-time recovery | Automated backups, point-in-time recovery, and fast crash recovery |
| Use cases | Suitable for general-purpose, smaller workloads with moderate performance requirements | Perfect for large-scale, high-performance, and mission-critical applications |
| Data migration | Supports migration from on-premise or cloud sources | Supports migration from MySQL and PostgreSQL environments |
The benefits of using Amazon RDS
We have mentioned some of the key features and main perks of Amazon RDS for database management in the previous sections of this article. It automates time-consuming tasks, scales databases, and provides enhanced security features, including encryption and monitoring, reducing the risk of data loss or breach. Migrating from a regular server to Amazon Cloud helps businesses take advantage of these benefits, improving database performance, reliability, and efficiency while reducing manual maintenance. Another good thing is that Amazon RDS supports multiple database systems, including Microsoft SQL Server, MySQL, MariaDB, Oracle Database, and PostgreSQL.
By the way, if you are looking for a comprehensive solution for database management, dbForge Edge might be your best bet. It’s a suite that comprises four database IDEs with similarly clean and intuitive user interfaces—and each of them covers a massive spectrum of tasks on different database systems, including those supported by Amazon RDS.
2 ways to migrate a MySQL database to Amazon RDS or Aurora
There are two approaches to migrating data from a regular MySQL server to a cloud one: using the good old-fashioned command line or a convenient GUI tool. Both methods get the job done, but each has its own strengths, weaknesses, and intricacies. In the next couple of sections, we are going to explore these in detail, and it is always up to you to decide which of the two methods works best for you and your business.
Migration using the command line
Using the command line as a data migration instrument offers a high level of functionality and control, making it a powerful tool for power users who are familiar with its toolset.
Connect to Amazon RDS for MySQL and Aurora MySQL
1. Log in to the AWS Management Console.
2. Go to the RDS dashboard and create a new MySQL instance by selecting the instance size, storage, security, and other options.
Make sure your RDS instance allows inbound traffic from your IP address. Go to the VPC security groups, find your RDS instance’s security group, and add a rule for inbound MySQL/Aurora (port 3306) with your IP.
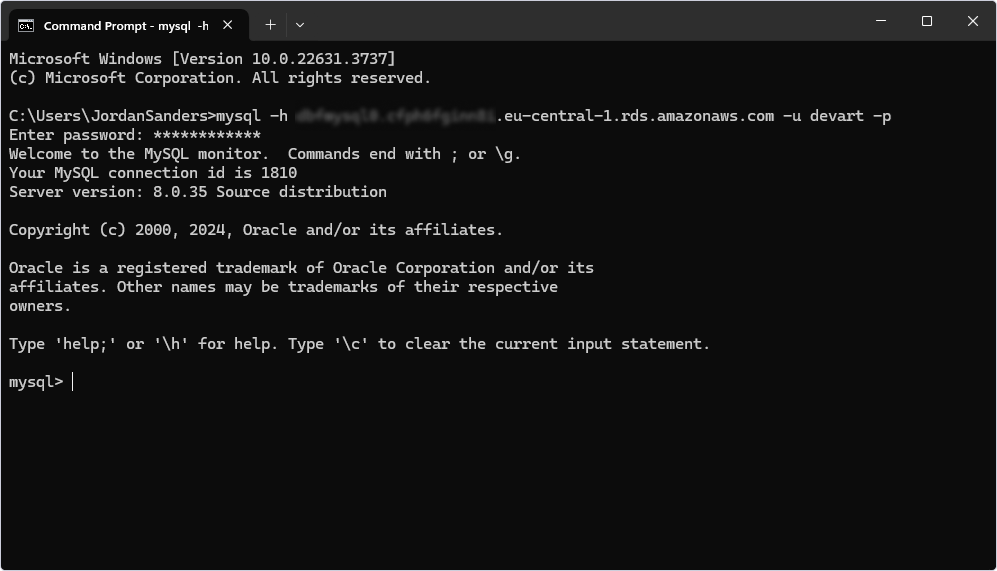
3. Open a terminal or command prompt.
4. Use the following command to connect to your RDS instance:
mysql -h <rds-endpoint> -u <rds-username> -pReplace <rds-endpoint> with your RDS instance endpoint and <rds-username> with the username you created during the RDS setup.
5. When prompted to enter the password, simply do so, and you will be connected.
Note: The processes of connecting to Amazon RDS and Amazon Aurora are identical.
Moving MySQL data using the command line
Now, we can proceed directly to data migration using the command line.
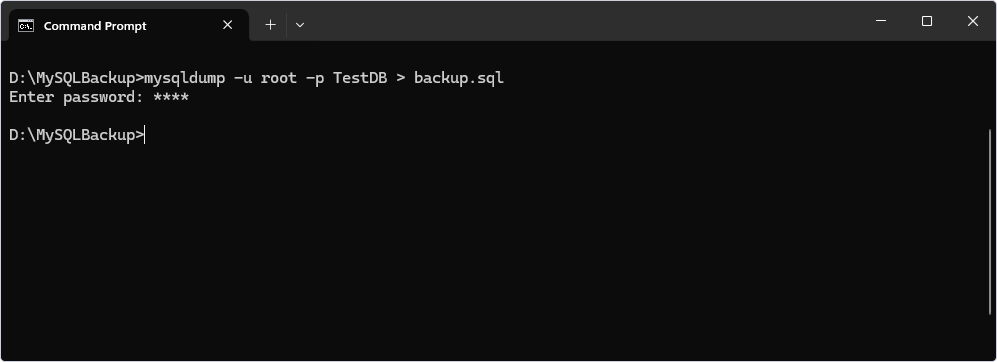
1. Use the mysqldump command to export your local database to a file:
mysqldump -u <local-username> -p <local-database > backup.sql
Replace <local-username> with your local MySQL username and <local-database> with the name of your database. Then, enter your password.
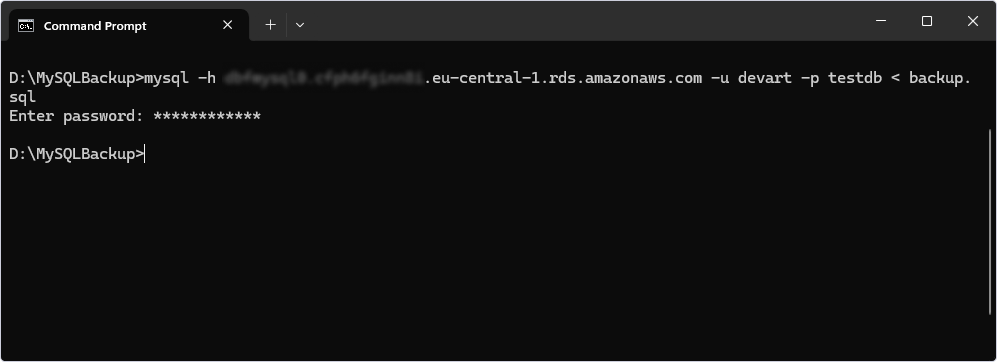
2. Use the mysql command to import your data into your Amazon RDS instance:
mysql -h <rds-endpoint> -u <rds-username> -p <rds-database> < backup.sql
- Replace
<rds-endpoint>with the endpoint of your Amazon RDS instance. - Replace
<rds-username>with your RDS username. - Replace
<rds-database>with the name of the database you want to import the data into.
3. Enter your RDS password.
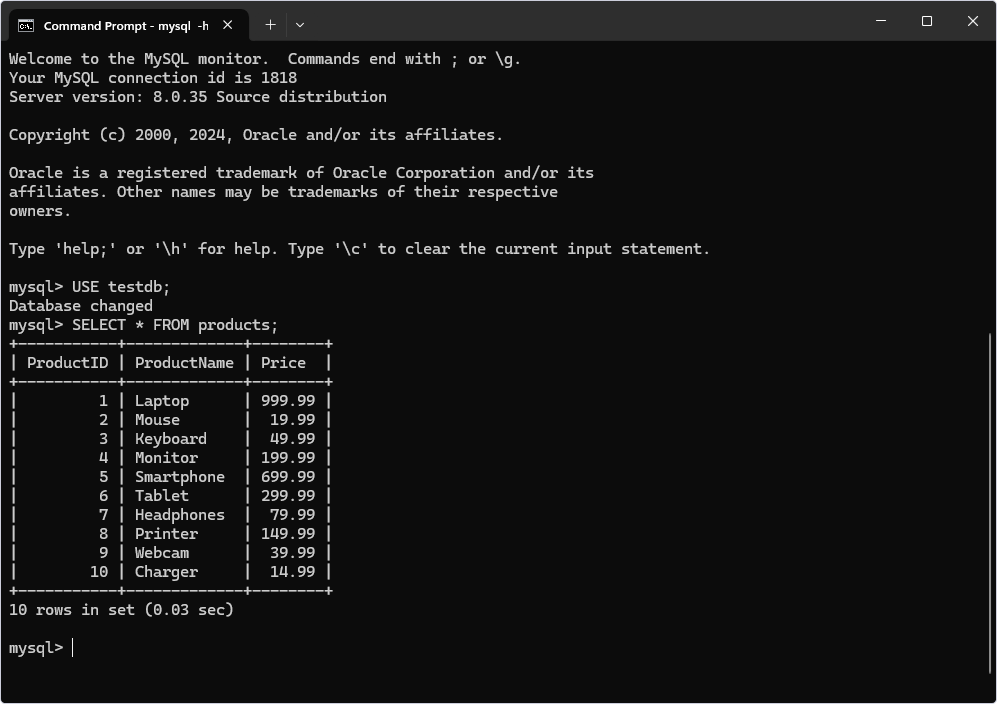
4. After the import process is complete, log in to your RDS instance and check if the data has been migrated successfully:
USE <rds-database>;
SELECT * FROM <table-name>;
Migration using a MySQL GUI tool
Newer users might feel overwhelmed due to the complexity and the steep learning curve of the command-line tools. However, there is no need to worry, as solutions like dbForge Studio for MySQL make the journey feel much less intimidating. With its clean and intuitive GUI, the Studio proved to be a perfect fit for beginners and seasoned pros alike.
Here, we are going to provide you with full instructions on how to use dbForge Studio to connect to AWS RDS, back up a MySQL database, and import the backed-up data to either an RDS or Aurora database.
How to connect to AWS RDS
In this section, we’re going to show you how to connect to RDS MariaDB using dbForge Studio:
1. Click New Connection in the Database Explorer.
2. Specify the connection type, RDS endpoint, port number, username, and password. Then, select the database you wish to connect to and click Test Connection.
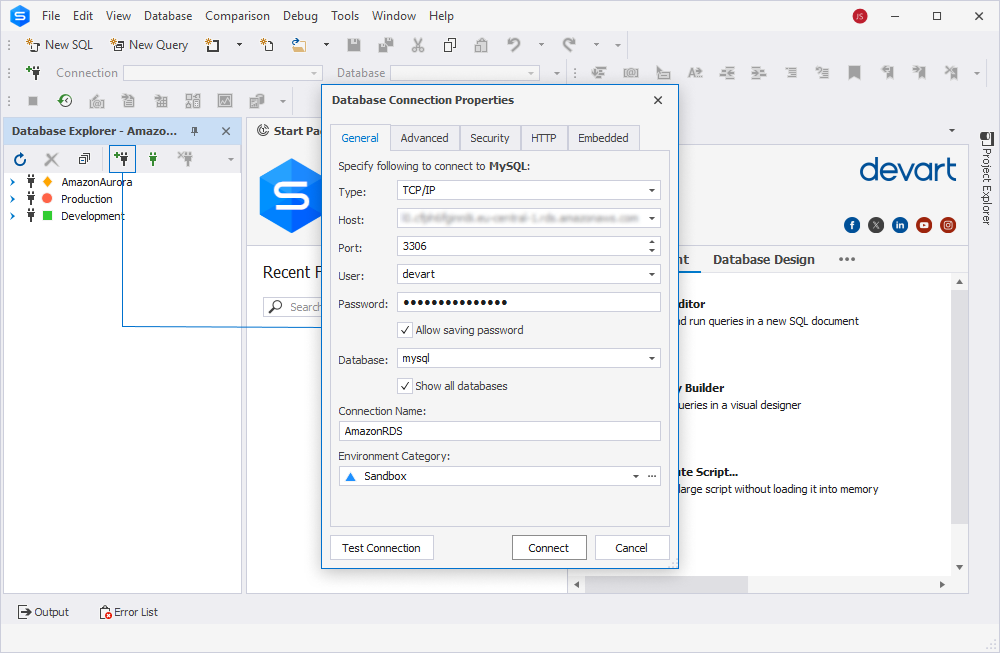
3. dbForge Studio will warn you if there are any issues with the connection. However, if all is set correctly, feel free to click Connect.
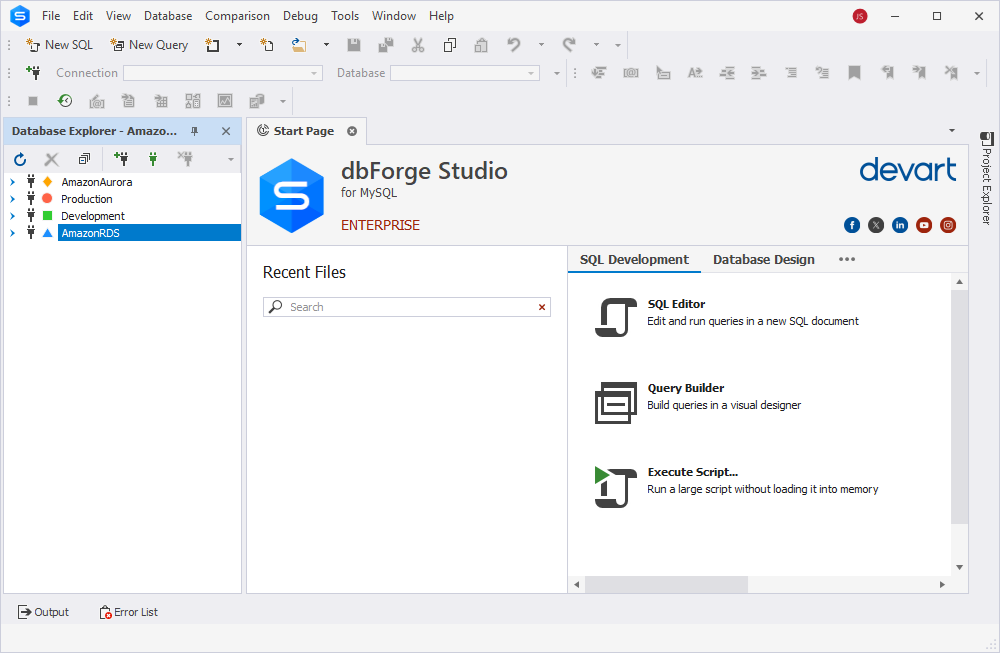
Now, you have a new AmazonRDS connection added to the list. This method also lays a solid foundation if you’re planning to migrate a MySQL database to PostgreSQL, especially when unifying database systems across environments.
Note: For step-by-step instructions on how to connect to AWS RDS MySQL, refer to the relevant guide.
How to back up a database using dbForge Studio for MySQL
With the MySQL backup tool, built into dbForge Studio for MySQL, you can back up and restore MySQL databases in the most efficient and quickest way.
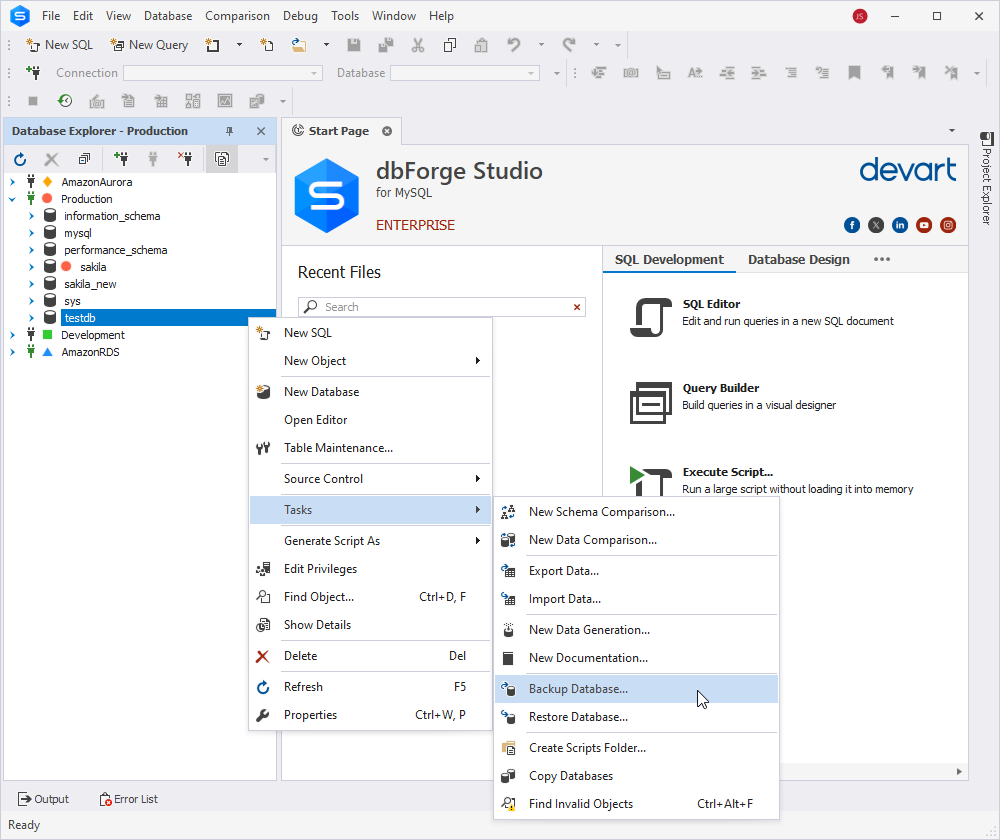
1. In Database Explorer, right-click the database you want to back up, point to Tasks, and select Backup Database.
2. In the Database Backup Wizard that opens, specify the connection, database, location to store the output file, and name for this file.
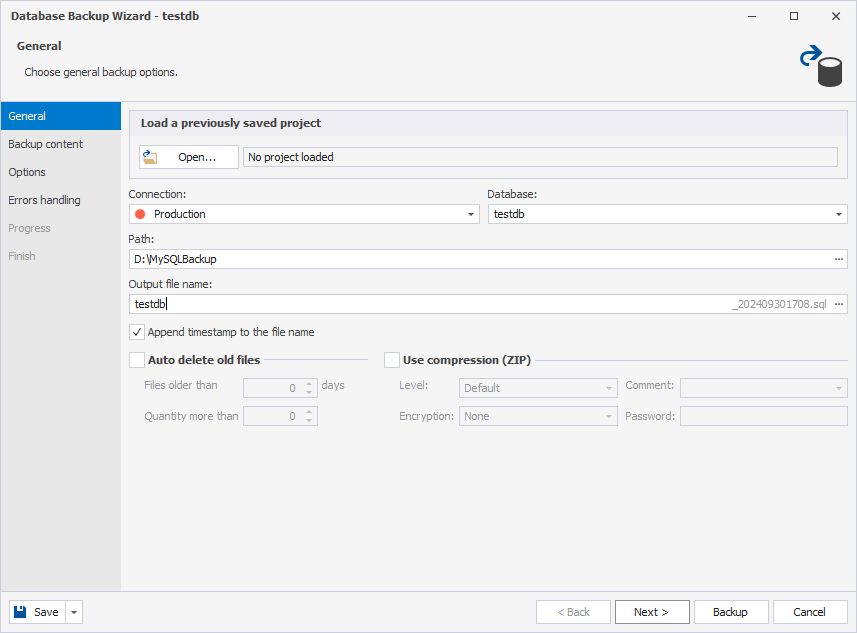
At this point, you can click Backup to proceed with creating the backup. However, if you wish to fine-tune the process, click Next and complete the optional steps.
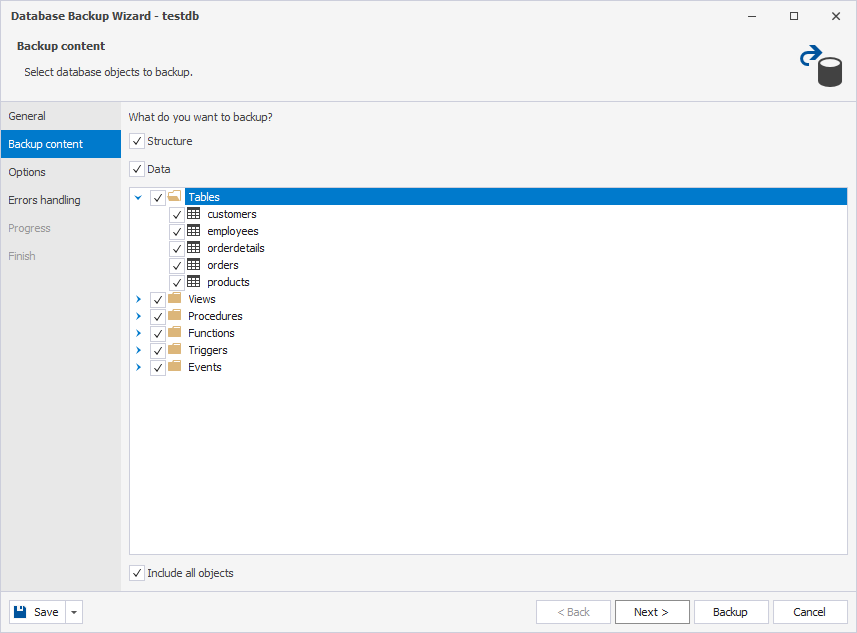
3. (Optional) On the Backup content tab, select whether you want to back up a database structure, data, or both, and select the required database objects.
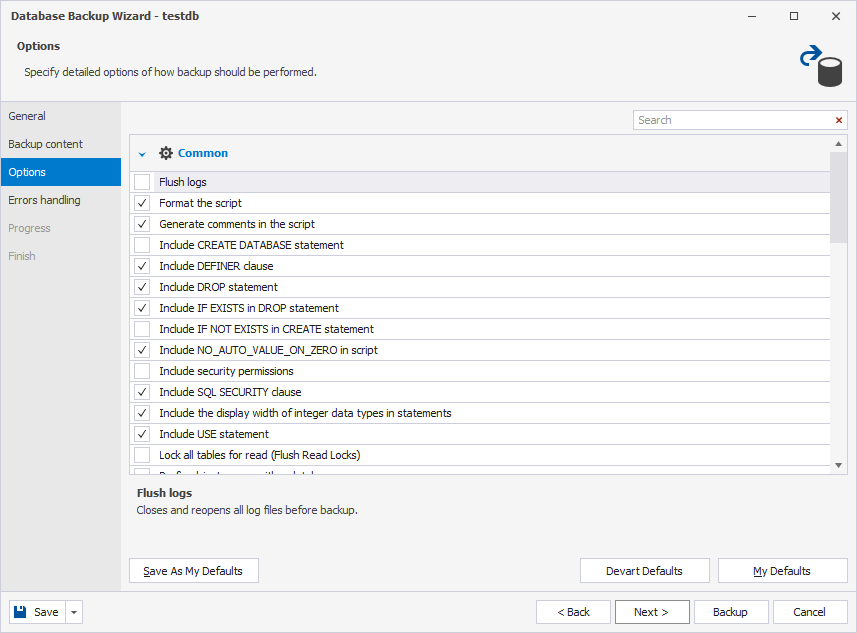
4. (Optional) On the Options tab, set additional options that will handle the backup process.
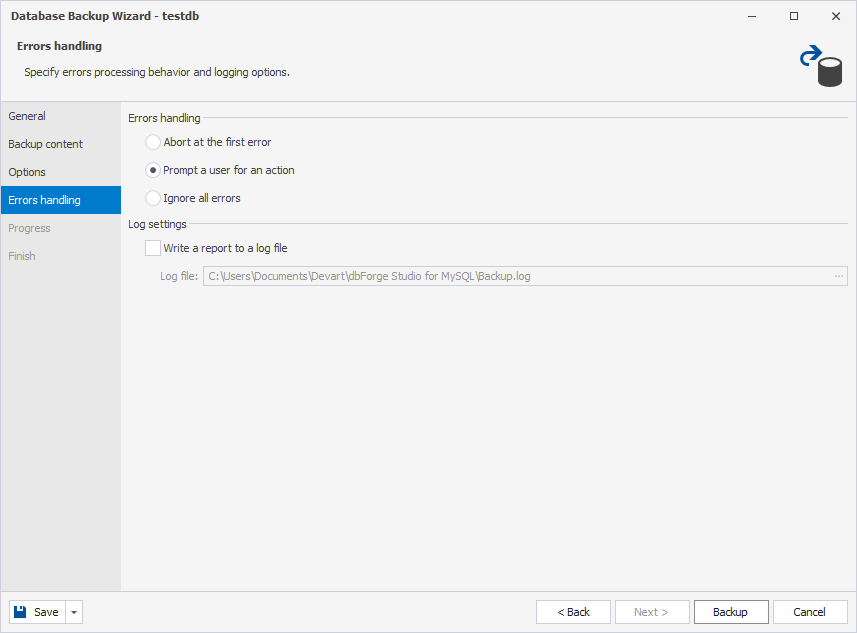
5. (Optional) If you want to configure error processing behavior and logging options, switch to the Errors handling tab and set up the options.
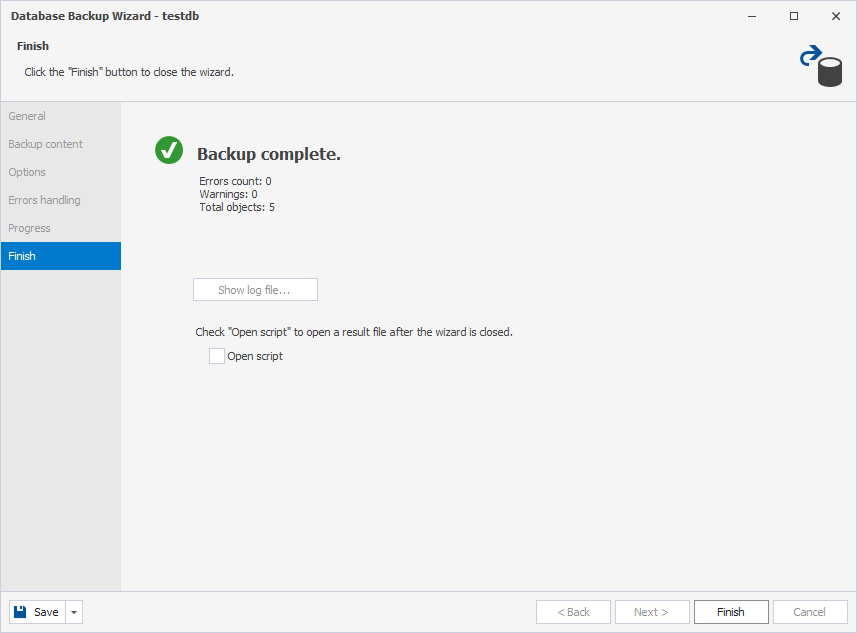
6. To launch the database backup, click Backup. After the process is complete, you will see the corresponding notification. Now you can close the wizard.
As mentioned, you do not need to complete all of the steps to create a backup. You can simply follow step 1, and the rest are optional.
Restore MySQL data on an RDS or Aurora database
Since we now have a backed-up database, let us restore it on our RDS instance:
1. In Database Explorer, right-click a database you want to import data to, point to Tasks, and select Import Data.
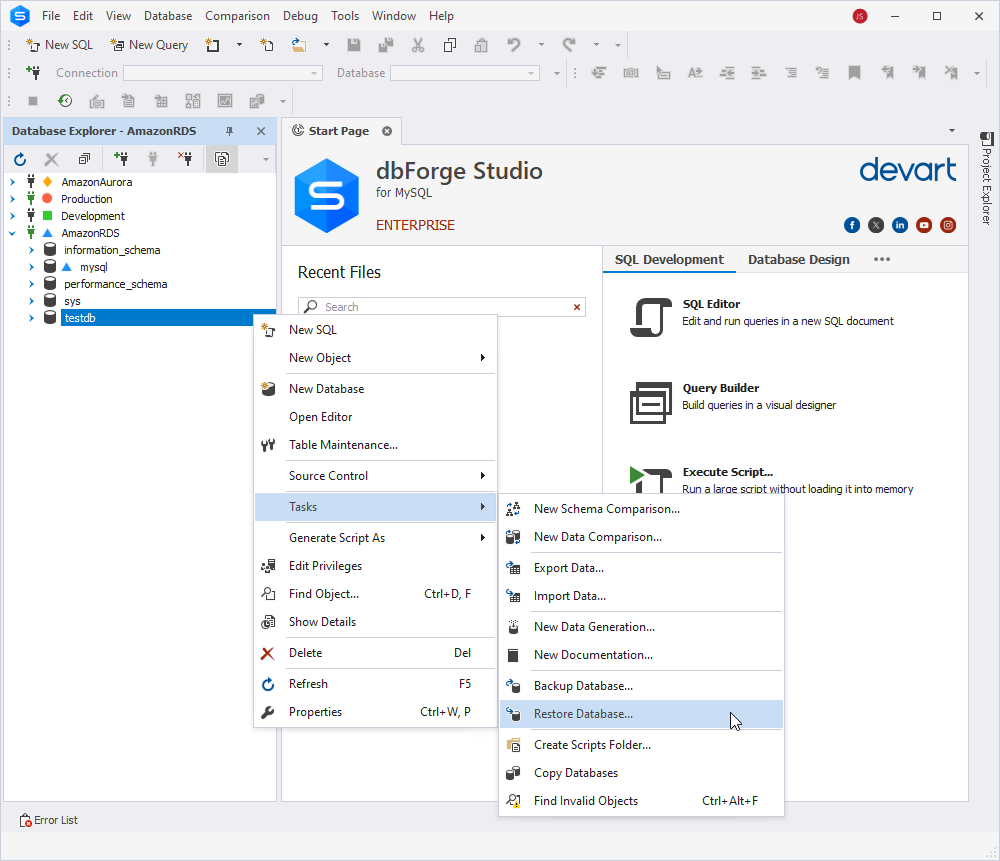
2. In the wizard that opens, select the backup script file.
3. Check that the encoding for the restored file is selected correctly. The Studio automatically selects it based on the restored file. If it fails, the default encoding (the current Windows encoding on the machine where dbForge Studio is running) is selected. You can always select the required encoding from the drop-down list.
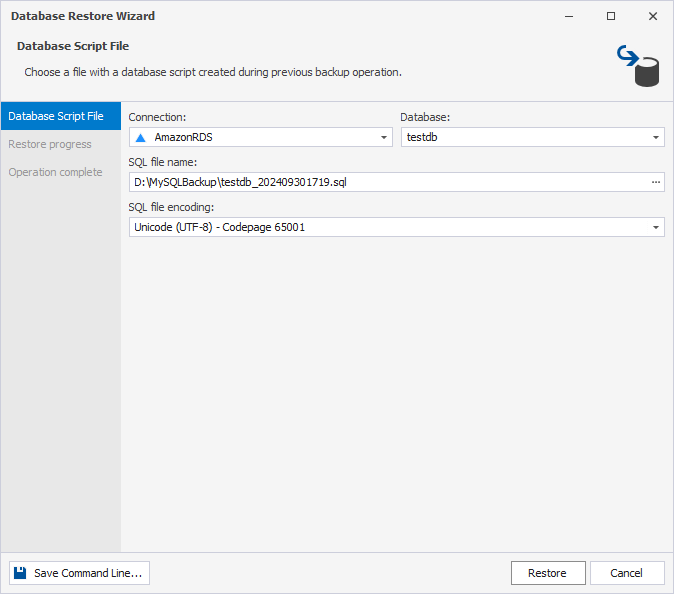
4. Having completed the above steps, click Restore. You will see a notification about the result of your job.
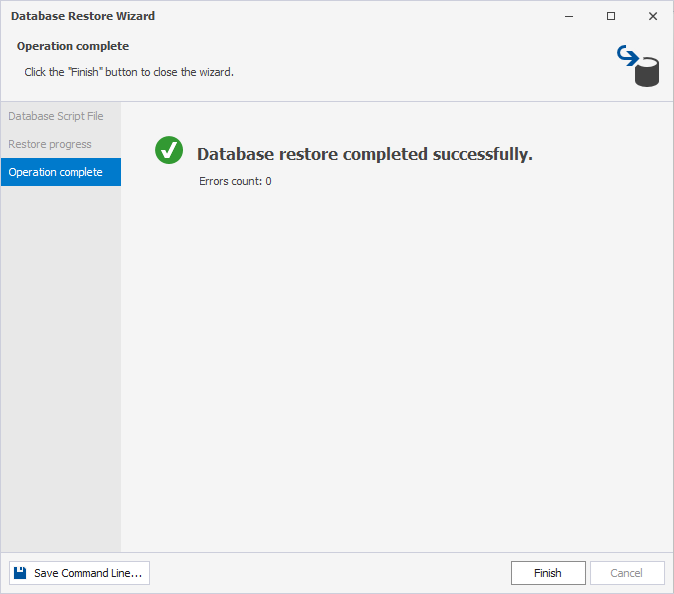
As a result of our efforts, the testdb database appeared on Amazon RDS.
Note: dbForge Studio for MySQL also allows you to export MySQL data to a file in order to import it to another local or remote database.
The best tool for migration from RDS for MySQL/MariaDB to Aurora MySQL
We have already figured out how to move data from your local MySQL to an RDS instance. But what if we went a little bit further and decided to migrate it to Amazon Aurora? In this article, we will be using the Copy Databases feature of dbForge Studio for this purpose.
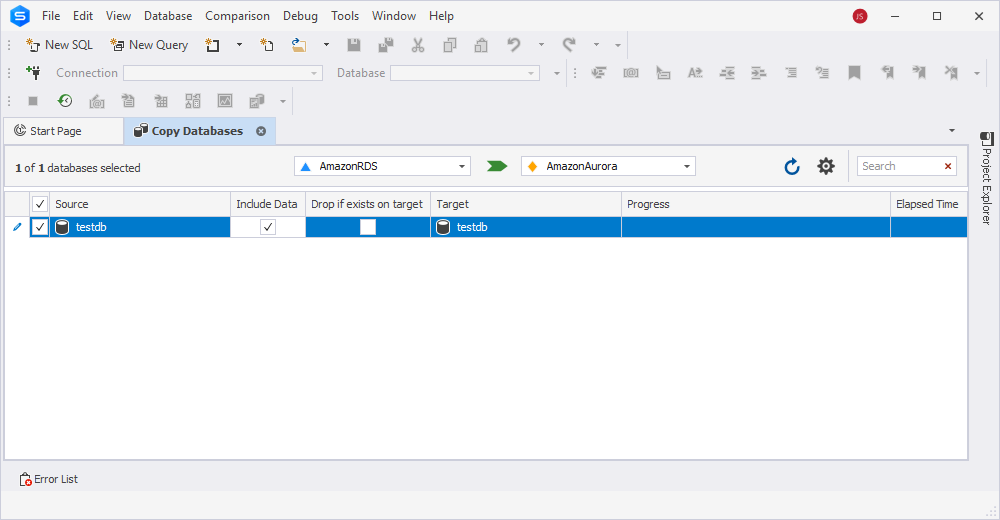
1. Make sure you have connections for both Amazon RDS and Amazon Aurora in Database Explorer.
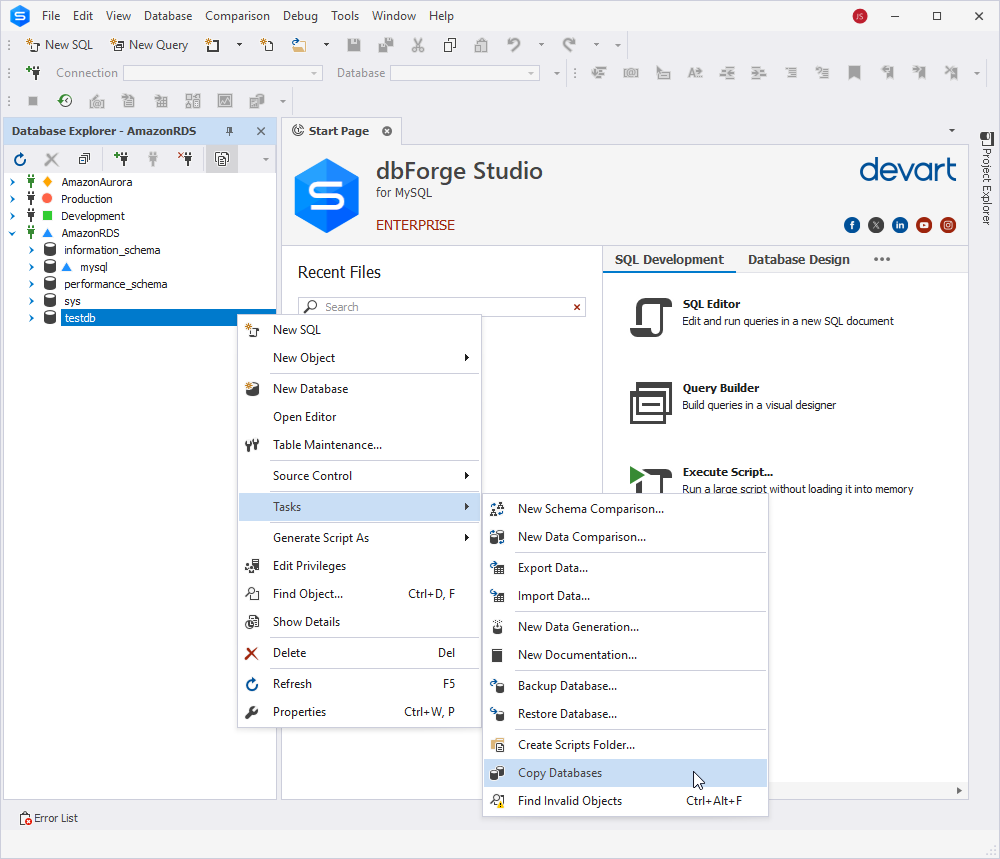
2. Right-click the database that is located on the RDS instance. Point to Tasks and select Copy Databases.
3. Choose a target server to copy databases to. The names of databases from the Source column will be duplicated in the Target column.
4. Once you’ve selected the databases, the corresponding fields in the Include Data and Drop if exists on target columns become editable. Select the corresponding checkbox in the Include Data column.
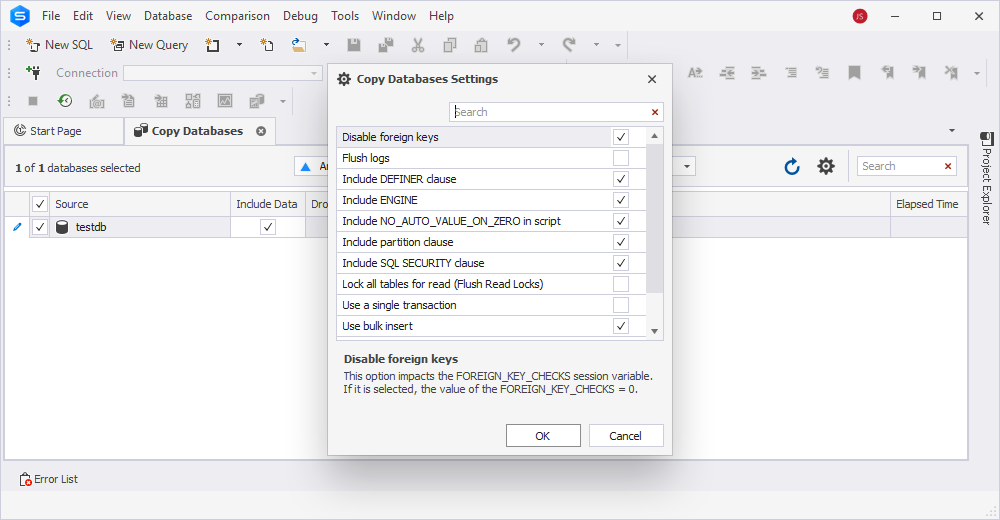
5. In the top-right corner, click the Settings icon to open the Copy Databases Settings dialog, where you can configure the following parameters for copying data from one database table to another:
- Maximum simultaneous database copy operations
- Disable foreign keys
- Exclude
DEFINERandSQL SECURITYclauses - Flush logs
- Include
NO_AUTO_VALUE_ON_ZEROin the script - Include partition clause
- Lock all tables for
READ(Flush Read Locks) - Use a single transaction
- Use bulk insert
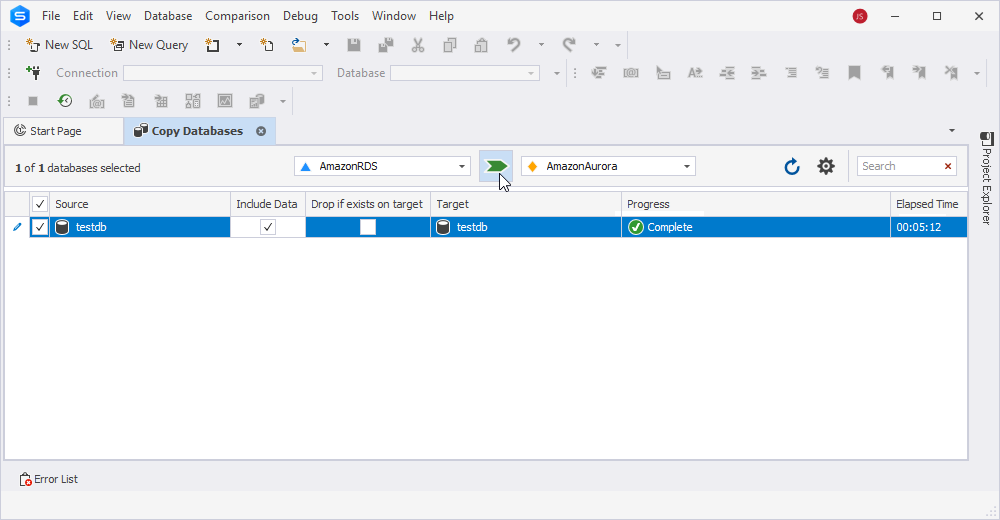
6. Click the Start copying databases arrow to run the copying process. dbForge Studio will notify you whether the job was successful or not.
Additional benefits of using dbForge Edge with AWS RDS
With dbForge Edge, database management becomes easier than ever. Being fully compatible with Amazon RDS, dbForge Edge will make your routine tasks like migration, optimization, and backups easier and more efficient.
1. Unified multiple database management: dbForge Edge is compatible with a variety of database management systems, including MySQL, MariaDB, PostgreSQL, Oracle, and SQL Server.
2. Simplified data migration: Move data between different RDS instances or from on-premises databases to RDS. Data comparison and synchronization features ensure smooth migrations with minimal risk of data loss or inconsistencies.
3. Advanced query optimization: Analyze and optimize SQL queries, which is crucial for performance tuning in an RDS environment. The integrated Query Profiler helps detect slow queries and suggests optimizations to improve overall database performance.
4. Backup and recovery: Create backups and restore databases on RDS manually or automate these tasks with scheduling. The solution supports various backup formats, making it easier to safeguard your data.
5. User-friendly interface for daily operations: Enjoy a user-friendly, GUI-based environment for managing database objects, executing scripts, monitoring performance, and performing administrative tasks on your RDS instances.
Conclusion
Transitioning your database to Amazon RDS or Aurora not only enhances your data management capabilities but also makes full use of the security and scalability of Amazon’s cloud infrastructure. Whether you choose to use the command line for a more hands-on approach or opt for the user-friendly dbForge Studio for MySQL, this guide will help you make it a smooth migration process. To explore the full potential of dbForge Studio and streamline your database management, don’t hesitate to download your free 30-day trial today!
Articles about Amazon RDS